background image

53

APPENDICES - APPENDIX 5

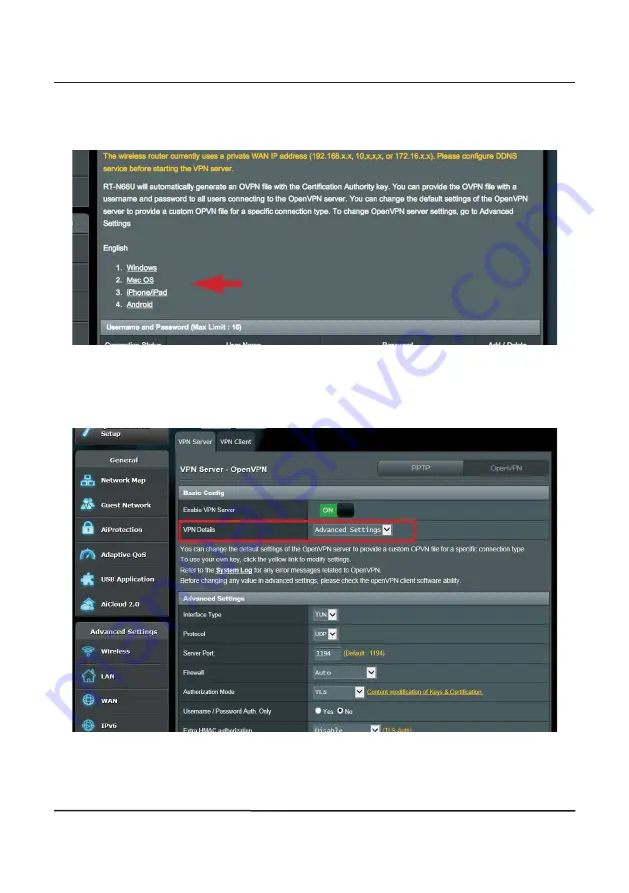
To complete the OpenVPN server side setting, turn to client side to build your 

OpenVPN client connection. For detail settings regarding OpenVPN client, 

please refer to the following FAQs displayed on the setting page of the router.

Advanced Settings

If necessary, go to the Advanced Settings page to perform further configura

-

tion.

Содержание 4000 Series

Страница 1: ...04 For s w v1 6 5 and above Barrett Communications 4000 Series IP Connectivity Networking Guide Includes instructions for Ethernet Adapters WiFi Adapters P N BCO40508 and Barrett 4050 Remote Control app BARRETT ...

Страница 2: ......

Страница 3: ...r iOS Devices 18 For Android Devices 19 Using the Barrett 4050 Remote Control App 20 SCENARIO 2 WiFi Client Mode 23 Setting up the transceiver as WiFi Client 24 Setting up the PC 26 ETHERNET SET UP SCENARIOS 3 27 SCENARIO 3 Ethernet Adaptor Switch PC 28 Setting up a Static IP Address on Windows 10 Professional 29 Setting up a Static IP Address on a 4050 Transceiver 32 Configuration 32 SCENARIO 4 E...

Страница 4: ...6 APPENDIX 4 Allowing Ports with a Firewall on Windows 10 Professional 48 APPENDIX 5 Setting up a VPN 50 General Settings 50 Advanced Settings 53 APPENDIX 6 Finding your Transceiver s IP Address 54 APPENDIX 7 Troubleshooting 55 APPENDIX 8 The Barrett Break Out Box BoB 56 BoB Front Panel 57 BoB Rear Panel 58 BoB Set up 59 BoB Name 60 Network Configuration 60 Network Status 61 Warranty Statement 62 ...

Страница 5: ...5 INTRODUCTION 1 This chapter contains the following sections Guide Overview Terms and Abbreviations The Barrett WiFi Adaptor Connection Details ...

Страница 6: ...pplications apps that can be used on Windows iOS and Android software via the transceiver s wireless network and WiFi adaptor Scenario 2 however connects over local WiFi via a router Chapter 3 demonstrates four ways of connecting the internet and transceiver via an Ethernet connection Scenarios 3 and 4 show how a system could be set up using a small local area network This allows multiple operator...

Страница 7: ...Port Forwarding Or port mapping is a name given to the combined tech nique of translating the address and or port number of a data packet to a new destination possibly accepting such packet s in a packet filter firewall then forwarding the packet according to the routing table Router A networking device that forwards data packets between computer networks It provides a wired link to the LAN and a ...

Страница 8: ...int Router Enables wireless network packet forwarding and routing and serves as an access point in a local area network It works much like a wired router but replaces wires with wireless radio signals to communicate within and pro vides a gateway to an external network Internet ...

Страница 9: ...iver using the Barrett 4000 series Remote Control Software which is available for iOS Android and Windows Two WiFi adaptors are supplied by Barrett An Edimax adaptor for use with WiFi Access Point mode and a TP Link adaptor for use with WiFi Client mode Only one may be used at any time See page 12 for examples of how to set up the Barrett 4050 HF SDR Trans ceiver to utilise WiFi Note it is not pos...

Страница 10: ...onnections between the Barrett 4050 HF SDR Transceiver and an IP network 1 Barrett 4050 HF SDR Transceiver rear P N BC405000 2 USB to Ethernet Adaptor with USB ports P N BCA40505 3 WiFi Adaptor P N BCO40508 4 4050 to USB Adaptor P N BCA40504 5 Barrett 4050 HF SDR Transceiver front P N BC405000 ...

Страница 11: ...S SET UP SCENARIOS 2 This chapter contains the following sections Connecting the WiFi Adaptor to the Transceiver Scenario 1 WiFi Access Point set up for Windows iOS and Android Devices Scenario 2 WiFi Client Mode ...

Страница 12: ... panel of the transceiver Setting up the Transceiver as a WiFi Access Point From the Barrett 4050 HF SDR Transceiver s Set tings screen tap Network to display the Network Set tings screen Tap Operation Mode from the Network Settings screen to dis play the Operation Mode screen Select WiFi Access Point Tap Configuration from the Network Settings screen to dis play the WiFi Access Point screen The s...

Страница 13: ...t Identifier from the WiFi Access Point screen to display the WiFi Access Point SSID screen Tap the appropriate characters from the keyboard into the WiFi Access Point SSID field The char acters are limited to A Z a z 0 9 _ and space Tap to save and return to the WiFi Access Point screen Access Point Channel Tap Access Point Channel from the WiFi Access Point screen to display the Access Point Cha...

Страница 14: ...to display the Country screen Select the appropriate country WPS Push Button Tap WPS Push Button WiFi Protected Setup from the WiFi Access Point Mode screen to dis play the WPS Connection screen This option will initiate the WiFi protection setup NOTE This is an advanced feature not required for the basic function ality of the app or transceiver To know more please contact your system administrato...

Страница 15: ...e transceiver For iOS devices go to Settings WiFi For Android devices either swipe down from the top of the screen and select WiFi or go to Settings WiFi 2 Type the password which was set up during the WiFi access point setup Note Ensure to enter the password as network security key rather than PIN from the router label Click Next The computer will then login to the transceiver s access point Note...

Страница 16: ...e transceiver remotely from their PC It is highly recommended to install the Bonjour app prior to installing the Bar rett 4050 Remote Control app 1 Download the BonjourPSSetup exe from https support apple com kb DL999 2 Follow the online instructions to install the Bonjour app Note If Bonjour is not installed no Barrett 4050 HF SDR transceivers will be linked in the connection screen The Barrett 4...

Страница 17: ...own opposite with a reminder to install the Bon jour app link provided on the previous page Existing installations will be updated 2 Select the Open Barrett 4050 Remote Control checkbox and click Finish to display the Connect to SDR screen 4 Select the device to connect to and tap or type in a specific IP address if the required transceiver does not appear Finding your trans ceiver s IP address is...

Страница 18: ...mote Control app may be downloaded from the App Store search Barrett 4050 Download and installation should begin automatically Please note that a minimum of iOS 10 is required to run this app Turn to page 20 for the Using the Barrett 4050 Remote Control sec tion of this guide ...

Страница 19: ...nstalled before beginning 1 Insert a USB stick into either the top of the transceiver front panel or via the appropriate adaptor and select Settings Export Export Android Apps 2 Plug in the USB stick via a USB to micro USB On the Go adaptor into the mobile device The built in file manager should pop up and allow access to the files on the USB stick If not go to My Files USB Device 3 Select Barrett...

Страница 20: ...sktop The Connect to SDR screen will appear on start up You may need to type over the transceiver IP address 192 168 3 2 in the example or simply select the transceiver you wish to connect to and tap to connect The Connecting screen will disap pear and be replaced by the screen on the right Using the Barrett 4050 Remote Control App ...

Страница 21: ...panel on the 4050 transceiver with the additional column of icons replicating the keypad operations of the transceiver Channel up scroll up Channel down scroll down Clear back one step Make a call Press to talk For more information regarding the functionality please consult the Barrett 4050 HF SDR Transceiver Operating and Installation Manual P N BCN40500 ...

Страница 22: ...ting 1 From the swipe screen select Settings Network to display the following screen 2 Tap Connection to disconnect from the transceiver 3 A confirmation screen displays Tap Yes The transceiver has now been successfully disconnected from the network ...

Страница 23: ...nsceiver via the Barrett Programming Software or use the Barrett 4050 Remote Control app to access all the functionality of the transceiver from their workstation Barrett 4050 HF SDR Transceiver P N BC4050000 WiFi Adapter P N BCO40508 Setup as WiFi Client DHCP WiFi Link WiFi Access Point Router not supplied DHCP Server Workstation with WiFi link to Access Point not supplied Barrett 4050 HF SDR Pro...

Страница 24: ...ode from the Network screen to dis play the WiFi Operation Mode screen b Select WiFi Client 3 Tap Connection from the Net work screen to display the Net work Connection screen Select a WiFi network to connect to from the list Tap Rescan WiFi if necessary to display more WiFi networks Prior to beginning the installation ensure the TP Link WiFi adapter is inserted in the USB socket located on the to...

Страница 25: ...25 WIRELESS SETUP SCENARIOS SCENARIO 2 5 Tap Connect to Network Enter the appropriate password and tap to submit This screen indicates that the transceiver is connected to the network ...

Страница 26: ... on the task bar b Click the name of the WiFi Access Point For example BCGuest This should be the same network as the transceiver Enter the password and click Next Open the Remote Control App on the PC and connect to the trans ceiver see page 20 Setting up the PC ...

Страница 27: ...UP SCENARIOS 3 This chapter contains the following sections Scenario 3 Ethernet Adaptor Switch PC Scenario 4 Ethernet Adaptor Switch DHCP Server PC Scenario 5 Ethernet Adaptor Router VPN Internet Router PC Recom mended ...

Страница 28: ...operate both should have matching static IP addresses The PC should already be installed with the Barrett 4050 Remote Control app P N BCO40516 Barrett 4050 HF SDR Programming Software P N USB40001 and Bonjour For instructions on installing this software please refer to page 16 1 Barrett 4050 HF SDR Transceiver P N BC405000 2 4050 to Ethernet Adaptor with USB ports P N BCA40504 3 Ethernet cable not...

Страница 29: ...w to set up a Windows PC with a static IP address A Default Gateway and DNS information are not required and can be left blank for this scenario 1 To set up the computer as a DHCP client right click the start button and choose Network Connections Setting up a Static IP Address on Windows 10 Professional ...

Страница 30: ...30 ETHERNET SETUP SCENARIOS SCENARIO 3 4 Click Internet protocol version 4 then click Properties 3 Right click Connection and choose Properties ...

Страница 31: ...et it to for example 192 168 1 20 and enter the subnet mask as for example 255 255 255 0 The default gateway and DNS are left blank then click OK You can obtain an IP address from your network administrator Selecting Obtain an IP address automatically will reverse this procedure ...

Страница 32: ...Trans ceiver s Settings screen tap Network to display the Network screen 2 Change the Operation Mode to Ethernet Configuration Tap Configuration from the Net work screen to display the Network Configuration screen A list of items that may be con figured displays To reveal more items either swipe down on the touch screen or press A brief description of each of the items which may be configured is d...

Страница 33: ...o save Switch to Off when setting a static IP address Network Mask Tap Network Mask from the Net work Settings screen to display the Network Mask screen Use the keyboard to type or edit the Network Mask then tap to save Default Gateway Tap Default Gateway from the Network Settings screen to display the Default Gateway screen Use the keyboard to type or edit the Default Gateway then tap to save ...

Страница 34: ...t the Primary DNS then tap to save Secondary DNS Tap Secondary DNS from the Net work Settings screen to display the Secondary DNS screen Use the keyboard to type or edit the Secondary DNS then tap to save The current IP address will appear under Status in the Network menu Note the static IP configuration will not save if the Ethernet cable is not properly connected ...

Страница 35: ...ceiver is set up in a LAN configuration An opera tor administrator with a computer set up in a different room to the transceiver but on the same network can control and program the transceiver from their location via the Barrett 4050 Remote Control app P N BCO40516 and Barrett 4050 Programming Software P N USB 40001 For instructions on the loading of this software refer to page 17 For more informa...

Страница 36: ...2 4050 to Ethernet Adaptor with USB ports P N BCA40504 3 Ethernet cable not supplied 4 Switch 5 Ethernet cable not supplied 6 Computer with Barrett 4050 Remote Control app computer not supplied Barrett 4050 Remote Control app P N BCO40516 DHCP Install Bonjour for discovery 7 DHCP Server ...

Страница 37: ...e Network Status screen A list of items will display To reveal more items either swipe down on the touch screen or press The current setting of each of the items is displayed to the right If this has been completed correctly the transceiver and PC should now be able to connect via the Barrett 4050 Remote Control app and or Barrett 4050 Programming Software Ensure that the Network s Operation Mode ...

Страница 38: ...ely maintain the transceiver network remotely via the Barrett 4050 Remote Control app P N BCO40516 and Barrett 4050 Program ming Software P N USB 40001 For instructions on the loading of this soft ware refer to page 17 Please refer to Appendix 4 Setting up a VPN on page 50 These are examples only and may differ in your situation If more information is required ask your network administrator about ...

Страница 39: ...le not supplied 4 Router Gateway DHCP VPN Server 5 VPN 6 Router Gateway 7 DHCP Server 8 Ethernet cable not supplied 9 Ethernet cable not supplied 10 PC with Barrett 4050 Remote Control application PC not supplied Barrett 4050 Remote Control application P N BCO40516 DHCP VPN Client Setup Port forwarding for incoming data in windows firewall UDP 55570 55586 ...

Страница 40: ...40 ETHERNET SETUP SCENARIOS SCENARIO 5 ...

Страница 41: ...X 2 Setting up DHCP on Windows 10 Professional APPENDIX 3 Setting up Port Forwarding in your Router APPENDIX 4 Allowing Ports with a Firewall on Windows 10 Professional APPENDIX 5 Setting up a VPN APPENDIX 6 Finding your Transceiver s IP Address APPENDIX 7 Troubleshooting APPENDIX 8 The Barrett Break out box BoB ...

Страница 42: ...rolhead acts as a WiFi client and connects to a WiFi access point DHCP server IPv4 If Internet traversal is required a VPN connection is necessary Recommended Networking preference 1 Ethernet via control head available since v1 6 or BoB for older set ups 2 Control head as WiFi access point 3 Control head as WiFi client Dedicated network between the 4050 and remote control and configura tion softwa...

Страница 43: ...ost with its IP address and other related configuration information such as the subnet mask and default gateway The DHCP is controlled by a DHCP server that dynamically distributes network configuration parameters such as IP addresses for interfaces and services 1 To set up the computer as a DHCP client right click the start button and choose Network Con nections 2 Then choose change adapter optio...

Страница 44: ...44 APPENDICES APPENDIX 2 4 Click Internet protocol version 4 then click Properties 3 Right click Connection and choose Properties ...

Страница 45: ...45 APPENDICES APPENDIX 2 5 Click Obtain an IP address auto matically then click OK The IP address is being obtained from the DCHP Server ...

Страница 46: ...he packets are traversing a network gateway such as a router or firewall 1 Log in to Router as per manufacturer s instructions 2 Under NAT or the port forwarding menu enter the ports you wish to forward to the networked 4050 HF SDR Transceiver 3 From the port forwarding menu under application enter a description for the rule then enter the port number you are forwarding from the protocol which is ...

Страница 47: ...47 APPENDICES APPENDIX 3 The following screen shot shows the port forwarding rules that are required ...

Страница 48: ...all The following steps show how to enable this 1 The following message appears once you have installed the Barrett 4050 Remote Control app Click Allow access to open the ports necessary for the control head app to operate 2 Under advanced settings of the Windows firewall check or change the port settings Type in the Windows search field Firewall to access the advanced menu 1 2 3 ...

Страница 49: ...49 APPENDICES APPENDIX 4 1 2 3 ...

Страница 50: ... their computing devices were directly connected to the private network Applications operating across the VPN may therefore benefit from the function ality security and management of the private network The following example shows how to set up an openVPN server There are various software available online General Settings Follow the steps below to create your own OpenVPN server 1 Select server mod...

Страница 51: ...51 APPENDICES APPENDIX 5 2 Enable the VPN server 3 Enter your username and password and click to create a new account for your OpenVPN server ...

Страница 52: ...Click Apply to save OpenVPN settings 5 It will take a few minutes to initialise the settings of the OpenVPN server and generate an OpenVPN configuration file Then click Export to save the ovpn configuration file named client ovpn ...

Страница 53: ...to client side to build your OpenVPN client connection For detail settings regarding OpenVPN client please refer to the following FAQs displayed on the setting page of the router Advanced Settings If necessary go to the Advanced Settings page to perform further configura tion ...

Страница 54: ...ENDIX 7 APPENDIX 6 Finding your Transceiver s IP Address Settings Network The Sta tus item shows the current IP address if successfully con nected The IP address of the BoB can be found under Settings BoB Network States ...

Страница 55: ...d set up on the transceiver is actually a network key not a PIN Action Click the link that reads connect using security key instead Enter the password from the transceiver Possible cause 1 Poor connec tion speed Action Ping the transceiver s IP address from the device This process will confirm or won t confirm a poor connection To do this search your Windows PC for cmd Type ping space IP address o...

Страница 56: ...DR Transceiver and an IP network to connect two antennas and or two Antenna Tuning Units ATUs to the 4050 HF SDR Transceiver and control the Linear Amplifier P N BC407500 The BoB is supplied complete with RF cable P N BCA97503 and a 15 way BoB to transceiver cable P N BCA40051 Warning When connecting or disconnecting the BoB from the 4050 HF SDR Trans ceiver ensure the transceiver is powered down ...

Страница 57: ...control head 4075 LINEAR AMPLIFIER 9 pin socket used to connect the BoB to a Linear Am plifier s 4050 Break out Box interface Ethernet Ethernet port ATU 2 Used to connect the secondary ATU ANTENNA 2 Used to connect the second antenna ANTENNA 1 Used to connect the first antenna ATU 1 Used to connect the first ATU ...

Страница 58: ... socket used for firmware upgrades 4050 TRANSCEIVER 15 pin socket used to connect the BoB to the 4050 HF SDR Transceiver GND Use this post to attach an earth connection RF IN Connect to the Antenna socket of the transceiver or RF Out socket of the Linear Amplifier ...

Страница 59: ...ransceiver is connected to the BoB Tap the Settings icon on the transceiver s home screen From the Settings screen either swipe down on the touch screen or press on the keypad to scroll down to reveal the BoB icon IT may take a few minutes to appear Tap BoB from the Settings screen to display the BoB screen From the BoB screen a list of items that may be configured will display A brief description...

Страница 60: ...fig ured will display To reveal more items either swipe down on the touch screen or press on the keypad The current status of each of the items is displayed to the right Note If DHCP is On no further set tings are displayed Network Configuration DHCP Tap DHCP from the BoB Network Settings screen to display the DHCP screen Select On to automatically obtain the network settings via an Ether net cabl...

Страница 61: ... screen to configure its value Use the keyboard to type or edit the IP Address then tap to save Network Status Tap Network Status from the BoB screen to display the BoB Net work Status screen A list of items display To reveal more items either swipe down on the touch screen or press The current setting of each of the items is displayed to the right ...

Страница 62: ...free of charge provided that the equipment is returned freight paid to Barrett Communications Pty Ltd head office or to an authorised service centre The repaired or replaced product will remain covered under and throughout the term of the original warranty period up to its expiration No repair or replace ment will extend the warranty term past the original thirty six 36 month anniversary of the or...

Страница 63: ...t designed or manufactured by it The Seller will however make every endeavour to ensure that the purchaser receives full benefit on any warranty given by the original equipment manufacturer This warranty is restricted to the original purchaser except where the original purchaser is a reseller authorised by the Seller who has purchased for the pur pose of resale warranty shall be extended to the re...

Страница 64: ...upport from the Australian office is available from 7 30 am to 4 00 pm local time Monday to Friday Barrett Communications Europe Unit 9 Fulcrum 2 Victory Park Solent Way Whiteley Hampshire PO15 7FN United Kingdom Tel 44 0 1489 880 332 Fax 44 0 1489 565 422 email support barrettcommunications co uk Telephone support from the UK office is available from 8 30 am to 5 00 pm local time Monday to Friday...

Страница 65: ...d Office Barrett Communications Pty Ltd 47 Discovery Drive Bibra Lake WA 6163 Australia Tel 61 8 9434 1700 Fax 61 8 9418 6757 Email information barrettcommunications com au www barrettcommunications com au ...

Отзывы: