3. Physical installation
3.7
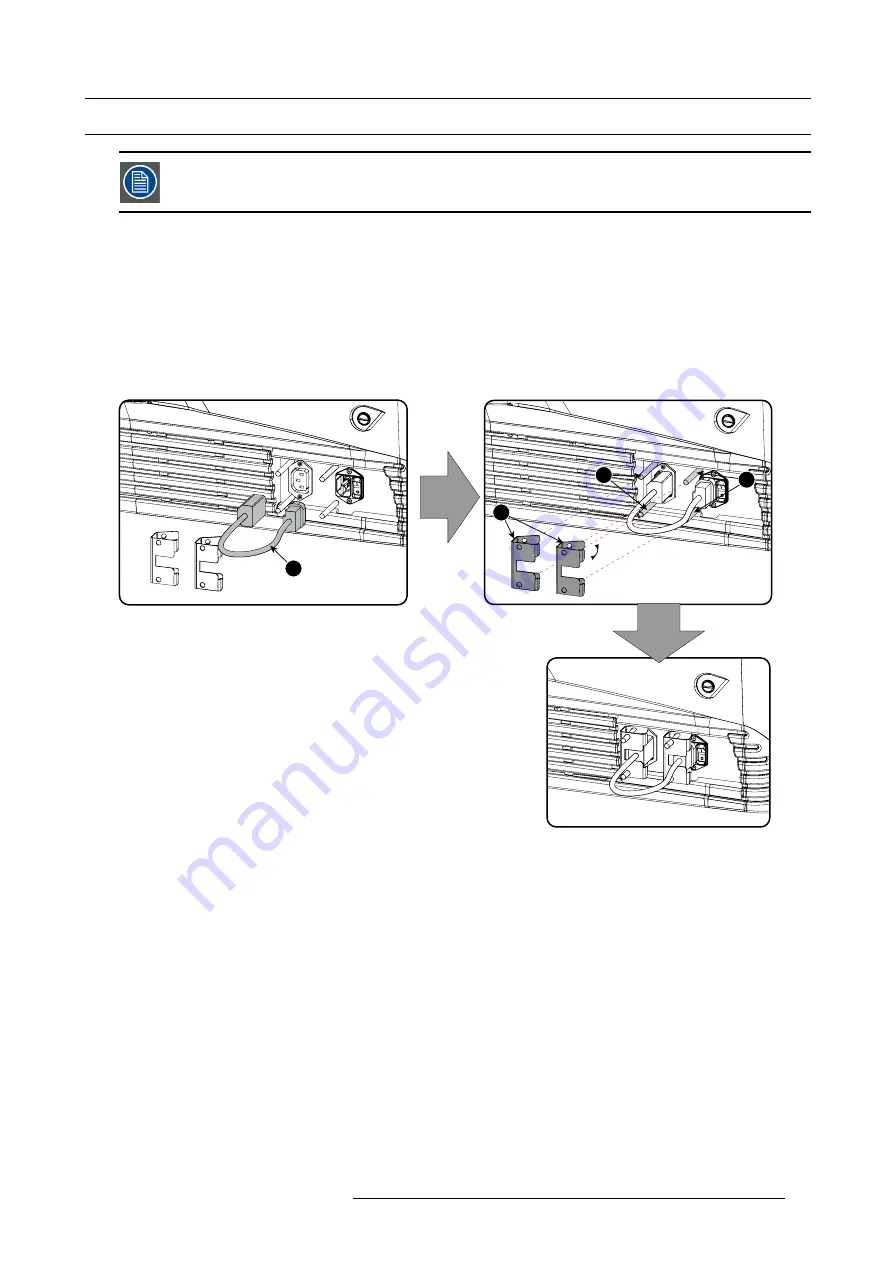
Power loop through to the projector electronics
This procedure explains how to provide the projector electronics with power in case no UPS unit is used.
Note that the projector is by default con
fi
gured for use without UPS. So, the short power link cable is already
installed.
Necessary tools
No tools.
Necessary parts
Short power link cable with plug type C13/C14
How to loop through the power
1. Plug in the short power cable (1) which was delivered with the projector.
Warning:
Always use the Barco short power cable which is delivered with the projector.
1
2
3
3
Image 3-16
Power loop through connection
2. Secure both plugs of the short cable with a
fi
xation spring (2). Handle as follow:
-
Squeeze the
fi
xation spring together.
-
Slide the
fi
xation spring on the
fi
xation pins (3) while squeezing together and push it against the power plug.
-
Release the
fi
xation spring.
R5905963 PROMETHEUS SERIES 09/03/2015
35
Содержание Prometheus I
Страница 1: ...Prometheus series Installation safety manual R5905963 00 09 03 2015 ...
Страница 15: ...1 Safety PR Image 1 2 R5905963 PROMETHEUS SERIES 09 03 2015 11 ...
Страница 92: ...5 Lenses lens holder 88 R5905963 PROMETHEUS SERIES 09 03 2015 ...
Страница 124: ...7 ICMP 120 R5905963 PROMETHEUS SERIES 09 03 2015 ...
Страница 130: ...8 Communicator Touch Panel 126 R5905963 PROMETHEUS SERIES 09 03 2015 ...
Страница 134: ...9 Starting up 130 R5905963 PROMETHEUS SERIES 09 03 2015 ...
Страница 144: ...10 Removal and installation of the projector covers Image 10 12 Side cover 140 R5905963 PROMETHEUS SERIES 09 03 2015 ...
Страница 152: ...10 Removal and installation of the projector covers 148 R5905963 PROMETHEUS SERIES 09 03 2015 ...
Страница 176: ...13 Specifications 172 R5905963 PROMETHEUS SERIES 09 03 2015 ...
Страница 186: ...14 Pin configurations 182 R5905963 PROMETHEUS SERIES 09 03 2015 ...


