background image

5-5

Connections

5975879 BARCOGRAPHICS 6300 120799

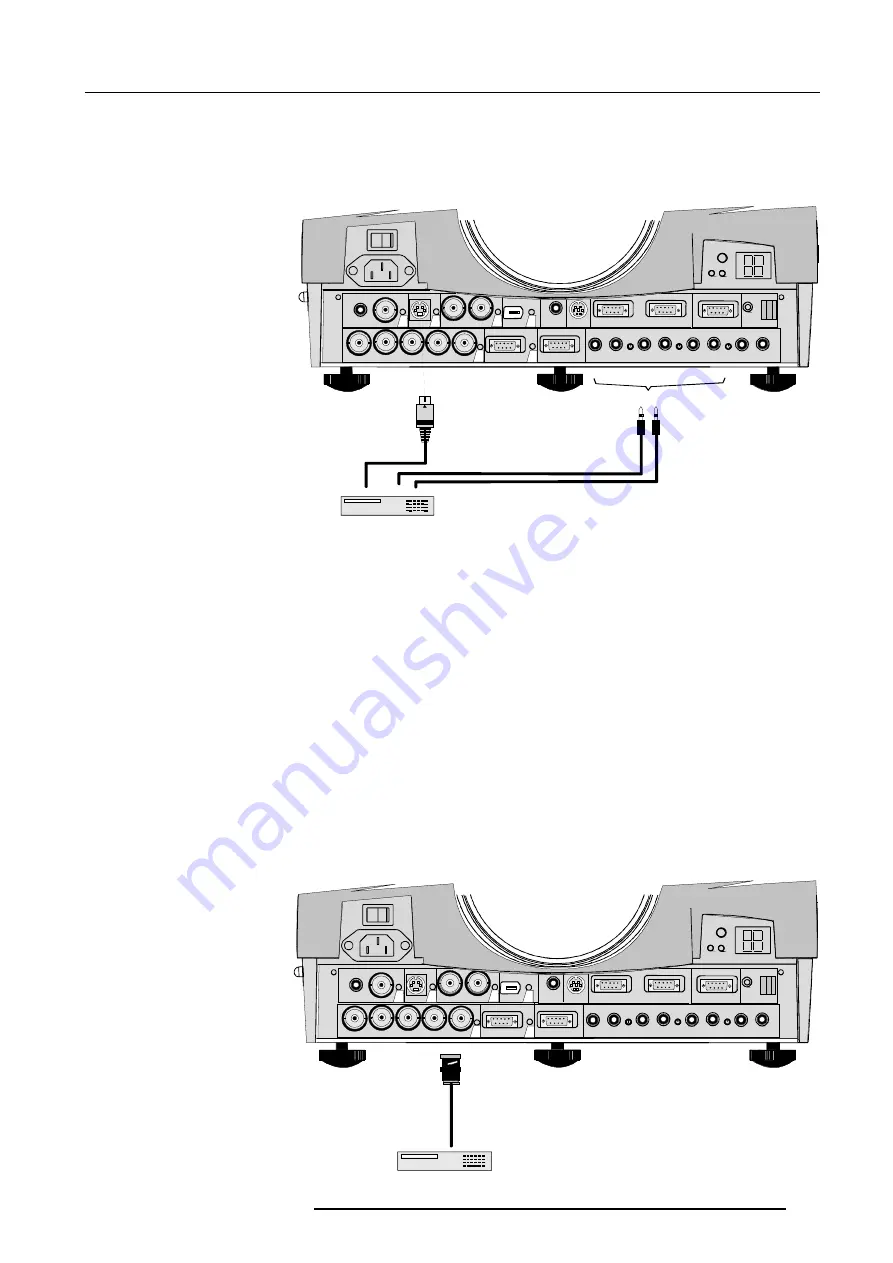
S-Video Input

Input  signal  :

Separate Y-luma/C-chroma signals for higher quality playback of

Super  VHS-signals.

SDI

SDO

S-VIDEO

VID EO

C OM PU TER

IEEE 1394

T RIG

M OU SE

MON ITO R

R S232 IN

RS232  O UT

AUD IO IN

AUD IO IN

AUD IO IN

AU DIO IN

C OM M.  PO R T

R C

C

B

A

R

G

B

H /C

V

5

6

2

1

4

3

VCR S-VHS

Lum a/Chroma

A, B or C

Pin  configuration  mini  DIN  plug  :

1

ground luminance

2

ground  chrominance

3

luminance 1.0Vpp ± 3 dB

4

chrominance 282 mVpp ± 3 dB

Slot  4  Selection  :

Key in 4 on the RCU or the local keypad.

Serial Digital Input / Serial Digital Output

Full compatibility with digital Betacam, or digital video sources.

This avoids the need for analog processing anywhere in the video production chain and guarantees the ultimate image quality.

An active loop through of the SDI input signal is provided for monitoring or for double or triple stacking applications.

SDI

SDO

S-VIDEO

V IDEO

COM PUTER

IEEE 139 4

TRIG

M OUSE

M ONITO R

RS23 2 IN

RS232 O UT

A UDIO IN

AUDIO IN

AUDIO IN

A UDIO  IN

COM M. PO RT

RC

C

B

A

R

G

B

H/C

V

5

6

2

1

4

3

D IG IT A L   V ID E O   S O U R C E

D ig ita l
V id e o

Optional input/output

Содержание Graphics 6300

Страница 1: ...BARCO PROJECTION SYSTEMS Date 14072000 OWNER S MANUAL Rev 05 GRAPHICS 6300 R9001440 Art No R5975879...

Страница 2: ...uses and can radiate radio frequency energy and if not installed and used in accordance with the instruction manual may cause harmful interference to radio communications Operation of this equipment...

Страница 3: ...1 Auto Image Adjustment 8 1 Adjust 8 1 RANDOM ACCESS ADJUSTMENT MODE 9 1 Starting up the Random Access Adjustment Mode 9 1 File Service 9 2 Load File 9 2 Edit File 9 3 Delete 9 5 Rename 9 5 Copy 9 5...

Страница 4: ...necessary if you ever have to ship your projector For maximum protection repack your projector as it was originally packed at the factory Contents of the complete unit box Projector dimensions units...

Страница 5: ...owards the bottom of the RCU 2 Lift up the top side of the cover at the same time 3 Push on the side of the battery towards the side 4 Lift up the battery at the same time 5 Repeat for the second batt...

Страница 6: ...al rule darken the room to the point where there is just sufficient light to read or write comfortably Spot lighting is desirable for illuminating small areas so that interference with the screen is m...

Страница 7: ...s given in the tabel in the same appendix B Start the installation procedure for the projector as described in the manual Inputs and computer video format input compatibility Some examples VIDEOandS V...

Страница 8: ...ver of the projector by pivoting it up and take it off image 1 3 Open both lens locks B by pulling them backwards Unlock first by pulling clip A forwards image 2 4 Put the lens on the lens holder 5 Fi...

Страница 9: ...ower Connections 1 Video input 1cinch or 1 BNC connector no loop through 2 Power switch 1 on 0 off 4 S Video 5 SDI and SDO serial digital input and loop trough output 2 x BNC terminals 6 IEEE 1394 not...

Страница 10: ...ication port allows communication with the 800 peripherals 6 IR Acknowledged IR signals are recognized IR Received IR signals are received but not recognized by the projector 7 Projector mode indicati...

Страница 11: ...e projector between 0 and 9 Press the recessed address key with a pencil followed by pressing one digit button between 0 and 9 4 Selection key to direct access the zoom focus shift functions 5 PAUSE t...

Страница 12: ...local keypad to make menu selections when in the adjustment mode or to zoom focus when the direct access is active Comparision between the cursor keys and the use of the and keys on the local keypad R...

Страница 13: ...ENTER EXIT to return Select with or then ENTER EXIT to return INSTALLATION INPUT SLOTS 800 PERIPHERAL CONFIGURATION OSD COLOR INTERNAL PATTERNS NO SIGNAL LENS Select with or then ENTER EXIT to return...

Страница 14: ...power switch to switch on When 0 is visible the projector is switched off When 1 is visible the projector is switched on When switching on with the power switch the projector starts in the stand by m...

Страница 15: ...selection 1 Press ENTER to start up the adjustment mode 2 Press the cursor key or to select Installation 3 Press ENTER to display the Installation menu 4 Press the cursor key or to select Input Slots...

Страница 16: ...ursor key or to select Input Slots 5 Press ENTER The internal system will scan the inputs and displays the result in the Input Slots menu 6 Push the cursor key or to select the first slot 7 Press ENTE...

Страница 17: ...f the projector This monitor output is only available when the computer input is used as input SDI SDO S VIDEO VIDEO COMPUTER IEEE 1394 TRIG MOUSE MONITOR RS232 IN RS232 OUT AUDIO IN AUDIO IN AUDIO IN...

Страница 18: ...ance 282 mVpp 3 dB Slot 4 Selection Key in 4 on the RCU or the local keypad Serial Digital Input Serial Digital Output Full compatibility with digital Betacam or digital video sources This avoids the...

Страница 19: ...ntrol another device RS232 in RS232 out To connect a Computer e g IBM PC or compatible Apple Macintosh to the RS 232 input of the projector to allow communicate between the computer and the projector...

Страница 20: ...or To activate this mouse function handle as follow 1 Start up your computer with the computer mouse plugged in The mouse driver should be loaded 2 Unplug the computer mouse without switching off the...

Страница 21: ...RCU b The hardwired RCU cable is not included c The local keypad Controlling the projector with the RCU and the hardwired RCU is equal How to use the RCU a Point the front of the RCU to the reflective...

Страница 22: ...ithin 5 seconds after pushing the address key For example if the Address key displays projector address 003 then press 3 digit button on the RCU to set the RCU s address to match the projector s addre...

Страница 23: ...s the volume Use the button for a higher volume Use the button for a lower volume Bass Control Bass control adjusts the bass level low tones Use the button for more low tones Use the button for less l...

Страница 24: ...o focus or zoom the image 1 Push the or key to zoom and or key to focus the image 2 When finished press EXIT to return To shift the image 1 Press ENTER to switch to the shift menu 2 Push the or key to...

Страница 25: ...lected if the user intends to change general settings such as password language address etc or some service actions as reset lamp run time panel adjustments etc or get set up information Some items in...

Страница 26: ...ment values will be saved when switching to another source Select with or then ENTER EXIT to return AUTO IMAGE ADJUST ACTION FULL AUTOMATIC Select with or then ENTER EXIT to return ADJUSTMENT MODE Sel...

Страница 27: ...rn Starting up the Random Access Adjustment Mode Push the cursor key or to highlight Random Access and then press ENTER RANDOMACCESS ADJUSTMENTMODE LOAD EDIT RENAME COPY OPTIONS DELETE CTI COLORTEMPER...

Страница 28: ...ugh the files the image will be adapted according to the settings of the selected file on line adaptation If the displayed image is not correct after selecting the best fitting file go to the Edit men...

Страница 29: ...by pushing the cursor key or How to find the correct values for the displayed item During the installation of a file with LOAD the horizontal period the total number of vertical lines and the interlac...

Страница 30: ...are visible in the image This can be corrected by forcing the field polarity to neg or pos Use the ENTER key to toggle between pos and neg Field Select Default both The field select is only used for...

Страница 31: ...olution Video525 s01 1 675x240i Video525 c01 1 675x240i Video525 c02 1 675x240i Active file Video525 c50 Select with or ENTER to accept EXIT to return Copy To copy a selected file into a new file 1 Pu...

Страница 32: ...DELETE OPTIONS FILE OPTIONS FILE SORT NAME Select with or then ENTER EXIT to return Picture Tuning 1 Push the cursor key or to highlight Picture Tuning 2 Press ENTER to select The Picture Tuning menu...

Страница 33: ...TE COMPUTER 9300K VIDEO 6500K FILM 5400K BROADCAST 3200K CUSTOM BALANCE Select with then ENTER EXIT to return PICTURE TUNING CTI ON COLOR TEMPARATURE GAMMA DECODING EBU DYNAMIC COLOR DEPTH GAIN RED Ga...

Страница 34: ...NG EBU DYNAMIC COLOR DEPTH NOISE REDUCTION INPUT BALANCE 0 DYNAMIC COLOR DEPTH 8 NOISE REDUCTION 0 8 4 Input Balance Attention Before starting the Input Balance function generate a signal with dominan...

Страница 35: ...a sound control is selected by highlighting the item with the cursor key a text box with a bar scale icon and function name of the control e g Volume appears on the screen only when text is ON The len...

Страница 36: ...nd vertical image shift horizontal and vertical image size side keystone only necessary if the projector is mounted at a non standard projection angle blanking aspect ratio options The following ways...

Страница 37: ...ted to the right when the value is negative the image is shifted to the left Size The size can be adjusted in a vertical or horizontal way When adjusting the vertical size The upper side of the image...

Страница 38: ...RIGHT Select with or then ENTER EXIT to return GEOMETRY SHIFT SIZE SIDE KEYSTONE BLANKING ASPECT RATIO 4 3 OPTIONS BLANKING TOP BOTTOM LEFT RIGHT RESET Select with or then ENTER EXIT to return Blankin...

Страница 39: ...the same side keystone correction for all files YES or NO YES the same keystone correction will be used for all installed files NO the keystone has to be adjusted file per file 1 Push the ENTER key t...

Страница 40: ...nge the input configuration 1 Push the cursor key or to highlight Input Slots 2 Press ENTER to select The internal system will scan the input slots and displays the result in the Input slots menu The...

Страница 41: ...ts directly with the digits keys on the RCU Lens Adjustments All lens adjustments are motorized and can be adjusted with the RCU To adjust all lens functions such as zoom focus and shift handle as fol...

Страница 42: ...ions are factory preprogrammed F1 dynamic color depth F2 noise reduction F3 configuration F4 Lens adjust zoom focus F5 Lens adjust shift How to program the quick access keys function keys 1 Scroll thr...

Страница 43: ...gle between PPM or RC5 OSD color On Screen Display The highlighted items on the menus can be displayed in red green or yellow To change this color setting 1 Push the cursor key or to highlight OSD col...

Страница 44: ...image or with a freeze of the last projected image To install the switching mode follow the next procedure 1 Push the cursor key or to highlight Switching mode 2 Press ENTER to select The switching m...

Страница 45: ...10 6 Installation Mode 5975879 BARCOGRAPHICS 6300 14072000...

Страница 46: ...XIT to return SERVICE IDENTIFICATION CHANGE PASSWORD CHANGE LANGUAGE CHANGE PROJ ADDRESS CHANGE BAUDRATE PC RESET LAMP RUNTIME LAMP RUNTIME HISTORY LAMP DIMMING MORE Select with or then ENTER EXIT to...

Страница 47: ...MORE Select with or then ENTER EXIT to return software version Proj Address to change the address of the projector see Change Projector Address in this chapter Installation possible installations Fron...

Страница 48: ...e 4 Press ENTER to change the language Available languages English Change Projector Address Projector Address Every projector requires an individual address between 0 and 255 This address can be softw...

Страница 49: ...ress EXIT to return to the service mode selection menu SERVICE IDENTIFICATION CHANGE PASSWORD CHANGE LANGUAGE CHANGE PROJ ADDRESS CHANGE BAUDRATE PC RESET LAMP RUNTIME LAMP RUNTINE HISTORY DIMMING COM...

Страница 50: ...CO logo menu 1 Push the cursor key or to highlight BARCO logo 2 Press ENTER to display the BARCO logo menu The actual settings will be displayed Within this menu three toggle settings and a shift cont...

Страница 51: ...ode selection menu the following warning will be displayed Preset Input Balance is reserved to qualified service personnel If you are not qualified press EXIT to cancel the preset input balance SERVIC...

Страница 52: ...75 025 79 976 135 000 1688 1280 1066 1024 FMR 640 X 400I 42 323 36 440 28 570 784 640 431 400 FMTO_2 640 X 400 55 370 24 370 21 056 864 640 440 400 HDMAC 1252 X 570I 25 020 31 250 39 125 1252 1024 625...

Страница 53: ...024 808 768 SUNXGA77 1024 X 768 77 069 62 040 84 375 1360 1024 805 768 SUP_MAC 1024 X 768 60 000 48 780 63 999 1312 1024 813 768 SVGA_56V 800 X 600 56 250 35 156 36 000 1024 800 625 600 SVGA_60V 800 X...

Страница 54: ...CLEAN TorayseeTM cloth 2 Always wipe lenses in a single direction Do not wipe back and forwards across the lens surface as this tends to grind dirt into the coating 3 Do not leave cleaning cloth in e...

Страница 55: ...ax 2 20 x SW 0 01 0 02 SW Inch PDmin 1 44 x SW 1 3 34 10 SW PDmax 2 20 x SW 0 39 31 0 SW QFD 2 1 3 0 1 Metric PDmin 2 13 x SW 0 10 0 056 SW PDmax 2 90 x SW 0 10 0 0745 SW Inch PDmin 2 13 x SW 0 39 86...

Страница 56: ...second or a third file for sources 1 to 6 1 Select the source between 1 and 6 2 Select the corresponding source number between 81 and 86 or 91 and 96 with the digit keys on the RCU 3 Enter the adjust...

Страница 57: ...s 1 6 of the projector e g When slot 1 of the projector has to be selected key in source number 81 The relationship between the sources of slot 1 6 of the projector with 800 peripheral is shown in the...

Отзывы: