


4
Supply Power to the Emitter-Receiver Directional Sensor Pair and Mount to
the Bracket
The Directional Sensor Pair comes with two components: an emitter and a receiver with an internal radio.
Set Up Your Hardware
Supply power to all devices
The Occupancy Monitoring Kit arrives with all necessary power sources needed to get the system operating quickly. This
includes lithium batteries for the Directional Sensors and Direct Select Operator Interface, and a DC power supply for the DXM
Controller and TL70 Wireless Indicator Light.
1
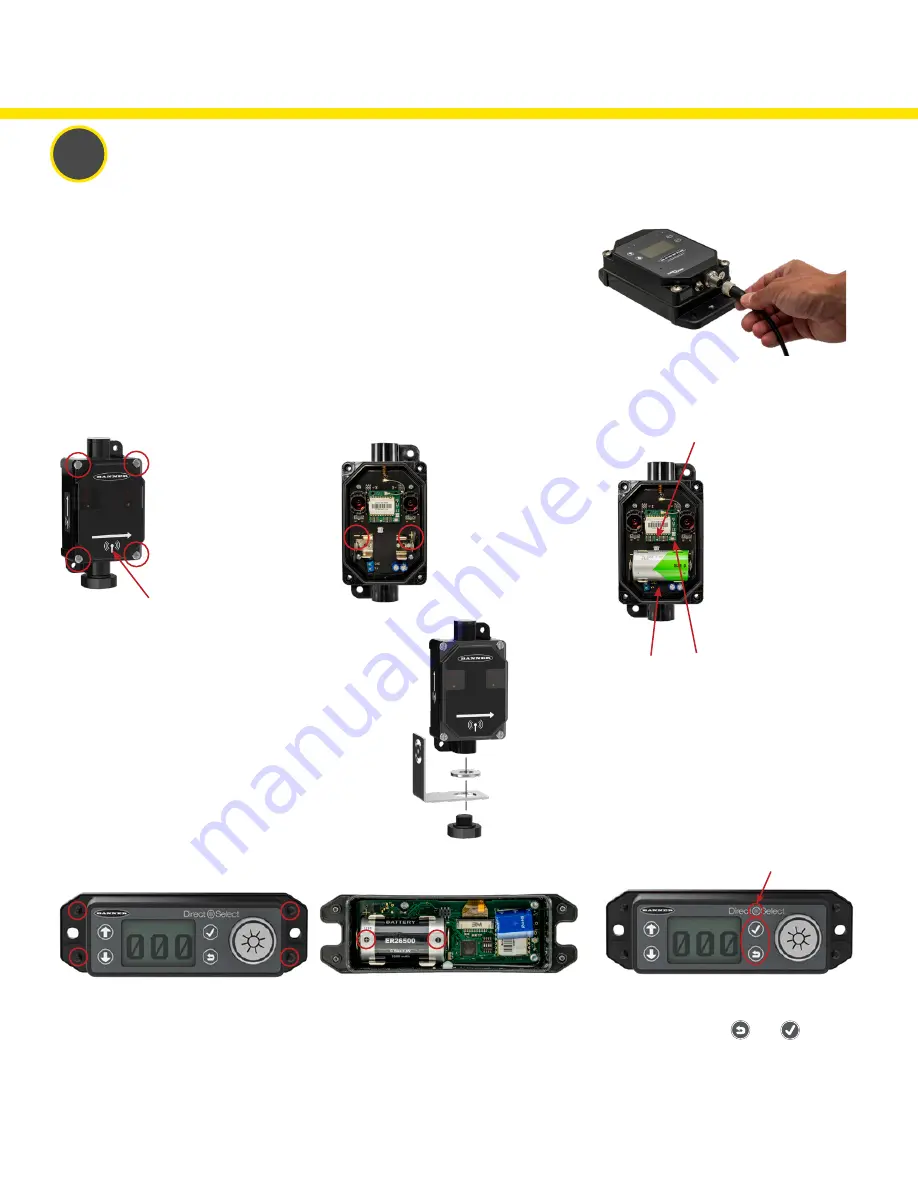
Supply Power to the DXM Controller
Plug the power supply into the DXM Controller, aligning the keys in the connector, and
hand tighten. Plug the power supply into a power outlet using the appropriate regional wall
adapter.
3. If the Status LED does not automatically
begin flashing, turn on the Operator Interface
by pressing and holding
and
together
for five seconds or until the Status LED starts
flashing red.
4. Reassemble the Node and tighten the four
corner screws. Do not over-tighten.
Supply Power to the Direct Select Operator Interface
1. Unscrew the four corner screws with a
Phillips screwdriver and open the Operator
Interface.
2. Insert the 3.6 V lithium battery. Verify the
battery’s positive and negative terminals align
to the positive and negative terminals as
marked.
Caution: There is risk of damage if the
batteries are installed incorrectly.
Status LED
1. Unscrew the four corner
screws with a Phillips
screwdriver on the Receiver
and remove the cover.
The Receiver has an internal
radio with a radio icon on the
base and front cover.
4. Place the cover back on the Receiver and hand tighten
the four corner screws. Do not over-tighten.
5. Mount the supplied bracket to the Receiver. Place the L
bracket between the washer and the jam nut. Thread the
jam nut onto the base of the Receiver. Hand-tighten the
jam nut.
Repeat this process for the Emitter.
2. Insert the 3.6V lithium
D cell battery. Verify the
battery's positive and
negative terminals align to
the positive and negative
terminals as marked.
Caution: there is risk of
damage if the batteries are
installed incorrectly.
3. If the radio board
Status LED does not
automatically begin
flashing, turn on the
radio by pressing and
holding the button until it
begins flashing.
Verify the toggle switch
on the bottom of the
sensor is in the “ON”
position.
Radio
button
Status LED
Radio icon
Toggle
switch


