background image

Set the Time

Use the 

Settings

 > 

System

 screen to define the time zone and daylight saving option. The time zone and DST options are

saved into the configuration file.

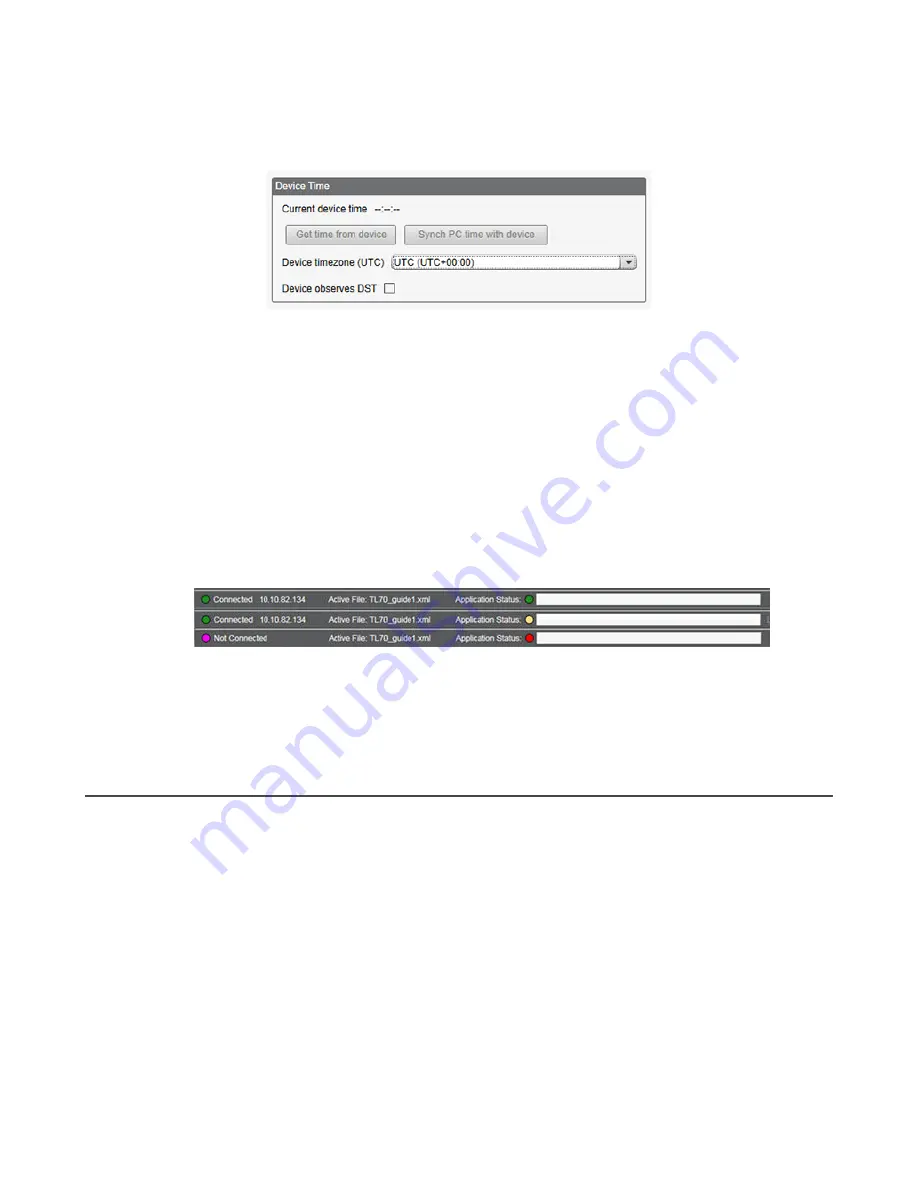
Figure 8. Settings > System > Device Time

1. Go to the 

Settings

 > 

System

 screen.

2. If you connect the DXM to a computer, click 

Sync PC Time with Device

 to set the time on the DXM to match the

time of the computer.

3. Set your time zone and select whether or not your device observes daylight saving time (DST).

Save and Upload the Configuration File

After making any changes to the configuration, you must save the configuration files to your computer, then upload it to the

device.
Changes to the XML file are not automatically saved. Save your configuration file before exiting the tool and before sending

the XML file to the device to avoid losing data. If you select 

DXM

 > 

Send XML Configuration to DXM

 before saving the

configuration file, the software will prompt you to choose between saving the file or continuing without saving the file.

1. Save the XML configuration file to your hard drive by going to the 

File

 > 

Save As

 menu.

2. Go to the 

DXM

 > 

Send XML Configuration to DXM

 menu.

Figure 9. Status indicator bar

If the Application Status indicator is red, close and restart the DXM Configuration Tool, unplug and re-plug in the

cable and reconnect the DXM to the software.

If the Application Status indicator is green, the file upload is complete.

If the Application Status indicator is yellow, the file transfer is in progress.

The device reboots and begins running the new configuration.

2.3 Banner Engineering Corp. Limited Warranty

Banner Engineering Corp. warrants its products to be free from defects in material and workmanship for one year following the date of shipment. Banner Engineering Corp. will

repair or replace, free of charge, any product of its manufacture which, at the time it is returned to the factory, is found to have been defective during the warranty period. This

warranty does not cover damage or liability for misuse, abuse, or the improper application or installation of the Banner product.

THIS LIMITED WARRANTY IS EXCLUSIVE AND IN LIEU OF ALL OTHER WARRANTIES WHETHER EXPRESS OR IMPLIED (INCLUDING, WITHOUT LIMITATION, ANY

WARRANTY OF MERCHANTABILITY OR FITNESS FOR A PARTICULAR PURPOSE), AND WHETHER ARISING UNDER COURSE OF PERFORMANCE, COURSE OF

DEALING OR TRADE USAGE.

This Warranty is exclusive and limited to repair or, at the discretion of Banner Engineering Corp., replacement. 

IN NO EVENT SHALL BANNER ENGINEERING CORP. BE

LIABLE TO BUYER OR ANY OTHER PERSON OR ENTITY FOR ANY EXTRA COSTS, EXPENSES, LOSSES, LOSS OF PROFITS, OR ANY INCIDENTAL,

CONSEQUENTIAL OR SPECIAL DAMAGES RESULTING FROM ANY PRODUCT DEFECT OR FROM THE USE OR INABILITY TO USE THE PRODUCT, WHETHER

ARISING IN CONTRACT OR WARRANTY, STATUTE, TORT, STRICT LIABILITY, NEGLIGENCE, OR OTHERWISE.

Banner Engineering Corp. reserves the right to change, modify or improve the design of the product without assuming any obligations or liabilities relating to any product

previously manufactured by Banner Engineering Corp. Any misuse, abuse, or improper application or installation of this product or use of the product for personal protection

applications when the product is identified as not intended for such purposes will void the product warranty. Any modifications to this product without prior express approval by

Banner Engineering Corp will void the product warranties. All specifications published in this document are subject to change; Banner reserves the right to modify product

specifications or update documentation at any time. Specifications and product information in English supersede that which is provided in any other language. For the most

recent version of any documentation, refer to: 

www.bannerengineering.com

.

For patent information, see 

www.bannerengineering.com/patents

.


Sure Cross

®

 DXM100-Bx and DXM1000-Bx Wireless Controllers


www.bannerengineering.com - Tel: + 1 888 373 6767

17

Содержание Sure Cross DXM100-B Series

Страница 1: ...Sure Cross DXM100 Bx and DXM1000 Bx Wireless Controllers Instruction Manual Original Instructions 190037 Rev J 9 August 2021 Banner Engineering Corp All rights reserved 190037 ...

Страница 2: ...se Board for the B2 and S2 Models 25 5 3 DIP Switches for the I O Board 25 5 4 Setting the Modbus Slave ID on the I O Base Board 26 5 5 I O Board Jumpers for the B1 and S1 Models 26 5 6 Applying Power 27 5 6 1 Connecting a Battery 27 5 6 2 Supplying Power from a Solar Panel 27 5 7 Connecting the Communication Pins 28 5 8 Modbus RTU Master and Slave Ports 28 5 8 1 Set the Master and Slave Port Para...

Страница 3: ...rameters for Emailing Log Files 62 8 8 Ethernet and Cellular Push Retries 63 8 8 1 Ethernet Push Retries 63 8 8 2 Cellular Push Retries 63 8 8 3 Event Action Rule or Log File Push Retries 63 8 8 4 Email and Text Message Push Retries 64 9 Additional Information 65 9 1 Working with Modbus Devices 65 9 1 1 Assigning Modbus Slave IDs 65 9 1 2 Wireless and Wired Devices 66 9 1 3 Modbus Communication Ti...

Страница 4: ...pport and Maintenance 99 13 1 File System and Archive Process 99 13 2 Troubleshooting 100 13 2 1 Restoring Factory Default Settings for the I O Base Board 100 13 2 2 Updating the DXM Processor Firmware 100 13 2 3 Troubleshooting Issues 104 13 2 4 Modbus Operation 104 13 3 DXM100 Documentation 104 13 4 DXM1000 Documentation 104 13 5 DXM Support Policy 105 13 5 1 Firmware Updates 105 13 5 2 Website ...

Страница 5: ...nsors indicators and control equipment Wired Connectivity Ethernet Modbus TCP or Ethernet IP Field Bus Modbus RS 485 Master Slave RS 232 or Controller Area Network CAN Wireless Connectivity Sure Cross Wireless Radio DX80 900 MHz DX80 2 4 GHz MultiHop 900 MHz or MultiHop 2 4 GHz Cellular modem LTE United States or GSM outside the United States Logic Controller Program the DXM s logic controller usi...

Страница 6: ... O ports connect to local sensors indicators and control equipment Universal Inputs Discrete outputs Courtesy power Switch power Battery backup Solar controller DC latching outputs SDI 12 sensor interface Connectivity The DXM s wired and wireless connectivity options make it easy to share data between local and remote equipment The cellular modem option eliminates the need for IT infrastructures t...

Страница 7: ...ks Power 12 30 V DC Solar Battery Comms RS 485 CAN RS 232 w flow or secondary RS 485 Inputs 4 universal IN Outputs 4 NMOS OUT 2 analog OUT 0 10 V or 4 20 mA Power Out 2 Selected 5 V or 16 V switched power 1 5 V courtesy power Blank None R1 900 MHz 1 W PE5 Performance Radio North America R2 900 MHz 1 W HE5 MultiHop Data Radio North America R3 2 4 GHz 65 mW PE5 Performance Radio Worldwide R4 2 4 GHz...

Страница 8: ...Performance Radio Worldwide R4 2 4 GHz 65 mW HE5 MultiHop Data Radio Worldwide R5 900 MHz 65 mW HE5L MultiHop Data Radio Used for M GAGE networks R8 900 MHz Performance Radios approved for Australia New Zealand R9 900 MHz MultiHop Radio approved for Australia New Zealand Smart valve control SDI 12 data collection Power 12 30 V DC Solar Battery Comms RS 485 1 SDI 12 sensor interface Inputs 4 univer...

Страница 9: ... board plugs into the base board using the two 20 pin socket connectors The board sits above the ISM radio socket and held by the base board standoffs Position the processor board so the USB and RJ45 Ethernet connection is to the front away from the SMA antenna connections Cellular Modem Optional The optional cellular modem purchased separately board plugs into the processor board with the U FL an...

Страница 10: ...ster RTU port The DXM uses the master Modbus RTU bus to communicate with locally connected Modbus devices or uses the Banner wireless radio to communicate with remote Modbus devices The other Modbus RTU port is used by a host system to access the DXM as a slave device The slave Modbus RTU port allows access all the internal registers concurrently with the master RTU port Set the slave Modbus ID us...

Страница 11: ...essor s Local Registers are divided into three different types integer floating point and non volatile When using Local Registers internally the user can store 32 bit numbers Using Local Registers with external Modbus devices follows the Modbus standard of a 16 bit holding register Local Registers are accessible as Modbus ID 199 Accessing the I O base board and the LCD follows the same communicati...

Страница 12: ... or script to slow down the RTU read or write rules Upload a blank XML bind all devices then upload the configured XML file Bind a DX80 Node to a DXM and Assign the Node Address Binding Nodes to a Gateway ensures the Nodes only exchange data with the Gateway they are bound to After a Gateway enters binding mode the Gateway automatically generates and transmits a unique extended addressing XADR or ...

Страница 13: ...vice ID You can leave the DXM Bind to address set to 1 because the MultiHop s rotary dials will override that setting 3 Start binding mode on the DXM radio by pressing ENTER on the DXM radio 4 After entering binding mode on the DXM put the MultiHop repeater or slave radio into binding mode For housed radios triple click button 2 For board level radios triple click the button For radios without but...

Страница 14: ... to OFF 4 The system will request a restart press ENTER to confirm 5 Follow steps 1 and 2 to reenter the Ethernet menu Use the arrow keys to select IP Press ENTER The IP address displays for example 192 168 0 1 6 Use the up and down arrows to change the IP address Press ENTER to move to the next octet 7 Press ENTER on the final octet to accept the changes 8 Cycle power to the DXM The changes are s...

Страница 15: ...its Connect to DXM screen differs from the other DXM models When the Select DXM Model drop down is set to DXM R90x a new network discovery table is displayed Click Scan Network for DXMs to detect DXM devices on the host computer s network Discovered DXMs are listed in the network discovery table Double click any row entry to connect to that DXM If the DXM s IP address is already known the standard...

Страница 16: ... only writes to the device and cannot read the data If the permissions are set to Read Write the web server can read the data from the device and write to the device from the web 5 Click Modify Registers to save and apply the changes Define an RTU Read Rule Follow these steps to create a new read rule This example screen shows a read rule created to read six registers address 1 through 6 from Modb...

Страница 17: ... factory is found to have been defective during the warranty period This warranty does not cover damage or liability for misuse abuse or the improper application or installation of the Banner product THIS LIMITED WARRANTY IS EXCLUSIVE AND IN LIEU OF ALL OTHER WARRANTIES WHETHER EXPRESS OR IMPLIED INCLUDING WITHOUT LIMITATION ANY WARRANTY OF MERCHANTABILITY OR FITNESS FOR A PARTICULAR PURPOSE AND W...

Страница 18: ...ht side of the I O base board Solid green DX80 ISM radio LED indicates power Flashing green MultiHop ISM radio LED indicates operation Red and green combined Communications traffic and binding 3 1 MultiHop Radio DIP Switches MultiHop ISM radio devices are defined with R2 R4 and R5 in the model number DXMxxx xxR2 MultiHop 900 MHz DXMxxx xxR4 MultiHop 2 4 GHz DXMxxx xxR5 MultiHop 900 MHz 100 mW DXMx...

Страница 19: ...witches to select the mode of operation All MultiHop radios within a wireless network must be in the same mode Modbus mode uses the Modbus protocol for routing packets In Modbus mode a routing table is stored in each parent device to optimize the radio traffic This allows for point to point communication in a multiple data radio network and acknowledgement retry of radio packets To access a radio ...

Страница 20: ...W mode reduces the radio s range but improves the battery life in short range applications For 2 4 GHz models this DIP switch is disabled The transmit power for 2 4 GHz is fixed at about 65 mW EIRP 18 dBm DX80 Performance Gateway ISM radio devices are defined with R1 R3 and R8 in the model number DXMxxx xxR1 DX80 Performance 900MHz DXMxxx xxR3 DX80 Performance 2 4GHz DXMxxx xxR8 DX80 Performance 9...

Страница 21: ... a cloud push To force a push to the cloud press and hold this button for five 5 seconds to send an immediate push message from the device if properly configured C Boot load jumpers D DIP switches E Micro SD card F LED 1 Heartbeat indicates the processor is running G LED 2 Indicates the cellular modem power cutoff is active if the incoming power is less than 11 2 V the cellular modem is powered do...

Страница 22: ...g Flashing green Processor is running Single red flash at power up time Bootloader is present Toggling Red Orange Bootloader is examining the new file Toggling Red Green Bootloader is loading the new image 4 3 DIP Switch Settings for the Processor Board After making changes to the DIP switch settings cycle power to the device Table 4 DIP switches for the DXM processor board Settings DIP Switches 1...

Страница 23: ...s access to Ethernet for custom programming Use the software or LCD menu system to configure the characteristics of the Ethernet connection including the IP address Any parameters not changeable from the menu system are configurable from the configuration software Ethernet parameter changes entered through the LCD menu override the XML configuration parameters To return to using the network settin...

Страница 24: ...t 4 6 M Primary RS 485 17 GD GND 28 U3 Universal Input 3 7 M Primary RS 485 18 P3 Courtesy Power 5 V 29 GD Ground 8 GD Ground 19 A2 Analog OUT 2 30 P1 Adjustable Courtesy Power 5 V or 16 V 9 TX RS 232 Tx 20 A1 Analog OUT 1 31 U2 Universal Input 2 10 RX RS 232 Rx 21 P2 Adjustable Courtesy Power 5 V or 16 V 32 U1 Universal Input 1 11 RT RS 232 RTS 22 N4 NMOS OUT 4 A Base board LED E Jumpers Configur...

Страница 25: ...ry RS 485 18 P3 Courtesy Power 5 V 29 GD Ground 8 GD Ground 19 A2 Analog OUT 2 0 10 V 30 P1 Adjustable Courtesy Power 5 24 V 9 1A DLatch 1A 20 A1 Analog OUT 1 0 10 V 31 U2 Universal Input 2 10 1B DLatch 1B 21 P2 Adjustable Courtesy Power 5 24 V 32 U1 Universal Input 1 11 2A DLatch 2A 22 N4 NMOS OUT 4 A Base board LED J Modbus Slave ID DIP Switches B A1 Cellular or secondary antenna K Modbus Slave ...

Страница 26: ... 1 0 1 0 1 0 0 1 1 0 1 1 1 0 0 0 0 1 1 0 0 1 OFF OFF x 2 11 12 13 14 15 16 17 18 19 ON OFF 20 21 22 23 24 25 26 27 28 29 OFF ON 30 31 32 33 34 35 36 37 38 39 ON ON 40 41 42 43 44 45 46 47 48 49 DXM100 1000 Bx Wireless Controller Example To set the DXM100 1000 Bx Wireless Controller to a Modbus Slave ID of 34 set the following Location J DIP switches set to 1 OFF 2 ON Location K DIP switches set to...

Страница 27: ...gic ground for the DXM100 1000 Bx Wireless Controller Pin 4 Solar or backup battery positive input Battery voltage must be less than 15 V dc Use only a sealed lead acid SLA battery 5 6 1 Connecting a Battery When attaching a battery to the DXM as a backup battery or as a solar battery verify the charging algorithm is set properly The factory default setting for the battery charging algorithm assum...

Страница 28: ...available on the DXM100 B2 models Pin 10 RS 232 Rx Pin 13 Secondary RS 485 The DXM100 1000 Bx Wireless Controller is a Modbus slave on this bus see I O Base Board Connections for the B1 Models on p 24 Pin 14 Secondary RS 485 Pin 15 CANL DXM100 B1 models only Not available on the DXM100 B2 models Pin 16 CANH 5 8 Modbus RTU Master and Slave Ports The DXM can be a Modbus RTU master device to other sl...

Страница 29: ...ed time for messages to be sent throughout the wireless network For the DXM the Timeout parameter is the maximum amount of time the DXM should wait after a request is sent until the response message is received from the Modbus slave device Wireless Modbus Backbone Applies to the Modbus slave port Define when there is an ISM radio plugged into the processor board When this is done the Modbus slave ...

Страница 30: ...ld and hysteresis Refer to the DXM100 Controller Instruction Manual p n 190037 for the parameter definitions When a universal input is configured as an NPN or PNP input type it can be enabled to be a synchronous counter Enable the counter function by setting Modbus register Enable Rising or Enable Falling to 1 See Modbus I O Registers for the B1 I O Base Board on p 77 for universal input register ...

Страница 31: ...8 to 1 to enable counting on the rising edge of the input signal 8 Read Modbus registers 4910 and 4911 to get the 32 bit value of the count Example Change Universal Input 2 to a 0 to 10 V dc Input 1 Connect the DXM to the PC 2 Launch the DXM Configuration Software software 3 Connect to the DXM by selecting the Device Connection Settings menu option You may connect using either USB or Ethernet 4 Se...

Страница 32: ... 3 to select 0 to 10 V For analog output 1 write to Modbus register 4008 for analog output 2 write to Modbus register 4028 see the table for the values DXM100 1000 B1 and S1 Models Pin Analog Output Modbus Register Description 20 1 507 0 to 20 mA or 0 to 10 V dc output I O board jumper selectable Accuracy 0 1 of full scale 0 01 per C Resolution 12 bit 19 2 508 5 9 4 Analog DAC Outputs for the B2 a...

Страница 33: ... SDI 12 command of M Use the configuration software to adjust the SDI 12 parameters power ground serial SD GD SP SDI 12 device B2 Controller Basic SDI 12 Interface Parameters Up to five devices commands can be accessed using the SDI 12 interface There are three parameters for each device command Enable Device Address Device Command For more information refer to the SDI 12 Technical Notes Enable In...

Страница 34: ...he factory default configuration defines the result registers as 32 bit registers floating point format and the first nine result registers are enabled for use A host system reads the SDI 12 device data from these registers Result Registers Register 1 Register 2 Register 3 Register 4 Register 5 Register 6 SDI 12 Device CMD 1 Result Upper 11101 11103 11105 11107 11109 11111 SDI 12 Device CMD 1 Resu...

Страница 35: ...second counts For example the default value is 22 500 which calculates to a sample rate of 22500 0 010 seconds Adjusting this value affects the battery life Warmup time Amount of time to wait in 0 010 second increments from powering on the device to the time to send communications to the device The default value is 50 or 50 0 010 seconds Adjusting this value affects the battery life Voltage The de...

Страница 36: ...d the Decagon GS3 Soil Moisture Probe SDI 12 and the Decagon MPS 2 Soil Moisture Probe HSTI HydraScout SDI 12 and the HydraScout HSTI Probe Sentek EnviroSCAN SDI 12 and the Sentek EnviroScan Soil Moisture Probe Sure Cross DXM100 Bx and DXM1000 Bx Wireless Controllers 36 www bannerengineering com Tel 1 888 373 6767 ...

Страница 37: ...lular modem does not turn on and will not turn on until the voltage is above 11 8 V dc A text file CmVMon txt on the internal micro SD card saves the periodic sampling of the incoming voltage If cellular operation stops because of voltage it is logged in this file 6 3 Using the DXM Cellular Modem The DXM cellular modem provides a remote network connectivity solution for the DXM To use the cellular...

Страница 38: ...er Cloud Data Services support center support bannercds com The support center includes video tutorials product documentation technical notes and links to download configuration software Important Only the DXM100 and DXM150 models offer SMS text messaging capabilities directly from the device SMS text messaging can be delivered using the BannerCDS web service from any DXM model 6 4 1 Install the C...

Страница 39: ... card or SIM card carrier You will need the SIM number to associate a wireless plan to this SIM card 2 Orient the cellular modem according to the pin layout and verify the pins are properly aligned Firmly press the modem into the 24 pin socket For the DXM100 DXM150 and DXM1000 models Install the cellular modem board onto the processor board as shown Use the diagram below to verify the orientation ...

Страница 40: ...IM1A Includes a cellular modem SIM card and internal adhesive antenna The SIM card is specific to the CATM1 technology and cannot be used in other cellular modems Requires a LTE AT T cellular wireless plan attached to the ICCID SIM card number and IMEI International Mobile Equipment Identity number Cellular plans can be purchased through secure bannercelldata com Figure 18 Installing the cellular ...

Страница 41: ...ts socket to be read The IMEI is the 15 digit number on top of the 4G LTE device 6 Click Activate Note Although new activations are typically functional in 20 minutes or less it may take up to 24 hours for the cellular plan to become active on the wireless network 6 4 4 Configure the DXM Controller for a Cellular Modem Use the DXM Configuration Software to create a configuration using a cellular c...

Страница 42: ...uires a few minutes after powering up before it can accept SMS messages Initial cellular connection times vary based on the wireless network A SMS message sent to the controller while a push session is active delays any response or the SMS message may be dropped based on the length of the push session Configuring the DXM for SMS Controlling Configure the DXM for SMS messaging capability using the ...

Страница 43: ...ter was set Example Texting sr1 10 sets register 1 to value of 10 sr1 10 send DXM acknowledgment text message Register 1 has been set to 10 Additional information may be available in the DXM Controller API Protocol instruction manual p n 186221 Sure Cross DXM100 Bx and DXM1000 Bx Wireless Controllers www bannerengineering com Tel 1 888 373 6767 43 ...

Страница 44: ...oftware 7 1 Registers The Registers submenu displays the processor s local registers that can be configured using the DXM Configuration Software To configure these local registers launch the DXM Configuration Software Go to Local Registers and expand the view for a local register by clicking on the down arrow next to the register number In the LCD Permissions field select None Read Write or Read W...

Страница 45: ... 1 to change the value to accept ENTER BACK to return to the previous menu Please Wait Site Survey results OR Failed to start Site Survey Binding All ISM radio devices must be bound to the internal Gateway master device before the DXM can access the wireless devices The first submenu under binding allows the user to set the wireless address of the device to bind with This is required to bind with ...

Страница 46: ... The DXM base configuration can include discrete current or voltage outputs The output values will be displayed based on their configuration settings Counters Counters on the DXM base board are associated to inputs but the count value is stored in different register Adjust or view the count registers using the LCD menu Charger The on board solar battery charger of the DXM stores information about ...

Страница 47: ...twork remember that the master MultiHop radio allocates a range of Modbus IDs for wireless devices typically 11 through 110 When setting the new ISM Modbus ID the system changes the Modbus ID on the internal radio and changes the reference to it on the DXM The reference Modbus ID is what the DXM uses to access the internal radio when running Binding or Site Survey Auto Detect Radio If the internal...

Страница 48: ... to change the default condition output type and switched power voltage Table 10 Output parameters Output Type Description Default Force output registers to a default condition if the I O board has not been communicated with for a user defined time period The communications timeout parameter must be set to use the Default condition Type Select the output type NMOS Sinking Switch Power Swch Pwr Ana...

Страница 49: ... on the network For step by step directions see Using the DXM Cellular Modem on p 37 7 5 5 DXM Modbus ID Use the secondary Modbus RS 485 port when the DXM is connected to a Modbus RTU network as a Modbus slave device Set the Modbus ID for the secondary RS 485 port using the LCD display menu System Config DXM Modbus ID 7 5 6 LCD Contrast Use the LCD Contrast option to adjust the LCD contrast Adjust...

Страница 50: ...net Gate Mac DNS1 DNS2 Cell Signal Phn Dev SIM CellVer CellMdl CellFw CellMask Wifi IP Mode AP Stat Script Path Baud Code LCD Board Serial Model Date RF FW Pt RF FW Ver RF EE Pt RF EE Ver Cell Shows the cellular MEID number Mobil Equipment Identifier MDN Mobil Device Number version signal firewall setting and firewall mask Some of these parameters are not visible until the cellular network is acce...

Страница 51: ...ic file running Wifi Displays the Wifi IP address and other settings 7 7 Display Lock Display Lock protects the DXM LCD menu system from being used until the proper pass code is entered Figure 27 Display Lock menu Display Lock Enter password x to change the value to accept ENTER BACK to return to the previous menu The display lock feature uses the configuration software to set a passcode within th...

Страница 52: ...e All tools can be connected to the DXM using a USB cable or an Ethernet connection 8 2 Save and Upload the Configuration File After making any changes to the configuration you must save the configuration files to your computer then upload it to the device Changes to the XML file are not automatically saved Save your configuration file before exiting the tool and before sending the XML file to the...

Страница 53: ...n the Local Registers Action rules can apply many different functions to the Local Register data including conditional statements math operations copy operations or trending 4 To perform scheduled events in Local Registers go to the Scheduler screen in the DXM Configuration Software These rules provide the ability to create register events by days of the week The scheduler can also create events b...

Страница 54: ...ayed 3 Name your new rule 4 Enter the local register 5 Select the days of the week this rule applies to 6 Enter the starting value for the local register 7 Use the drop down list to select the type of Start at time a specific time or a relative time 8 Enter the starting time 9 Enter the end time and end value for the local register Register updates can be changed up to two times per day for each r...

Страница 55: ...r Authentication DXM Configuration Authentication The webserver and mail server authentication depends upon the service provider 8 5 1 Set the Controller to use Authentication The DXM can be configured to send login and password credentials for every HTTP packet sent to the webserver This provides another layer of security for the webserver data Configuration requires both the webserver and the DX...

Страница 56: ...ation validation 3 Enter the same username and password as used in the DXM Configuration Software The username and password do not need to be a defined user within the Banner Cloud Data Services website 8 5 3 Mail Server Authentication Complete the mail server settings to have the DXM send email alert messages or to email the log files The SMTP password is stored in the DXM not the XML configurati...

Страница 57: ...ata from the Gateway and the first 16 Nodes with an EtherNet IP 5 host To expand the number devices going to Ethernet IP change the Devices in system parameter in the DX80 Gateway default setting is 8 to 32 To change this value 1 Launch the the DX80 Configuration Software 2 In the menu bar go to Device Connection Settings and select Serial or Ethernet DXM 3 In the Configuration Device Configuratio...

Страница 58: ... Originator is collected in numerical order and placed into the data buffer destined for assembly instance 100 DXM local registers are capable of 32 bits but only the lower 2 bytes for each local register are transferred For example if DXM registers 1 10 20 and 21 are defined as EIP DXM Originator registers the assembly instance 100 will have the first eight bytes of data coming from the DXM local...

Страница 59: ...L file are not automatically saved Save your configuration file before exiting the tool and before sending the XML file to the device to avoid losing data If you select DXM Send XML Configuration to DXM before saving the configuration file the software will prompt you to choose between saving the file or continuing without saving the file 1 Save the XML configuration file to your hard drive by goi...

Страница 60: ...r screen to define parameters 4 Set the email and message parameters on the Notifications screen 5 To send alert messages define the threshold rule to use email and or SMS 6 To send log files define the log file parameters 8 7 1 Define the Network Interface Settings On the Cloud Services screen shown with Show advanced settings selected define the network connection settings by selecting Ethernet ...

Страница 61: ...nition login and password for a mail server Important Only the DXM100 and DXM150 models offer SMS text messaging capabilities To send email you must supply the SMTP Server Server Port and login credentials When you are only sending SMS messages over cellular the SMTP Server is not required The default SMTP port is 25 but may need to be adjusted for Ethernet based networks Note that many facilities...

Страница 62: ...Action Rules Thresholds Depending upon which recipients are defined select the appropriate email or SMS checkbox for the threshold rule under Email SMS on state transition When the threshold rules goes active or inactive an email is generated For more information on how to set up threshold rules refer to the DXM Configuration Software Instruction Manual p n 209933 8 7 6 Define Log File Parameters ...

Страница 63: ... DXM attempts to send the saved packet as well as the newly created register data packet If it cannot send the new register data packet the new register data packet is appended to the saved file on the micro SD card to be sent later After 10 rounds of retries the data set is archived on the micro SD card under folder _sxi No additional attempts to resend the data are made the data file must be man...

Страница 64: ...nd Text Message Push Retries There are no retries for emails or SMS messages that fail to be sent from the DXM Sure Cross DXM100 Bx and DXM1000 Bx Wireless Controllers 64 www bannerengineering com Tel 1 888 373 6767 ...

Страница 65: ...internal devices in the DXM Table 14 DXM Internal Modbus Slave IDs factory default Modbus Slave ID Device 1 DX80 Performance Gateway or MultiHop ISM Radio MultiHop wireless devices connected to the internal MultiHop radio should be assigned Modbus Slave addresses starting at 11 199 Local Registers Internal storage registers of the DXM 200 I O Base Board All data and parameters for each input or ou...

Страница 66: ...DXM these slave addresses are available to use for directly connected devices 61 198 Available to user for direct connected Modbus slave devices or the expansion of the wireless network slave IDs to go past 50 wireless devices 199 Allocated for internal Local Register 200 Allocated for the I O base board will be different for special DXM slave only models 201 Allocated for the LCD display board th...

Страница 67: ...d to the network the timeout should be set to 25 seconds For each additional MultiHop repeater device creating another level of network hierarchy add an additional two seconds to the timeout period Calculating the Communication Timeout for 10 30 VDC MultiHop Radios Line powered 10 30 V dc MultiHop devices operate at the maximum communication rate resulting in a much lower timeout parameter setting...

Страница 68: ...s in a MultiHop network are contained within each individual radio device To obtain Modbus register data from a MultiHop device configure the DXM to access each device across the wireless network as an individual Modbus slave device Table 17 Example MultiHop Modbus registers with generic devices MulitHop Device Slave ID Modbus Registers DXM Master radio 1 none Slave radio 11 Modbus register 1 16 a...

Страница 69: ...e Sure Cross DX80 Alternative Modbus Register Organization registers are used for reordering data registers to allow host systems to efficiently access all inputs or outputs using a single Modbus command The register groups include the input output registers bit packed registers and analog registers This feature is only available with the Performance models using version 3 or newer of the LCD firm...

Страница 70: ... 4 3 2 1 0 6601 Node 15 Node 14 Node 13 Node 12 Node 11 Node 10 Node 9 Node 8 Node 7 Node 6 Node 5 Node 4 Node 3 Node 2 Node 1 Gateway 6602 Node 31 Node 30 Node 29 Node 28 Node 27 Node 26 Node 25 Node 24 Node 23 Node 22 Node 21 Node 20 Node 19 Node 18 Node 17 Node 16 6603 Node 47 Node 46 Node 45 Node 44 Node 43 Node 42 Node 41 Node 40 Node 39 Node 38 Node 37 Node 36 Node 35 Node 34 Node 33 Node 32...

Страница 71: ... using the discrete format Analog 16 Bit Registers Registers 6801 through 9098 The most efficient way to read or write analog data from a Gateway is by using these 16 bit analog registers Most networks consist of similar Nodes reporting data using the same I O registers for each Node For this reason the analog data is arranged by I O point using Modbus registers 6801 through 9098 For example Input...

Страница 72: ... device or a Modbus slave device exchanges data using the Local Registers Modbus over Ethernet Modbus TCP uses the Local Registers as the accessible register data Local Registers 851 900 Data Flash Non volatile 32 bit Unsigned The top 50 Local Registers are special non volatile registers The registers can store constants or calibration type data that must be maintained when power is turned off Thi...

Страница 73: ...037 10038 Http Push Last Status Last DXM push status 0 Initial state no push attempt as finished yet 1 Attempt complete 2 Attempt aborted 10039 10040 Cellular Strength BER Cellular signal strength Value range 0 31 0 113 dBm or less 1 111 dBm 2 30 109 dBm through 53 dBm in 2 dBm steps 31 51 dBm or greater 99 not known or not detectable BER not used 10055 10056 Alarms smtp attempts Email attempts 10...

Страница 74: ... registers updated from Modbus transactions are restricted to a16 bit data value to follow standard Modbus holding register definition The local registers defined in action rules must all be within the same register group For example an action rule cannot have inputs from an integer group with the result register defined as a floating point register To move between integers and floats use the Regi...

Страница 75: ... bit pieces to accommodate the Modbus protocol Use these registers when reading writing external devices that require Modbus registers in floating point format Since Modbus transactions are 16 bits the protocol requires two registers to form a 32 bit floating point number Virtual registers The DXM has a small pool of virtual registers that show internal variables of the main processor Some registe...

Страница 76: ...0106 Number of write map timeouts 10107 Number of write map errors 10108 Write map success streak 10109 Number of passthrough successes API message passing statistics 10110 Number of passthrough timeouts 10111 Number of passthrough errors 10112 Passthrough success streak 10113 Number of 43 buffer successes DX80 Gateway automatic messaging buffer statistics 10114 Number of 43 buffer timeouts 10115 ...

Страница 77: ...ule 1 broadcasts 2x039 Reserved Reset Codes The reset codes are in virtual register 11015 and define the condition of the last restart operation Table 30 Reset codes Reset Code Definition 0 Undefined 1 Unknown 2 General 3 Brownout 4 Watchdog 5 User 6 Software 7 Return from backup mode 9 2 6 Modbus I O Registers for the B1 I O Base Board The I O base board stores the input and output values in Modb...

Страница 78: ...r 2 5 V or 16 V 507 0 20000 Analog Output 1 default 0 20 000 mA 0 10000 Analog Output 1 0 10 000 V 508 0 20000 Analog Output 2 default 0 20 000 mA 0 10000 Analog Output 2 0 10 000 V 9 2 7 Modbus I O Registers for the B2 I O Base Board The I O base board stores the input and output values in Modbus holding registers Since the I O base board is defined as a separate device configure the DXM to read ...

Страница 79: ...uts 1 2 3 4 Enable Full Scale Registers 3303 3323 3343 3363 Temperature C F Registers 3304 3324 3344 3364 Input Type Registers 3306 3326 3346 3366 Threshold Registers 3308 3328 3348 3368 Hysteresis Registers 3309 3329 3349 3369 Enable Rising Registers 4908 4928 4948 4968 Enable Falling Registers 4909 4929 4949 4969 High Register for Counter Registers 4910 4930 4950 4970 Low Register for Counter Re...

Страница 80: ...ot communicated with the DXM baseboard for the period of time defined by the Communication Default IO Timeout 2953 Communication Default I O Timeout 100 ms Count This parameter defines the host timeout period in 100 millisecond increments If a host does not communicate within this timeout period the device outputs are set to the default values 2954 Enable Default on Power Up Setting this parameter...

Страница 81: ...s required to be before the input is considered OFF A typical hysteresis value is 10 to 20 of the unit s range In the example shown the input is considered on at 15 mA To consider the input off at 13 mA set the hysteresis to 2 mA The input will be considered off when the value is 2 mA less than the threshold Threshold ON point Time Input Value Input Hysteresis OFF point Input Type Program the univ...

Страница 82: ...rated temperature inputs define one of the universal inputs as a temperature input 9 2 12 Modbus Registers for the LCD Board Modbus Slave ID 201 Control the four user defined LEDs using the display board s Modbus registers Using write maps or ScriptBasic write the Modbus registers shown below with 0 off or 1 on The LCD display is Modbus Slave 201 Modbus Register I O Connection Modbus Register I O ...

Страница 83: ...tage can be selected and is controlled using a Modbus register on the I O board Modbus slave ID 200 The voltage options are 5 volts or 16 volts for DXM100 B1 models or 5 to 24 V dc for DXM100 B2 models Turn the switched power on or off using the output register 505 for switch power 1 or 506 for switch power 2 For continuous power set the Default Output register to 1 then cycle the power Switch Pow...

Страница 84: ... is 5 V for DXM100 B1 models and set to the lower voltage setting for DXM100 B2 models Switched Power Enable Enables the switched power supply Set to 1 to enable set to 0 to disable This does not enable the supply output to the actual output pin To enable the supply output to the output pin set Modbus register 505 or 506 to 1 Set to 0 when associating the switched power supply to an input Voltage ...

Страница 85: ...of 1000 represents a sample interval of 10 seconds 1000 0 010 seconds 10 seconds Switch Power Enable Mask The Switch Power Enable Mask works with the warm up and voltage parameters to define the switch power output The bit mask can select any number of switch powers 0x0 No switch power enabled 0x1 Enable Switch Power 1 0x2 Enable Switch Power 2 0x3 Enable Switch Power 1 and Switch Power 2 Switch P...

Страница 86: ...ed to use a 12 V sealed lead acid SLA battery The characteristics of a solar system require the battery to be of a certain type There are two types of lead acid batteries SLI batteries Starting Lights Ignition designed for quick bursts of energy like starting engines Deep Cycle batteries greater long term energy delivery This is the best choice for a solar battery Since a solar system charges and ...

Страница 87: ... tilt from horizontal is at an angle equal to the latitude of the site location For optimum performance adjust the tilt by plus 15 degrees in the winter or minus 15 degrees in the summer For a fixed panel with a consistent power requirement throughout the year adjust the tilt angle to optimize for the winter months latitude plus 15 degrees Although in the summer months the angle may not be the mos...

Страница 88: ...ntroller will no longer function 1 Turn the power OFF to the DXM Controller 2 Set DIP switch 4 to the ON position 3 Press and hold the processor button 4 Turn the power ON to the DXM Controller The processor board s LED flashes to indicate the process is complete about 10 20 seconds 5 Set DIP switch 4 to the OFF position 6 Cycle power to the DXM Controller 7 Reload the configuration file before re...

Страница 89: ...the processor button until processor board LED flashes 4 Set DIP switch 4 to the OFF position 5 Cycle power to the DXM Controller 6 Reload the configuration file before resuming normal operation Sure Cross DXM100 Bx and DXM1000 Bx Wireless Controllers www bannerengineering com Tel 1 888 373 6767 89 ...

Страница 90: ...troller see Save and Upload the Configuration File on p 17 After PROFINET is enabled the IP address for the DXM Controller is controlled by the PROFINET host The LCD display and DXM Configuration Software no longer control the setting of the IP address The PROFINET IP address settings are invisible to the LCD display and the DXM Configuration Software The PROFINET data type and data size to from t...

Страница 91: ... 64 128 256 and 512 bytes Input Integers are data from the DXM to the PLC Output integers are data from the PLC to the DXM Table 37 Slots 1 through 3 Module Notes Input Integer 512 Allowed in slots 1 3 Module Identifier 0x30 Input Integer 256 Allowed in slots 1 3 Module Identifier 0x31 Input Integer 128 Allowed in slots 1 3 Module Identifier 0x32 Input Integer 64 Allowed in slots 1 3 Module Identi...

Страница 92: ...g from Local Registers 1001 1064 Slot 7 Output Integer 64 The output integer 64 module has a total of 64 bytes 32 Modbus registers The data will come from the PLC and be put into DXM Local Registers 5001 through 5032 10 5 Configuration Instructions 10 5 1 Install the GSD File Although these instructions are specific for the Siemens TIA Portal v14 software you may use these instructions as a basis ...

Страница 93: ...e was downloaded to 9 Select the DXM GSD file 10 Click Install Figure 53 Hardware catalog The system installs the DXM GSD file and places it in the Hardware catalog In the example the DXM GSD file is located under Other field devices PROFINET IO Banner Engineering Corp Banner If the DXM GSD file does not install properly save the log and contact Banner Engineering Corp Sure Cross DXM100 Bx and DXM...

Страница 94: ...The Network view displays 5 Double click on the DXM icon to open the Device view screen 6 Click on the DXM icon in the graphic area of the Device view screen The Module properties window displays and the module can now be configured 7 Click Properties 8 Click General 9 Select PROFINET Interface Ethernet addresses Figure 55 Ethernet addresses 10 Select Set IP address in the project 11 Enter the IP ...

Страница 95: ...ion in Siemens TIA Portal the DXM receives the specified address but only after the program has been loaded into the PLC and is running If the DXM is restarted after it was discovered and configured by the PLC the DXM retains the IP address that was assigned to it using the LCD or software until after the PLC discovers the DXM and assigns it the specified address again However if this address is d...

Страница 96: ...he PROFINET device name field Note that each name can be used only once 4 Click Assign name The device now has a PROFINET name Sure Cross DXM100 Bx and DXM1000 Bx Wireless Controllers 96 www bannerengineering com Tel 1 888 373 6767 ...

Страница 97: ...measurements are listed in millimeters unless noted otherwise 86 mm 3 39 94 6 mm 3 72 104 mm 4 09 59 5 mm 2 34 20 4 mm 0 8 35 mm 1 38 Sure Cross DXM100 Bx and DXM1000 Bx Wireless Controllers www bannerengineering com Tel 1 888 373 6767 97 ...

Страница 98: ... 5 dBi RP SMA Male Connector BWA 2O5 C Antenna Rubber Swivel 2 4 GHz 5 dBi RP SMA Male Connector Long Range Omni Antennas BWA 9O8 AS Antenna Fiberglass 3 4 Wave 900 MHz 8 dBi N Type Female Connector BWA 2O8 A Antenna Fiberglass 2 4 GHz 8 dBi N Type Female Connector Long Range Yagi Antennas BWA 9Y10 A Antenna 900 MHz 10 dBd N Type Female Connector Cellular Antenna BWA CELLA 002 Cellular multiband 2...

Страница 99: ...he Logging Interval specified by the user At the Push Interval time the HTTP log file is sent to the webserver or host system If the transmission is successful the HTTP log file is time stamped and placed into the archive directory _sxi If the transmission fails the file remains in the root directory and subsequent Logging Intervals are appended to the file and are sent at the next Push Interval S...

Страница 100: ...0 1 second 4152 0 1 0 Reboots cycles power to the I O base board 1 Restores factory defaults for I O parameters 13 2 2 Updating the DXM Processor Firmware There are two different update procedures depending on the DXM firmware version of your device Update Your DXM Processor Firmware Prior to Version 2 0 To update DXM Processor firmware prior to version 2 0 use the SAM BA program from MicroChip At...

Страница 101: ... correct device 5 On the SCRIPTS pull down m enu select ENABLE FLASH ACCESS Click EXECUTE Figure 59 SAM BA popup window 6 In the SCRIPTS pull down menu select BOOT FROM FLASH GPNVM1 Click EXECUTE Click EXECUTE again if the message indicates it failed 7 In the Flash tab click on the folder icon for the Send File Name field Select the boot load file must be a bin file and click SEND FILE The file is...

Страница 102: ...ond LED3 continues to blink during the application programming process Finished After programming has completed the DXM resets and begins running the new firmware The firmware file names follow an 8 3 filename convention The first 5 characters are the firmware part number in hexadecimal the last 3 characters of the part number are the major minor version number For example if 30FA9052 hex is the f...

Страница 103: ...e version 2 0 or later using SD card follow these instructions The firmware file can manually be put on the SD card in the BOOT directory must have version 2 0 or later on the DXM 1 Disconnect the DXM from its power supply 2 Remove the micro SD card from the DXM a Open the cover housing to the DXM b Use your fingernail to slide the top metal portion of SD card holder c The metal cover hinges upwar...

Страница 104: ...is is because all internal devices such as the ISM radio LCD etc of the DXM are also Modbus slaves 13 3 DXM100 Documentation DXM Wireless Controller Sell Sheet p n 194063 DXM100 B1 Wireless Controller Datasheet p n 186724 DXM100 B2 Wireless Controller Datasheet p n 195232 DXM100 Bx Wireless Controller Instruction Manual p n 190037 DXM100 S1 Modbus Slave Datasheet p n 195454 DXM100 S2 Modbus Slave ...

Страница 105: ...actory 13 5 2 Website Information The Banner website is the main method of disseminating DXM information to customers The data found on the website include DXM instruction manuals Configuration manuals Firmware downloads Firmware release notes Errata data any known issues with a release of firmware Possible work around solutions for known issues DXM Solutions Guides 13 5 3 Feature Requests Our cus...

Страница 106: ...rference and 2 this device must accept any interference received including interference that may cause undesired operation Note This equipment has been tested and found to comply with the limits for a Class A digital device pursuant to Part 15 of the FCC Rules These limits are designed to provide reasonable protection against harmful interference in a residential installation This equipment genera...

Страница 107: ...anges or modifications not expressly approved by the manufacturer could void the user s authority to operate the equipment IMPORTANT The transmitter modules DX80 2400 and SX243 have been certified for fixed base station and mobile applications If modules will be used for portable applications the device must undergo SAR testing IMPORTANT If integrated into another product the FCC ID IC label must ...

Страница 108: ...ve Swivel DX80 2400 7 dBi 50 Ω 13 8 Contact Us Banner Engineering Corp headquarters is located at 9714 Tenth Avenue North Minneapolis MN 55441 USA Phone 1 888 373 6767 For worldwide locations and local representatives visit www bannerengineering com 13 9 Warnings Install and properly ground a qualified surge suppressor when installing a remote antenna system Remote antenna configurations installed...

Страница 109: ...e warranty period This warranty does not cover damage or liability for misuse abuse or the improper application or installation of the Banner product THIS LIMITED WARRANTY IS EXCLUSIVE AND IN LIEU OF ALL OTHER WARRANTIES WHETHER EXPRESS OR IMPLIED INCLUDING WITHOUT LIMITATION ANY WARRANTY OF MERCHANTABILITY OR FITNESS FOR A PARTICULAR PURPOSE AND WHETHER ARISING UNDER COURSE OF PERFORMANCE COURSE ...

Страница 110: ... code prevents having to re bind all Nodes if the Gateway is ever replaced binding MultiHop networks Binding MultiHop radios ensures all MultiHop radios within a network communicate only with other radios within the same network The MultiHop radio master automatically generates a unique binding code when the radio master enters binding mode This code is then transmitted to all radios within range ...

Страница 111: ... counter frequency The frequency counter calculates the frequency of the input signal in Hz Frequency counters can be used to measure flow rates such as measuring the flow rate of items on a conveyor or the speed at which a windmill spins courtesy power outputs Courtesy power outputs provide continuous power and cannot be turned on or off cyclic reporting Cyclic reporting is when the Gateway polls...

Страница 112: ...he Node Link Failure flag is set the output points are set to the user defined states and the inputs are frozen Gateway Link Failure Gateway link failures are determined by three global parameters Polling Interval Maximum Missed Message Count and Re link Count When the Node s Gateway Link Failure flag is set and the Gateway determines a timeout condition exists for a Node any outputs linked from t...

Страница 113: ... any discrete output or switch power output FlexPower Banner s FlexPower technology allows for a true wireless solution by allowing the device to operate using either 10 to 30 V DC 3 6 V lithium D cell batteries or solar power This unique power management system can operate a FlexPower Node and an optimized sensing device for up to 5 years on a single lithium D cell free space loss FSL The radio s...

Страница 114: ...nk is active The heartbeat is always initiated by the Node and is used only to verify radio communications Using the Nodes to notify the Gateway that the radio link is active instead of having the Gateway poll the Nodes saves energy and increases battery life I am here hibernation storage mode While in storage mode the radio does not operate To put any integrated battery Sure Cross radio into stor...

Страница 115: ...ith the Gateway and the Node Link Failure flag is selected the output points are set to the user defined states and the inputs are frozen local and non local registers Local registers are registers specific to the device in question When discussing a Gateway the Gateway s local registers include the registers specific to the Gateway in addition to all the Nodes registers that are stored in the Gat...

Страница 116: ...ections out of sync link loss loss of radio signal The Sure Cross wireless devices use a deterministic link time out method to address RF link interruption or failure When a radio link fails all pertinent wired outputs are sent to the selected default value state until the link is recovered ensuring that disruptions in the communications link result in predictable system behavior Following a time ...

Страница 117: ...ture measurement device that measures the electrical resistance across a pure metal The most commonly used metal is platinum because of its temperature range accuracy and stability RTDs are used for higher precision applications or for longer wire runs because RTDs can compensate for wire length In industrial applications RTDs are not generally used at temperatures above 660º C Though RTDs are mor...

Страница 118: ...m When using more than one Modbus slave assign each slave a unique ID number By default Gateways are set to Modbus Slave ID 1 sleep mode During normal operation the Sure Cross radio devices enter sleep mode after 15 minutes of operation The radio continues to function but the LCD goes blank To wake the device press any button slow scan mode All internal battery models In slow scan mode the device ...

Страница 119: ...mation time division multiple access TDMA TDMA is a wireless network communication architecture that provides a given slot of time for each device on the network providing a guaranteed opportunity for each device to transmit to the wireless network master device thermistor A thermistor is a temperature sensitive resistor that changes resistance based on temperature fluctuation thermocouple A therm...

Страница 120: ... network Some examples include point to point bus ring tree mesh and star configurations transceiver A transceiver includes both a transmitter and receiver in one housing and shares circuitry abbreviated as RxTx wireless sensor network WSN A wireless sensor network is a network of low power electronic devices that combine sensing and processing ability The devices use radio waves to communicate to...

Страница 121: ... 52 59 90 upload 17 52 59 90 create holiday event 55 one time event 54 weekly event 54 D DXM configure for cell 41 H holiday event 55 M modify multiple registers 16 O one time event 54 R registers multiple registers 16 S save configuration file 17 52 59 90 scheduler 54 55 U upload configuration file 17 52 59 90 W webserver authentication 55 56 weekly event 54 ...

Отзывы: