background image

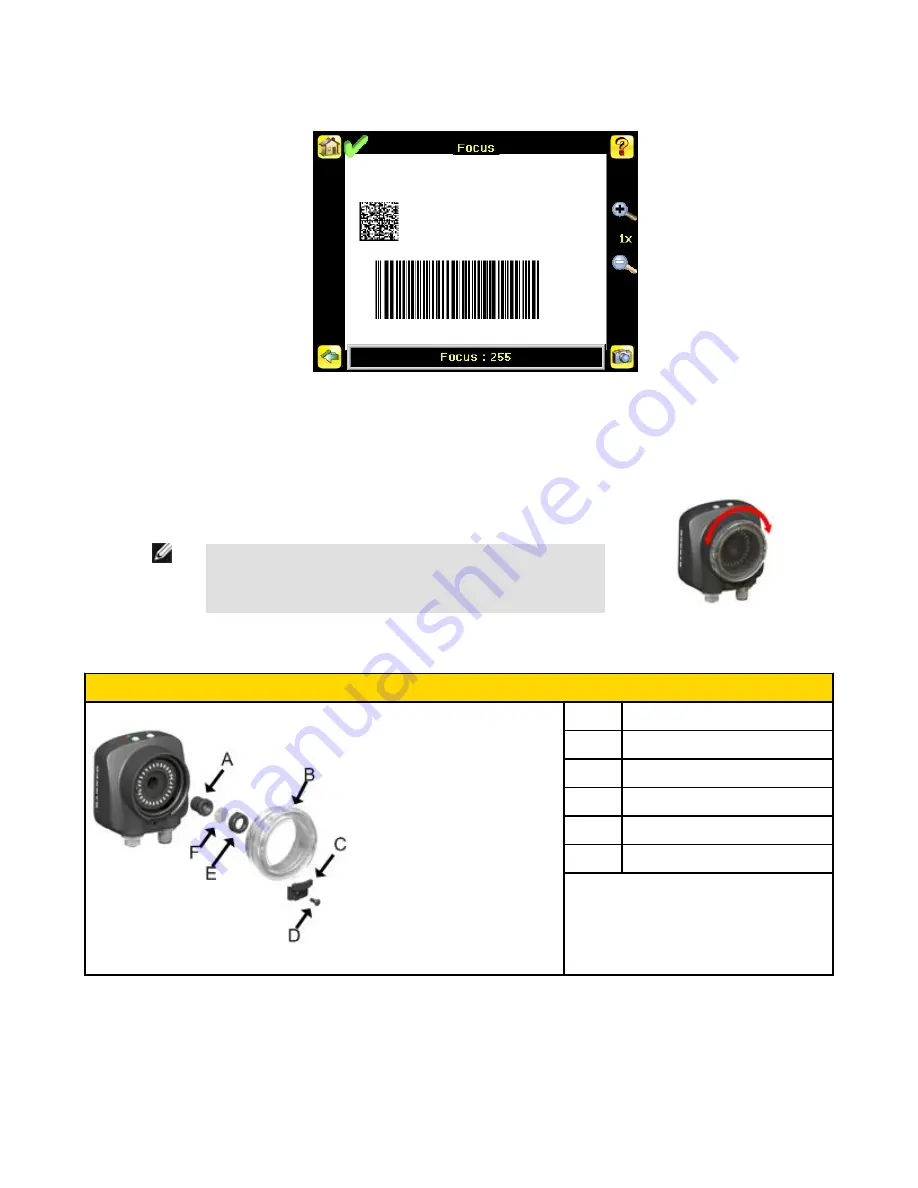
4. Go to Main Menu Imager > Focus to adjust the focus while monitoring the Focus Number:


For Micro-lens Models Only:

1. Use the supplied 1/16" hex key to loosen the Focusing Window locking screw (D), then adjust focus on the iVu Series sensor using

the clear Focusing Window (B).

2. Adjust focus while monitoring the focus number. To ensure the best image, adjust the focus until

the Focus Number peaks.

NOTE: Turning the Focusing Window counter-clockwise focuses on
closer objects, while turning the Focusing Window clockwise focuses
on more distant objects.


3. Once the best image has been acquired, lock the focusing window.

Micro-Lens Models


A

Lens

B

Focusing Window

C

Locking Clip

D

Locking Screw

E

Filter Cap (optional)

F

Filter (optional)

NOTE: Filter Kits are available separately.


iVu Plus BCR Quick Start Guide

10

www.bannerengineering.com - tel: 763-544-3164

154722

Содержание iVu Plus BCR

Страница 1: ...iVu Plus BCR Quick Start Guide 154722 9 7 2012 Rev D...

Страница 2: ...ng a Good Image 9 Setting Up a Barcode Application 12 Compare Data 13 Compare Data 13 Setting up for Data Compare 13 Trigger Modes 15 External Single Mode 15 Continuous Mode 16 External Gated Mode 16...

Страница 3: ...heet iVu Plus BCR Integrated Datasheet In addition there is integrated Help built into the sensor itself NOTE Before setting up the sensor remove all packaging If using an iVu with an integrated touch...

Страница 4: ...llow the sensor to be mounted either perpendicular to the part or at an adjustable angle Available iVu Brackets SMBIVURAL SMBIVURAR SMBIVUU Thread three M4 x 4mm screws through the bracket into the mo...

Страница 5: ...l shown C Mount model connections are identical iVu Plus BCR with Remote Display The cable connections on the iVu Plus with remote display are shown below and power I O connections B are defined in th...

Страница 6: ...Input 5 Gray Remote Teach Input 1 White Output 1 Output 8 Red Ready Output 4 Yellow Strobe Out 5V dc only Output 3 Green Output 2 Output 9 Orange Output 3 Output 10 Light Blue RS 232 TX Output 11 Bla...

Страница 7: ...Demo Mode the sensor reboots into its normal operating mode with default settings NOTE You may return to Demo Mode any time by going to Main Menu System Sensor Mode and se lecting Demo Live Mode Over...

Страница 8: ...either no good barcode was found or the data did not compare A Match condition occurs when the required number of barcodes are found and the compare is successful A No Match condition occurs when the...

Страница 9: ...it from the background Depending on the target this may mean the integral ring light is not the best choice and other Banner lights should be considered Adjust the mounting angle to provide the clear...

Страница 10: ...ure the best image adjust the focus until the Focus Number peaks NOTE Turning the Focusing Window counter clockwise focuses on closer objects while turning the Focusing Window clockwise focuses on mor...

Страница 11: ...e focus until the Focus Number peaks 3 Replace the Lens Enclosure on the camera C Mount Models D C A B E C A C Mount Lens B Lens Enclosure C Retainer Ring optional D Filter optional E Filter Retainer...

Страница 12: ...ne next to DataMatrix 2 Go to Main Menu Inspection Barcode Barcode Count to select the number of barcodes 1 to 10 to be read at one time Once the sensor has been set up as described Each successfully...

Страница 13: ...ith subsequently read barcodes If the previous input data con tained any masked characters Remote Teach will retain the masked characters only if the new data is of the same length as the previous inp...

Страница 14: ...ome icon to return to the main screen For all subsequent triggers when the sensor reads the barcode data it will compare it against this reference data iVu Plus BCR Quick Start Guide 14 www bannerengi...

Страница 15: ...een display External Single Mode In External Single mode the sensor depends on an external trigger For each trigger the sensor captures an image and executes one scan through the configured barcode ty...

Страница 16: ...different symbol will be read immediately Scan Time Limit Main Menu Inspection Properties Scan Time Limit limits the amount of time the sensor will attempt to scan for barcodes on an image NOTE A No...

Страница 17: ...r specific commands The commands can come from either Serial I O or Ethernet I O Industrial Ethernet Only When Industrial Ethernet communication channel is enabled triggers can be received from the mo...

Страница 18: ...n the transmission of out put data if the sensor does not successfully read a barcode the output will be NO_READ if the sensor is configured for Continuous trigger mode the sensor will only transmit o...

Страница 19: ...ta Export used to export selected inspection data to a remote device Image Export used to export inspection images to a remote device Data export and command channel can be configured for either Ether...

Страница 20: ...1 is crated with Data Matrix and Linear Barcodes enabled Adding a New Inspection To add a new stored inspection 1 Go Main Menu Inspection Stored Inspections and click Add New 2 Select Rename to type a...

Страница 21: ...utton in the top center of the screen that displays the currently running inspection This will display all the stored inspections 2 Select the inspection to start and click the Start Running button th...

Страница 22: ...or ID To change the name or ID of an inspection go to Main Menu Inspection Stored Inspections Set Name ID Select the inspection from the list iVu Plus BCR Quick Start Guide 22 www bannerengineering co...

Отзывы: