background image

If the 

Cloud Permissions

 are set to Read, the web server only views data from the device and cannot write data to

the device. If the permissions are set to Write, the web server only writes to the device and cannot read the data. If
the permissions are set to Read/Write, the web server can read the data from the device and write to the device from
the web.

5. Click 

Modify Registers

 to apply the changes.

Set the IP Address

Follow these instructions to change the DXMR90-4K's IP address.
By default, the DXMR90-4K is set to a static IP address of 192.168.0.1. The IP address can be changed by using the DXM

Configuration Software and updating the XML.

1. Launch the DXM Configuration Software.
2. Go to the 

Settings

 > 

Ethernet

 screen.

3. In the 

IP Address

 section, select 

Static IP

 or 

DHCP

 from the drop-down list.

If 

Static IP

 is selected, enter the 

IP address

Subnet

, and 

Gateway address

 as desired.

If 

DHCP

 is selected, the 

IP address

Subnet

, and 

Gateway address

 are grayed out and not configurable.

Changing the IP Address to 

DHCP

 can make it so the DXM cannot be reached. Before changing this to 

DHCP

,

you MUST have a server that is going to assign an IP Address to the DXMR90-4K.

4. Save your changes to the configuration file (

File

 > 

Save

).

5. Upload the configuration file to your controller (

DXM

 > 

Send Configuration to DXM

).

Save and Upload the Configuration File

After making any changes to the configuration, you must save the configuration files to your computer, then upload it to the

device.
Changes to the XML file are not automatically saved. Save your configuration file before exiting the tool and before sending

the XML file to the device to avoid losing data. If you select 

DXM

 > 

Send XML Configuration to DXM

 before saving the

configuration file, the software will prompt you to choose between saving the file or continuing without saving the file.

1. Save the XML configuration file to your hard drive by going to the 

File

 > 

Save As

 menu.

2. Go to the 

DXM

 > 

Send XML Configuration to DXM

 menu.

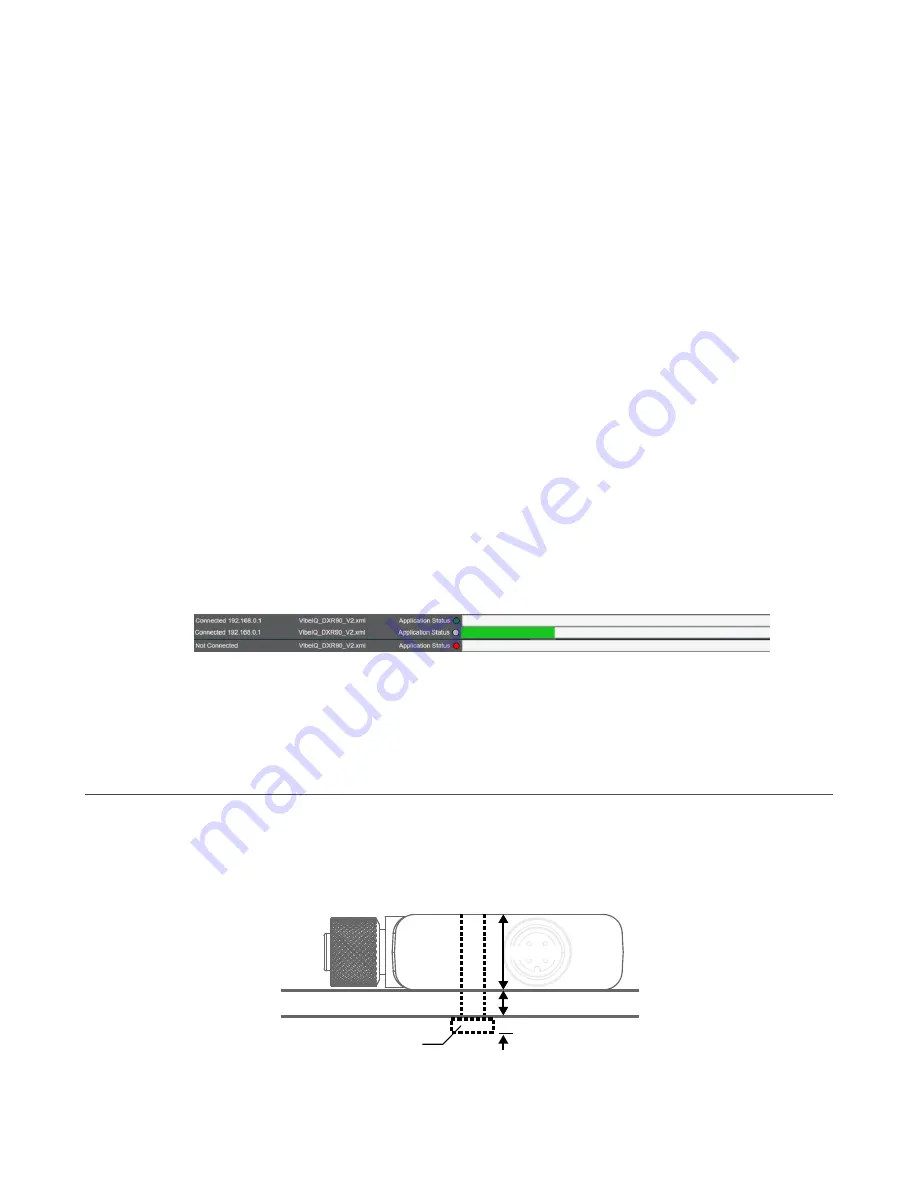
Figure 8. Status indicator bar

If the Application Status indicator is red, close and restart the DXM Configuration Tool, unplug and re-plug in the

cable and reconnect the DXM to the software.

If the Application Status indicator is green, the file upload is complete.

If the Application Status indicator is gray and the green status bar is in motion, the file transfer is in progress.

After the file transfer is complete, the device reboots and begins running the new configuration.

3.3 Mechanical Installation

Install the DXMR90-4K to allow access for functional checks, maintenance, and service or replacement.
All mounting hardware is supplied by the user. Fasteners must be of sufficient strength to guard against breakage. Use of

permanent fasteners or locking hardware is recommended to prevent the loosening or displacement of the device. The

mounting hole (4.5 mm) in the DXMR90-4K accepts M4 (#8) hardware. See the figure below to help in determining the

minimum screw length.
 

NUT

3 mm *

for minimum 
engagement of 
three threads

Screw Length = 16.0 mm + “X” mm + 3 mm

X

 *

16.0 mm

DXMR90-4K IO-Link Master


12

www.bannerengineering.com - Tel: + 1 888 373 6767


Содержание DXMR90-4K

Страница 1: ...DXMR90 4K IO Link Master Instruction Manual Original Instructions 229492 Rev A 9 September 2022 Banner Engineering Corp All rights reserved 229492...

Страница 2: ...to use Authentication 21 5 1 1 Set the Web Services to Use Authentication 21 5 1 2 Controller Configuration Authentication 22 5 2 Register Flow and Configuration 22 5 2 1 Basic Approach to Configurat...

Страница 3: ...n properties and other details The IODD files for Banner IO link devices can be downloaded for free on www bannerengineering com 1 1 IO Link Systems At least one IO Link master and one IO Link device...

Страница 4: ...t The IO Link port functions as a standard digital output 4 DO_C Q 1 3 Combining IO Link Devices with Different Specifications Any combination of masters and devices is possible However if IO Link dev...

Страница 5: ...signals using pin 2 or pin 4 of the IO link master ports The configurable IO link master works with IO link devices and allows for quick deployment of IO link data to Ethernet IP and Modbus TCP and Mo...

Страница 6: ...es for external devices on the network Wired Connectivity Ethernet Modbus TCP client server or Ethernet IP User Interface API Interface Host Initiated control and Web service integration 2 1 Models Mo...

Страница 7: ...concurrently with Modbus TCP By default the DXMR90 4K is configured as a Modbus TCP IP Server 2 3 Dimensions All measurements are listed in millimeters unless noted otherwise Figure 2 DXMR90 4K dimens...

Страница 8: ...Link Master Ports 1 4 female Table 1 Ports 1 4 female connector Port 1 4 5 pin M12 Connector female Pin Wire Color Description 2 3 4 1 5 1 Brown bn 18 V DC to 30 V DC 2 White wh I Q digital in out 3...

Страница 9: ...Config File The configuration software creates an XML file that is transferred to the DXM using an Ethernet connection The DXM can also receive the XML configuration file from a Web server using an E...

Страница 10: ...with the selected model you will be prompted to either proceed and wipe out the active configuration or cancel the model change and preserve the configuration Figure 5 Opening splash screen for Tradi...

Страница 11: ...ify a range of registers from the Local Registers Local Registers in Use Modify Multiple Registers screen Select which parameter fields to modify Most parameters have three selections Unchanged no cha...

Страница 12: ...load it to the device Changes to the XML file are not automatically saved Save your configuration file before exiting the tool and before sending the XML file to the device to avoid losing data If you...

Страница 13: ...ON Do not overtighten the DXMR90 4K s mounting screw during installation Overtightening can affect the performance of the DXMR90 4K DXMR90 4K IO Link Master www bannerengineering com Tel 1 888 373 676...

Страница 14: ...IO Link port The DXMR90 4K IO Link Master has 4 Class A ports Pin 2 on these is an additional discrete IO channel For specific pinout connections see Wiring on page 8 For more information on the devi...

Страница 15: ...maintained when power is turned off This register data is stored in a data flash component that has a limited write capability of 100 000 cycles so these registers should not be used as common memory...

Страница 16: ...ber of passthrough errors 22112 Passthrough success streak 23000 Read map success count Read Write maps statistics 24000 Write map success count 25000 Read map timeout count 25000 Write map timeout co...

Страница 17: ...he DXMR90 4K has four IO link ports for connecting IO Link devices and digital sensors lights and actuators All ports use a 4 pin M12 female connector to connect to remote devices No additional wiring...

Страница 18: ...t The IO Link port functions as a standard digital input 3 DI_C Q Digital Output The IO Link port functions as a standard digital output 4 DO_C Q For more information on the port settings of the DXMR9...

Страница 19: ...Software Instruction manual can also be downloaded directly on the product page for the DXMR90 4K 4 5 Connecting to Remote Modbus Devices In addition to the 4 IO link ports the DXMR90 4K has one Modbu...

Страница 20: ...nd slave settings include None default odd even space and mark Timeout applies to the Modbus master port and covers the expected time for messages to be sent throughout the wireless network For the DX...

Страница 21: ...a pop up box appears with additional instructions Since the data is not stored in the XML configuration file it is hidden from view of the DXM Configuration Software 4 Click on Send Authentication Th...

Страница 22: ...egisters I O Base 5 2 1 Basic Approach to Configuration When programming an application in the DXMR90 4K first plan the overall data structure of the Local Registers The Local Registers are the main s...

Страница 23: ...Cs p n b_4205242 DXM EIP Config File for DXM Controller with Internal Gateway Models DXM1xx BxR1 DXM1xx BxR3 and DXM1xx BxCxR1 p n 194730 5 3 1 Configuring the Host PLC On the host PLC install the DXM...

Страница 24: ...Data AOI when working in conjunction with the IO Link Master AOI is to provide quasi realtime read write access to all IO Link parameter data in the sensor Each Parameter Data AOI is specific to a gi...

Страница 25: ...12 ft MQDEC 420RS 6 10 m 20 ft MQDEC 430RS 9 14 m 30 2 ft MQDEC 450RS 15 2 m 49 9 ft MQDEC 403RR 0 9 m 2 9 ft Male Right Angle Female Right Angle 32 Typ 1 26 30 Typ 1 18 14 5 0 57 M12 x 1 31 Typ 32 Ty...

Страница 26: ...A 24 V DC Class 2 4 pin M12 Euro style quick disconnect QD PSDINP 24 06 DC power supply 0 63 Amps 24 V DC with DIN Rail Mount Class I Division 2 Groups A B C D Rated PSDINP 24 13 DC power supply 1 3 A...

Страница 27: ...Use Only IP65 IP67 NEMA 1 UL Type 1 Operating Conditions 40 C to 70 C 40 F to 158 F 90 at 70 C maximum relative humidity non condensing Storage Temperature 40 C to 80 C 40 F to 176 F Vibration and Mec...

Страница 28: ...ces local serial ports local I O ports and local ISM radio devices to the Internet using either a cellular connection or a wired Ethernet network connection In a continuing effort to provide the best...

Страница 29: ...n the destination country The Sure Cross wireless products were certified for use in these countries using the antenna that ships with the product When using other antennas verify you are not exceedin...

Страница 30: ...WHETHER ARISING UNDER COURSE OF PERFORMANCE COURSE OF DEALING OR TRADE USAGE This Warranty is exclusive and limited to repair or at the discretion of Banner Engineering Corp replacement IN NO EVENT SH...

Страница 31: ...ntication 21 22 C configuration file save 12 upload 12 M modify multiple registers 11 R registers multiple registers 11 S save configuration file 12 U upload configuration file 12 W webserver authenti...

Отзывы: