background image

14

*NOTE! Do not choose the VCR as your Picture-

in-Picture source if a recording is being executed

on your VCR, as Picture-in-Picture may disrupt

your recording. BeoSystem 1 will attempt to

avoid the situation by making it impossible to

activate the Picture-in-Picture function.

While e.g. TV is on…

To move the inserted picture…

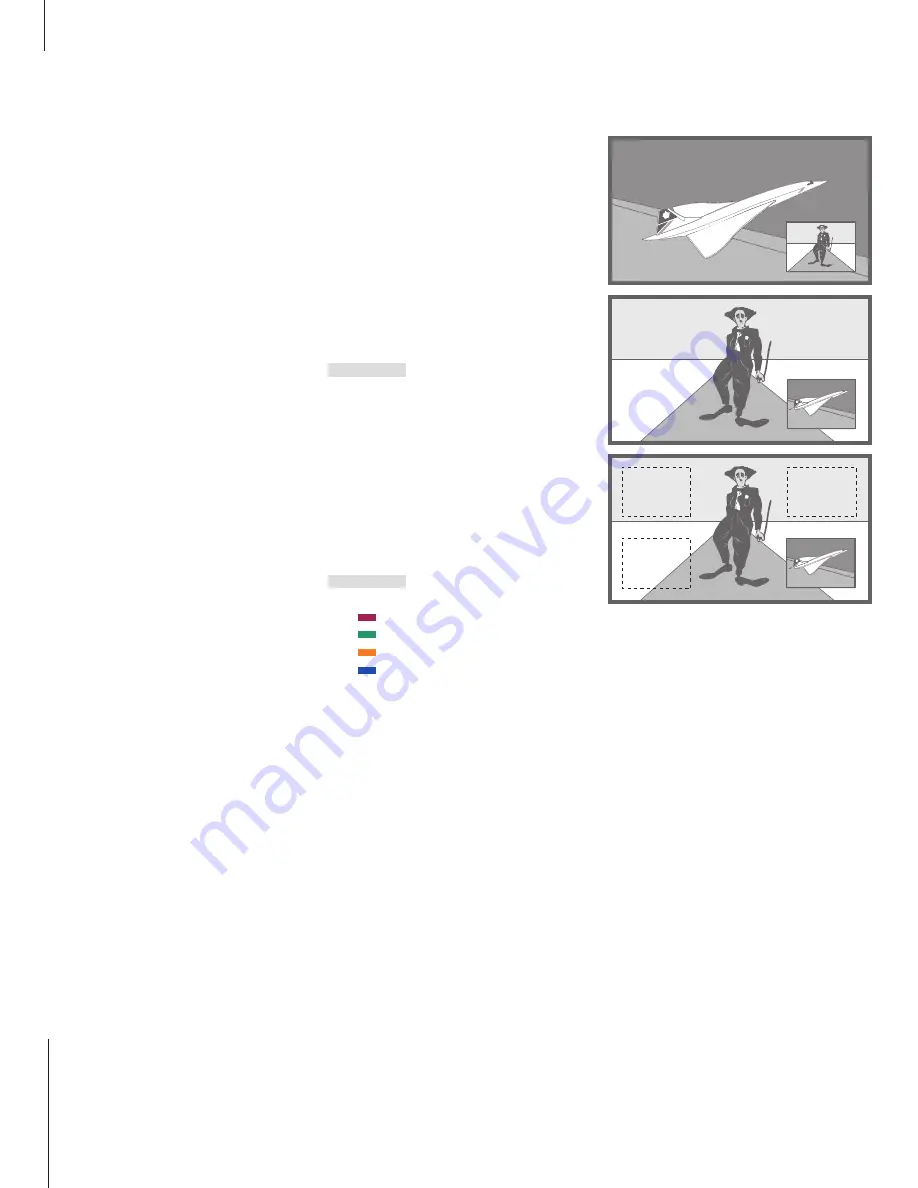
The Picture-in-Picture function allows

you to watch two sources at the same

time. One source, e.g. a TV channel,

is shown in full size, and a second

source is shown in a small window on

the screen. You can insert e.g. VCR or

DVD playback in the small window.

When you activate the Picture-in-

Picture function, a small window is

superimposed on the screen. You can

move this window around on the

screen, from one corner to another, or

swap the source in the small window

with the source shown in full size.

When the Picture-in-Picture function is

activated, the sound always follows

the source shown in full size, but

buttons pressed on your Beo4 remote

control affect the picture in the small

window.

See two sources simultaneously

Picture-in-Picture

When Picture-in-Picture is switched on and a

TV or Satellite source is shown in the small

window on the screen, you can change

channels for that source. If VCR is selected in

the window, then you can play, cue or wind

the cassette.

Press LIST repeatedly until P-IN-P

appears in the Beo4 display

Select which source to display in

the small window*

Operate this source with Beo4 as

usual

Press to swap the sources

Press LIST repeatedly until P-IN-P

appears in the Beo4 display

Use the coloured buttons to

move the picture to one of the

corners of the screen

To exit the P-IN-P function, press

the source button that

corresponds to the source shown

in the main picture

LIST

P-IN-P

SAT

V TAPE

DVD

0

LIST

P-IN-P

TV

Содержание BeoSystem 1

Страница 1: ...Guide BeoSystem 1...

Страница 2: ...etup before connecting any appliance to the AC outlet Note Your BeoSystem 1 operates on a normal house hold current 120 volts 60Hz and has a polarised plug Because one blade of the plug is wider than...

Страница 3: ...4 gives you immediate access to all the entertainment sources in your home TV and Satellite programmes a DVD or CD player a VCR an audio cassette player or radio all with one touch of a button BeoSyst...

Страница 4: ...programmes from the VCR 12 Record lock a source Using a DVD player via Beo4 13 Switching on and using a DVD player 13 Selected DVD functions See two sources simultaneously 14 Picture in Picture Using...

Страница 5: ...ster additional equipment Adjust the picture format 39 Choose 4 3 wide screen 16 9 or letterbox format Adjust sound and picture settings 40 Adjust volume or mute the sound 40 Store sound adjustments 4...

Страница 6: ...Press to return to a previous on screen menu Adjust volume press the middle to mute the sound TV LIGHT RADIO SAT DVD CD V TAPE RECORD A TAPE 7 8 9 4 5 6 TEXT 0 MENU 1 2 3 LIST EXIT STOP GO Switch on r...

Страница 7: ...own above will give you either a list of options to choose from or a list of settings to fill in TV SETUP 1 SOUND 2 PICTURE 3 CLOSED CAPTIONING 4 PARENTAL CONTROL 5 RECORD LOCK 6 EXTERNAL SOURCES 7 FI...

Страница 8: ...Step through available TV channels one by one Switch on Satellite channels if these are available in your setup Use the number keys to select a specific channel This applies to both TV and Satellite...

Страница 9: ...LIST SERVICES 1 2 3 4 5 6 7 The menu overlay above is from a digital Satellite receiver and shows the functions and services available With the overlay on the screen you can use your Beo4 remote contr...

Страница 10: ...sing a VCR You can switch on your VCR start and stop playback and search through a tape via a direct button on Beo4 Press to switch on your VCR directly and start playback Rewind or fast forward throu...

Страница 11: ...hed on To ensure a successful recording you must make sure that the VCR is set to the correct input If you attempt to switch to another TV source while recording then the RECORD indication appears on...

Страница 12: ...etween BeoSystem 1 and your VCR when you preset a timed recording via a Satellite receiver a set top box or equipment connected to the V AUX sockets on BeoSystem 1 Via the RECORD LOCK menu you can loc...

Страница 13: ...to DVD functions Press to switch on your DVD player and start playback Call up the menu overlay Press a coloured button on Beo4 to activate a specific function shown in the menu overlay Use the numbe...

Страница 14: ...with the source shown in full size When the Picture in Picture function is activated the sound always follows the source shown in full size but buttons pressed on your Beo4 remote control affect the p...

Страница 15: ...your home For further information about BeoLink systems please contact your Bang Olufsen retailer Using an integrated audio system An audio video setup When BeoSystem 1 is set up with an audio system...

Страница 16: ...room you can operate all connected audio and video systems through the BeoSystem 1 and listen to the sound in the link room Use BeoSystem 1 in a link room Link room operation When you are in the link...

Страница 17: ...r your PC in the EXTERNAL SOURCES menu Please refer to Register equipment connected to BeoSystem 1 Use a connected PC Press LIST on Beo4 until PC appears in the display Press GO to select PC as your s...

Страница 18: ...set of recesses for lifting the system The illustration shows the placement of each recess A and B Placing your BeoSystem 1 There are several mounting options to choose from when placing your BeoSyste...

Страница 19: ...receiver s rear cover unscrew the two C screws and loosen the two D screws then lift off the cover Cut the included cable to the required length and strip the cable Insert the cable end through the ca...

Страница 20: ...the sockets Y G Pr R and Pb B no connection should be made to the H and V sockets If the DTV IN sockets are used then make sure that the analogue sound outputs RIGHT and LEFT and the digital sound ou...

Страница 21: ...speakers DATA For connection of a plasma screen supported by BeoSystem 1 or connection of a Home automation system with a projector Socket types which apply to some or all of the dedicated areas CTRL...

Страница 22: ...not included For information about how to connect low power IR transmitters please refer to the opposite page Refer to Connection panels on BeoSystem 1 for information about where to connect external...

Страница 23: ...tible with BeoSystem 1 Each device has a dedicated connection area clearly marked on the BeoSystem 1 rear connection panel Plug the device s IR transmitter into the corresponding socket marked CTRL Mo...

Страница 24: ...pectively a plasma screen a projector and a Home automation system Multiple screens cannot be connected at the same time The connections and sockets on BeoSystem 1 which should be used are illustrated...

Страница 25: ...tter connect the appropriate cable to the DATA socket on the BeoSystem 1 rear connection panel and the other end to your plasma screen Connect a projector Connect a low power IR transmitter to the PRO...

Страница 26: ...important that you find out where to place your loudspeakers before you start connecting them to BeoSystem 1 Once they are connected then you can make the presets necessary to give you the ultimate so...

Страница 27: ...hich method you use when connecting your speakers remember to set the L R LINE switch on the speakers to L and R left and right channel respectively FRONT SUBWOOFER REAR CENTRE L R L R SPEAKER TYPE FR...

Страница 28: ...stance SPEAKER DISTANCE CENTRE 10 LEFT FRONT 15 RIGHT FRONT 15 RIGHT REAR 8 LEFT REAR 8 store To set the distance for each speaker Press MENU on Beo4 to call up the main TV SETUP menu Press GO to call...

Страница 29: ...you select the AUTOMATIC setting the sound shifts automatically from speaker to speaker every 2 3 seconds You have to highlight the different loudspeakers in the menu in order to be able to adjust the...

Страница 30: ...n Option programming is done with the Beo4 remote control and with the entire system switched to standby The following options are available Option programming for BeoSystem 1 Hold the standby button...

Страница 31: ...a link room such as a bedroom BeoLink distribute sound Link connection The main room system must be connected to the link room system with a Master Link cable Connect the Master Link cable to the sock...

Страница 32: ...s shown in the Beo4 display and press GO Press LIST repeatedly until V OPT is shown in the Beo4 display and press 6 If you connect BeoSystem 1 for use in a link room where other link systems such as s...

Страница 33: ...8 to call up a menu directly or use to step to the menu item you want and press GO to select it In menus Press ss or tt to view or modify different options Press GO to store Once you have completed m...

Страница 34: ...dio Program Identify the cable box socket Once you have connected a cable box to a socket on the BeoSystem 1 top connection panel you must register the connection in the RF SETUP menu RF CHANNEL SETUP...

Страница 35: ...ble box Perform a CH TEST that is test that the box is working by pressing ss or tt to change channels If you can not change channels check your OUTPUT CH number or box type number once more Move the...

Страница 36: ...f source connected for INPUT A and press GO to store If the AUTO TUNING menu appears press tt to start automatic tuning or press ss to skip automatic tuning If tuning has been performed the ADD REMOVE...

Страница 37: ...NNEL 4 REMOVE CHANNEL add done FINE TUNE RF INPUT ANTENNA CHANNEL 4 FINE 3 SOUND STEREO store What s on the ADD REMOVE CHANNELS menu RF INPUT RF INPUT appears on the menu if you connect cable or anten...

Страница 38: ...Press 6 to call up the EXTERNAL SOURCES menu Use to step to the menu option you want Press ss tt to view your choices for each menu option Press GO to store Once you have completed menu operations Pr...

Страница 39: ...cally In this case format adjustment is done via the DTV menu overlay Please refer to Watch TV or Satellite programmes for more information about the menu overlay Adjust the picture format Adjust the...

Страница 40: ...tely Adjustments to the sound volume are briefly displayed on the screen Store sound adjustments You can store volume bass treble and subwoofer levels and indicate whether the loudness function should...

Страница 41: ...R is shown in the Beo4 display Press to adjust the balance between left and right speakers Press to adjust the balance between front and rear speakers LIST SPEAKER ss tt BAL FRONT 0 PICTURE BRIGHTNESS...

Страница 42: ...e currently in use The type of sound you select applies until you switch BeoSystem 1 to standby or select another sound type Press LIST repeatedly until SOUND is shown in the Beo4 display Press GO to...

Страница 43: ...in TV SETUP menu Press 3 to call up the CLOSED CAPTIONING menu Press ss tt to adjust the setting for DISPLAY Choose ON or OFF Press to move to TYPE and press ss tt to select a type of closed captionin...

Страница 44: ...ker mode 3 and 5 are available to preset They apply to video sources only TV SETUP 1 SOUND 2 PICTURE 3 CLOSED CAPTIONING 4 PARENTAL CONTROL 5 RECORD LOCK 6 EXTERNAL SOURCES 7 FIRST TIME SETUP 8 RF CHA...

Страница 45: ...pre recorded with one of the sound systems To call up the SOUND SYSTEM menu Press MENU on Beo4 to call up the main TV SETUP menu Press GO to call up the SOUND menu Press 6 to call up the SOUND SYSTEM...

Страница 46: ...by others Choose a code that is easy to remember The default setting is 0000 TV SETUP 1 SOUND 2 PICTURE 3 CLOSED CAPTIONING 4 PARENTAL CONTROL 5 RECORD LOCK 6 EXTERNAL SOURCES 7 FIRST TIME SETUP 8 RF...

Страница 47: ...TV PARENTAL GUIDELINES menu by pressing GO Use the number buttons on Beo4 to enter the access code If you have not yet preset your own code enter the default code 0000 Press ss tt to adjust the setti...

Страница 48: ...using the number buttons on Beo4 If you have not yet entered your own code enter the default code 0000 Press ss tt to adjust the setting RATING This automatically adjusts the restriction setting Optio...

Страница 49: ...recordings on BeoSystem 1 Connect your CamCorder to the VIDEO L and R sockets on BeoSystem 1 when it is in standby Connect a Super VHS CamCorder to the S VHS socket on the close up connection panel in...

Страница 50: ...lufsen product Anything which you consider important positive or negative may help us in our efforts to refine our products Thank you Write to Bang Olufsen a s Customer Service Dept 7210 Peter Bangsve...

Страница 51: ...erference will not occur in a particular installation If this equipment does cause harmful interference to radio or television reception which can be determined by turning the equipment off and on the...

Страница 52: ...www bang olufsen com...

Отзывы: