background image

Mounting     14

Mounting

Rack mounting

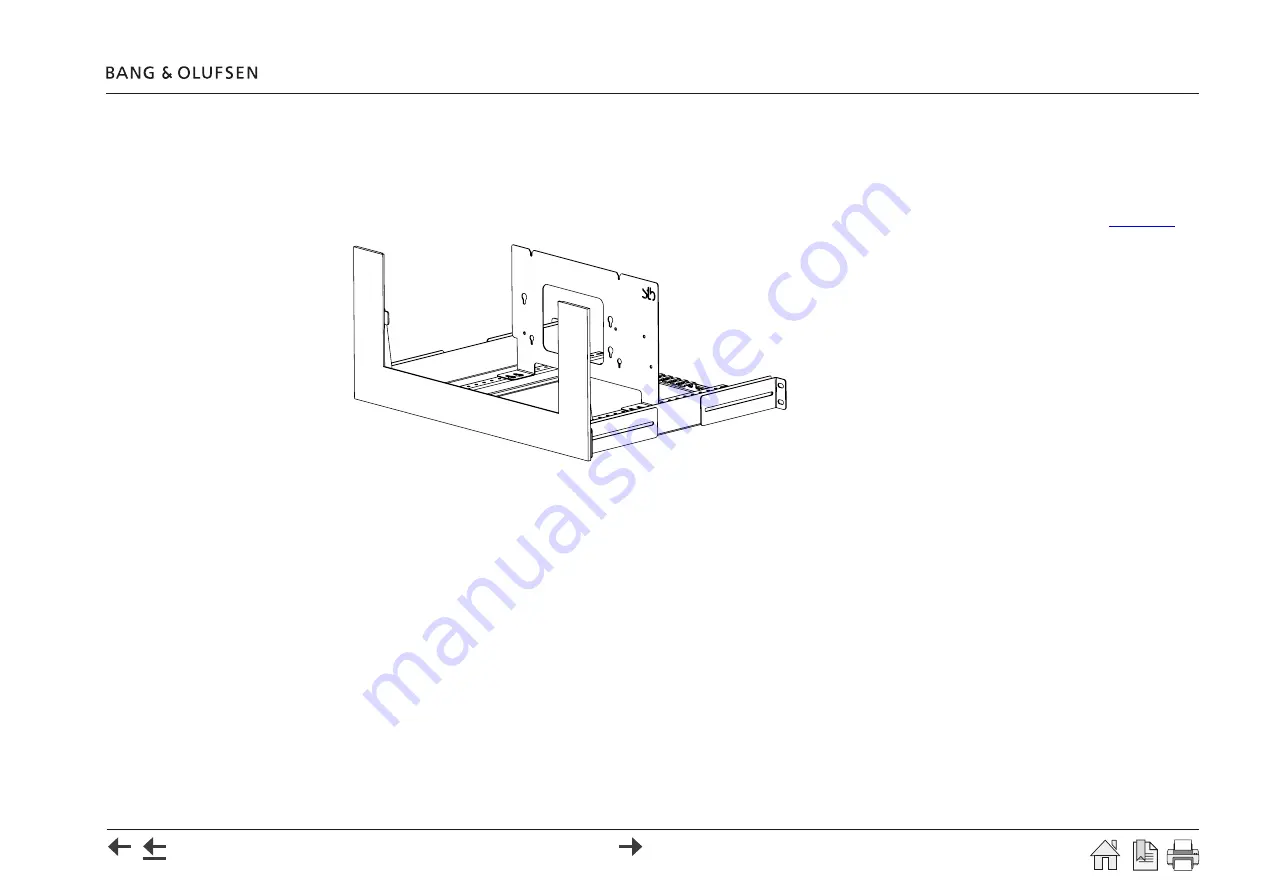
A rack-mount installation 

is preferred

 if possible. The below illustration is an example of how to place a BeoLink. The BeoLink Gateway may be 

placed front most in the subrack which also has room for another 4 similar products (BeoLink Gateway, BeoLink Converter NL/ML) and/or other 

Bang & Olufsen products; see 

BeoWise

 >

 3rd party products 

>

 Brackets

 for possible solutions supported by Bang & Olufsen: see 

rack mount

Rack-mount warnings

Operating temperatures.

The operating ambient temperature of the rack installation may be higher than room ambient temperature. Therefore, consideration should be given 
to installing the equipment in an environment compatible with the maximum ambient temperature of +50°C (+122°F).

Reduced air flow

Installation of the equipment in a rack should be such that the amount of airflow required for safe operation of the equipment is not 

compromised.

Содержание BeoLink 1703

Страница 1: ...BeoLink Gateway Type 1703 Installation Guide English version 1 1 37 2 17 0 4 0 BANG OLUFSEN 2015 03 04T12 45 v1 1 for review ...

Страница 2: ...ocol Control of the entire home takes in principle place via one remote unit either a Bang Olufsen remote control a BeoRemote App or the overlay menus on the TV Furthermore the installation can be connected to via the Web interface from anywhere in the Internet The concept also supports in easy setup integration and even easy event programming which means seamless integration of the systems As suc...

Страница 3: ...s to navigate when using the guide see the survey of keys shortcuts and hot keys below arrow keys on the keyboard navigates to the next page arrow keys on the keyboard navigates to the previous page Navigates you to the previous view Esc Esc button exits Full Screen Mode press Ctrl L to return to Full Screen Mode Another feature to optimise the navigation is the navigation icons at the bottom of t...

Страница 4: ... total freedom exists in designing the home automation control system by creating the areas zones and placing the systems and resources These terms and use are explained in this Installation Guide To make a better overview of the home automation installation the project is organized in Areas Zones Systems and Resources An Area is subdivided in Zones Systems i e the BeoLink system and the various h...

Страница 5: ...ividing into smaller entities Areas can be added renamed and removed Note each area is subdivided in zones see below global area A special area is named global that is a virtual area The content can be reached from any other area or zone The global area is per default subdivided in a global zone see below The global area can be renamed or deleted Zones Zones are logical entities that are used to s...

Страница 6: ... This is despite the Home Automation system may serve more zones where each of the products the system consists of are placed Systems are invisible in the daily use from a user interface point of view The Home Automation systems may consequently be assigned to the global area global zone Systems are usually assigned to zones by the installer in the Systems page The products making up the system ar...

Страница 7: ... system dependant When a resource is placed in an area zone that are later reorganized i e deleted the resource must also be reorganized The area zone can first be deleted when no resource or system is related else a message appears Virtual Resource A Virtual Resource is typically a button scene operated from the user interface and it is programmed by a macro A Virtual Resource is per default assi...

Страница 8: ... three types Resource event matching a specific event on a specific resource Example LIGHT 3 was pressed on the TV in the dining room Generic event apply to a set of similar events throughout the house more zones Example a button named PARTY was pressed on any zone any area System event include calendar and astronomical clock events front panel button events and system connectivity events Commands...

Страница 9: ...meras is made from this subpage Zones setup For each zone the resources are listed and some settings can be changed and the resource can be made hidden visible Favourites Lists Is a list of provided channels for radio or TV e g subscribed to Examples are Boxer ViaSat Sky etc With each of these source providers it is possible to set up favourite channels User Interfaces Webpanel Access BeoLink Gate...

Страница 10: ... 1710 and newer with old FirmWare Add RETURN to LIST Stby LIST then press Centre and select AV using Centre up and press Centre then select REMOTE using Centre up and press Centre and ADDED is shown to confirm selection Press and hold BACK to leave setup It is recommended to keep the HOME CONTROL as one of the top positions in the displayed for easy accessibility Network source Network source is a...

Страница 11: ...twork Link Installation Cable Cat 7 quality are recommended to avoid non desired noise and interference The mains socket is for the connection to the mains MASTER LINK The MASTER LINK sockets RJ45 and ML are used to connect products connected in a Master Link system This makes it possible to control a compatible audio and video system throughout the entire setup The connections in the RJ45 socket ...

Страница 12: ...the system will cycle through the functions The LED indicates the function number by flashing red a number of times function no 1 one flash function no 2 two flashes etc Count the number of red flashes while holding the Setup button and when the desired number is reached let go the button The LED indicator starts to flash red To confirm the function execution the setup button should be pressed aga...

Страница 13: ...y Internet B O Recommended Router ISP Modem Router Switch Bang Olufsen Zone 1 Zone 3 Zone 2 Home Automation System Energy control Alarm system Home Automation Contol System RS232 NL ML Delay Box BeoLink Converter NL ML Network Link Master Link RS232 USB AP Web camera Lighting Heat control Window blinds Operations switches Home Automation Contol System Ethernet Ethernet Zone 4 Zone 5 Area 1 Area 2 ...

Страница 14: ...3rd party products Brackets for possible solutions supported by Bang Olufsen see rack mount Rack mount warnings Operating temperatures The operating ambient temperature of the rack installation may be higher than room ambient temperature Therefore consideration should be given to installing the equipment in an environment compatible with the maximum ambient temperature of 50 C 122 F Reduced air fl...

Страница 15: ...Place screws in recess as shown Shelf placement When rack mount installation is not possible the BeoLink Gateway can be placed on its feet on a stable surface Such shelf could also be in a 19 rack A shelf can take both a BeoLink Gateway and a BeoLink Converter NL ML placed side by side 1 2 95 mm 3 75 130 mm 5 12 75 mm 2 95 84 mm 3 32 158 mm 6 24 1 2 3 3 ...

Страница 16: ...tunneling Legrand Bticino LK IHC Intelligent House Control Viewer models only LexControl Lutron Grafik Eye GRX Grafik QS QSE Radio RA Lutron Home Works Home Works QS Home Works Radio Ra2 Lutron Home Works Interactive Phillips Hue Smart House Vantage Velux Home Automation Control systems Ethernet connection RS232 connection RS485 connection Crestron AMX Control4 Beckhoff Do not use RS232 cables tha...

Страница 17: ...ateway The available SW packages on the ServiceTool Computer can be searched for and be installed Follow instructions on the ServiceTool page Web interface The Web panel can be viewed on the ServiceTool screen Connection The ServiceTool can access the BeoLink Gateway either via the home router AP or by a direct cable from the Ethernet socket of the computer to the Network Link Ethernet socket of t...

Страница 18: ...e from the installation to the ML socket See BeoLink Handbook for appropriate cables Connect the RS232 cable to RS232 based system s or to a powered USB hub that connects to RS232 based systems The USB to RS232 cable converter has Bang Olufsen Part No 6100051 Mount mains cable in the wire holder as illustrated Mount BeoLink Gateway in the rack system wall bracket or place it on a stable surface No...

Страница 19: ...must first be connected in DHCP mode to the router and the static IP address is then set as described in Network settings page 22 Accessing directly The BeoLink Gateway is set to fixed IP address mode by activating the Setup button function 3 see page 12 The computer and the Network Link socket of the BeoLink Gateway must be connected directly to each other using an Ethernet cable The computer mus...

Страница 20: ...ton to access the BeoLink Gateway setup functions The setup functions are used for first time setup or any other setup of the system Now the login box appears First time login Type admin in both fields and click Login The User name admin exists per default and cannot be changed whereas the related Password can be changed by the user later see page 41 User login Other users can be created by enteri...

Страница 21: ...r service situation Note Only the Display name is visible in the user interfaces except the Webpanel access directly on the BeoLink Gateway Project name i e a distinguishing name for the project setup any name number etc Display name i e a name of the BeoLink Gateway that will be shown in all interfaces BeoLink App WEB panel etc Examples of display name are the family name or the name number of th...

Страница 22: ...abled by removing the check mark in the check box next to DHCP enabled It is recommended to reserve an IP address in the router or use a static IP address if DHCP is disabled Address If the DHCP is disabled in the router the IP address must be entered manually in the Address field Default IP address is 192 168 1 10 Mask Settings must be according to the same settings in the router for the Network ...

Страница 23: ... Set Synchronize from internet Synchronizing with an external time server by setting the check mark Remove the check mark to disable the synchronization with the time server Time zone Setting for the time zone is chosen from the drop down list Choices are made based on an appropriate match of Continent City Location settings Astronomical Clock The Location settings are used by the BeoLink Gateway ...

Страница 24: ... To be able to use the BeoLink App the Integration protocol must be enabled on the local network TCP port For the LAN a TCP port must be allocated The default port is 9000 Ports below 1024 are reserved for standard TCP services Enabled With a checkmark set in Enabled the integration protocol TCP protocol over Ethernet is enabled Requires authentication Authentication is optional Authentication is ...

Страница 25: ...part of the page The USB to RS232 converter cable also used for connecting to the Bang Olufsen ServiceTool can be used to connect each system using the RS232 protocol A bit rate must be selected Select between the following bit rates 9600 bps 19200 bps 38400 bps 57600 bps and 115200 bps The RS232 connection does not require authentication ...

Страница 26: ...e deleted by activating the x sign in the greyed area boxes and renamed by activating the tool Zones are added to the areas by activating the sign in the greyed area boxes In the Zone settings window the zone can be given a name entered in the Name field and the Area it shall belong to can be chosen from the drop down list An icon can be assigned that will be visible in the user interfaces for eas...

Страница 27: ...m kitchen bedroom The Name is stated as desired Area Name of area An Area can be subdivided in one or more zones Areas are used as structural elements e g when handling big installations An area could be house guest house floor levels in house courtyard summer house etc By choosing another Area from the drop down list the marked zone will be moved to that area Icon When adding a new zone A Zone ca...

Страница 28: ... select another zone in the Zone drop down list by which the system is moved to that zone A system can also be rename and the configuration and connection settings can also be changed Systems are assigned to zones by the installer Systems are invisible in the user interfaces BeoSound 5 host When a BeoSound 5 is part of the system setup the IP address for this must be entered in the BeoSound 5 host...

Страница 29: ... down list Press Add system to confirm the selection Default values for e g Connection type Login Password Host and Port will be shown For specific details on different systems please refer to the on line help The values can be changed matching the settings used in the installation Press Apply to confirm settings Delete a system To delete a system first make a selection in the left column and then...

Страница 30: ...d select from drop down list Name Enter a name see page 7 to ease identification of the resources Type Select type from the drop down list press Select type The type of available resources depends on the actual A V product BeoLink ressource types can only be NetworkLink product or MasterLink product Address Unique identification of a resource The format depends on the system NL is the serial numbe...

Страница 31: ...ose of having standard resource types is that such common set of features are shared by the most supported systems Address Unique identification of a resource The format depends on the HA system using various number scheme Capture An easy way to add resources is to use the capture function This function is recommended to be used as often as possible Press Capture and then activate various componen...

Страница 32: ...tionality by themselves Macros see page 33 must be defined to link user actions on a virtual resource with events and commands in the systems User experience Virtual Resources can appear as a single functional entity on user interfaces hiding the fact that internally in the BeoLink Gateway the resource is implemented by combining a set of macros for all the needed actions on the button Addressing ...

Страница 33: ...trol Command on a Bang Olufsen remote control etc the macro will be triggered This means that the commands in the macro will be executed in order A macro is also assigned to area zone to which it belongs even if it handles activity outside the zone Having macros assigned to zones helps when setting up user interfaces In the example shown for the cinema a button exists in the room Cinema Scene wall...

Страница 34: ...xt activating the physical wall button and the virtual button on the user interface there will be created the two events in the event part of the display Add command The Add command button is used to define the commands to be executed when either of the two buttons in the above example are pressed With both events the Set Cinema Scene resource in the home automation system is executed to avoid an ...

Страница 35: ...Events The list of events for triggering a macro can be filled in manually or selected from recent events There are three types of events o Generic o Ressource o System Resource events Resource events match a specific event on a specific resource System events System events include calendar and astronomical clock events and system connectivity events Generic events Generic events apply to a number...

Страница 36: ...e list can be reordered by dragging the handles at the left of each row or by clicking on the arrows on the far right of each row There are four types of commands o Generic o Ressource o System o Macro Generic commands Generic commands apply to any area or zone with the possibility of selecting the same area or zone where the event was generated Resource Commands Resource Commands apply to a speci...

Страница 37: ...ered during the execution for instance if a macro called THEATER ON for setting up a home theatre takes more than one minute to execute What will happen if this macro is called repeatedly Will all commands start to overlap each other What will happen if the THEATER OFF macro is called to switch the home theatre off during the set up It is important to understand that a possible messy overlap of co...

Страница 38: ...nstallation Note Generic events and commands are matched against all possible resources every time an event occurs or a command is executed If the name of a resource is changed on a working configuration the resource will no longer match an existing generic event or command Therefore it is important to be consistent when naming resources It is also important to avoid to spoil functionality by rena...

Страница 39: ...Set up BeoLink Gateway Macros Generic Resource Command 39 Generic Resource Command ...

Страница 40: ...are configured in this section of the Interfaces page The user interfaces are the BeoLink App running on a mobile devices overlay menus in the TVs and the Webpanel accessed from a computer Configurations are synchronized in real time towards the Webpanel and the TV overlay menu The synchronization with the BeoLink App is done when activating Configuration Save revision Users admin The user named a...

Страница 41: ...ed to administer users and user rights This option should be set for the owner of the installation or a superuser who is responsible for managing user access Controller should normally be selected Allows the user to access BeoLink Gateway via mobile devices BeoLink App When disabled the only access is via the Webpanel Select zone access for user Finally choices should be made for Select zone acces...

Страница 42: ...o identify the B O products on the BeoLink Gateway Beo4 remote control Beo4 navigation button With Beo4 type 171x and Beo4 type 162x by which the product is operated Product sources For each product sources can be added when relevant By this the connected sources are made available to the user For local and distributed sources on Network Link products it can be queried directly from the product by...

Страница 43: ...the same name from the Audio Video masters are selected using the LINK Modifier Also necessary for products in OPTION 4 Some BeoLink products do not support the modifier With NL products The LINK modifier checkbox should be checked if the source is a Network source UI type Indication to the mobile application on what type of user interface is needed for operating the product The type that suits th...

Страница 44: ... for video distribution Up to 32 HDMI matrix sources can be selected on the source drop down menu The input format for the matrix controlled sources depends on the TV type and type of remote control as follows Beo4 and Beo5 ML TV Matrix input 00 to 09 and 10 to 32 NL TV Matrix input 1 to 9 and 10 to 32 BeoRemote One Matrix input 1 to 9 and 10 to 16 Note The mobile applications do not support sourc...

Страница 45: ... No to get in contact to the camera to which all commands will be appended must be provided The format may vary e g http 192 168 1 37 80 The optional User name and Password fields may be used for basic HTTP authentication to access the camera from the user interfaces Camera resources path Commands for obtaining Video Images both in high and low resolution must be provided e g mjpg video cgi for hi...

Страница 46: ...le to work with HTTP authentication By pressing the Raw edit button a text representation of all the fields appears for setting camera resolutions and commands It is possible to copy paste edit in the favourite text editor It is possible to copy and paste the text when setting up other similar cameras and for each of these to adapt to the actual camera e g adjust to the correct IP address ...

Страница 47: ...ed Hidden Hidden and Shown in user interface Options Hints For macros and buttons that are visible on the user interfaces the following options are available Confirm When a checkmark is set in the checkbox and when a button pressed or a macro is triggered the action needs confirmation on a hand held device e g pressing a Yes button to avoid unintended activation before the desired function is exec...

Страница 48: ... The Remove button is used to remove a source provider of favourites chosen in the left column Commands global options For each favourite list a global End command and a global Delay that will affect each favourite command can be set End command The end command is added at the end of each favourite command sequence and can be either NONE PLAY or SELECT Delay The global delay is a delay value added...

Страница 49: ...le application to retrieve the logo The URL will be filled in automatically when the logo picker is used The URL can be entered manually Logo picker Note The logo picker only works when an Internet connection is available Press on a logo field The logo picker shows a pop up window for selecting logos from the B O repository and shows up by clicking the logo Available logos are shown in groups of 5...

Страница 50: ... actions which have occurred events macros and commands The menu can be used for the following To find the precise addressing of a specific component If a keypad a sensor etc is pressed on the Home Automation System the event generated will be monitored by the tool To check whether macros and the belonging commands are working as intended Note The four show buttons are per default active and can b...

Страница 51: ...ation errors and critical system errors The log menu can be used to Verify the connection to external devices Errors will be shown Check of incoming BeoLink Gateway protocol connections The size of the system log is limited which means that old messages will be deleted when new messages appear Note The length of the log is limited to 10 000 lines and when full the oldest will disappear first ...

Страница 52: ...o to next step 2 Press the Download service report button 3 Copy the entire text in the text box in the step 3 instruction and copy into an e mail Fill in the individual lines re product and set up information Also observations about the experienced problem may be added Copy the downloaded service report from step 2 into the e mail as an attached file 4 When the e mail is completed send it to the ...

Страница 53: ...ffect immediately Online update Ensure the router used with the BeoLink Gateway is connected to the Internet Press the Check for lastes version button and the latest official SW will be displayed Press the Start online update and the displayed SW version will be downloaded to the BeoLink Gateway and it takes effect immediately ServiceTool Connect the BeoLink Gateway to the ServicTool computer and ...

Страница 54: ...he BeoLink Gateway when the Save button is pressed By this the recent autosaved file see below will be discarded Up to ten revisions of the configuration can be saved If a manually Save revision is not made the recent autosaved file will be the recent saved configuration Autosave When configuration of the BeoLink Gateway takes place and the operator has not saved the configuration by a manual Save...

Страница 55: ...figuration file from a computer where the file was saved at an earlier stage see page 56 By selecting Configuration Load from file a configuration file can be uploaded into the BeoLink Gateway The uploaded configuration will become active immediately and substitute the current configuration ...

Страница 56: ...o file the current configuration will be downloaded to a computer It is recommended to use this method to take a copy of the configuration on a computer or save to another storage media when an installation is finished It can be useful to have such a configuration file as a reference if a problem should occur or as a back up if the BeoLink Gateway should be defective ...

Страница 57: ...e revision see page 54 Autosaved configurations are listed in the Revision history and is marked with the tag Auto save Reloading a saved revision To access any of the ten saved revisions or the auto save configuration select Configuration Revision history and choose the saved revision desired When selected the file will be copied into the current configuration It will become active immediately an...

Страница 58: ... Terminate Pin 8 Terminate Shield GND USB RS232 USB A 2 0 5 VDC 5 0 to 500 mA used for USB RS232 adapter cable Pin 1 5 V V Bus Pin 2 Data Pin 3 Data Pin 4 GND Shield GND MASTER LINK RJ45 RJ45 socket Pin 1 Data 0 4V 0 1V Pin 2 Data 0 4V 0 1V Pin 3 Supply voltage 7V to 15V in St By 3V to 15V Pin 4 Looped to MASTERLINK ML Pin 5 Looped to MASTERLINK ML Pin 6 Supply voltage 7V to 15V in St By 3V to 15V...

Страница 59: ...N C Pin 5 N C Pin 6 N C Pin 7 N C Pin 8 N C Pin 9 N C Pin 10 N C Pin 11 Supply voltage 7V to 15V in St By 3V to 15V Pin 12 Supply voltage 7V to 15V in St By 3V to 15V Pin 13 Looped to MASTERLINK RJ45 Pin 14 Looped to MASTERLINK RJ45 Pin 15 Looped to MASTERLINK RJ45 Pin 16 Looped to MASTERLINK RJ45 Shield Data GND ...

Страница 60: ...e 38 F Factory default 12 Favourites Lists 48 Firmware 53 First time login 20 Fixed IP address 12 Forgotten IP address 19 Functions by Setup button 12 G Generic Resource Command 39 Generic Resource Event 38 Global area 27 definition 5 Global area 27 global area global 5 Global zone 27 definition 5 H HDMI matrix support 44 Home Automation systems definition 6 systems supported 16 Hostname 22 I Icon...

Страница 61: ... Time 23 Integration Protocol 24 Network 22 Setup button 11 Functions 12 Set up the BeoLink Gateway 21 Shelf placement 15 Software 53 Source products 42 Sources via matrix 44 Status colours icons 28 Synchronize from internet date time 23 System definition 6 icons 28 Systems 28 T TCP port 24 Tools 50 Firmware 53 Log 51 Logout 53 Monitor 50 Service Report 52 Software 53 Types of connections 13 U USB...

Страница 62: ...tion types 16 ServiceTool 17 Cable connections 18 Accessing the BeoLink Gateway 19 Set up the BeoLink Gateway 21 Connection specifications 58 Index 60 Table of Contents 62 Introduction Home Automation systems supported connection types Accessing the BeoLink Gateway Connection specifications Setup of BeoLink Gateway Cable connections How to use this installation guide ServiceTool Index Connection p...

Отзывы: