#656-253, Sungsu-1ka, Sungdong-ku, Seoul, Korea
TEL: 02-469-1239 / FAX: 02-497-1270 / E-MAIL: [email protected] / WEB SITE: www.banseok.co.kr
7. Maintenance and Cleaning
7. Maintenance and Cleaning
Normal cleaning is
accomplished by purging
with appropriate solvent. The
needle seat can be removed
(after the reservoir pressure
has been bled off) for
cleaning without demounting
the valve.
CAUTION:
CAUTION:
Always relieve
the reservoir pressure and
disconnect the power before
performing any maintenance
on the system.
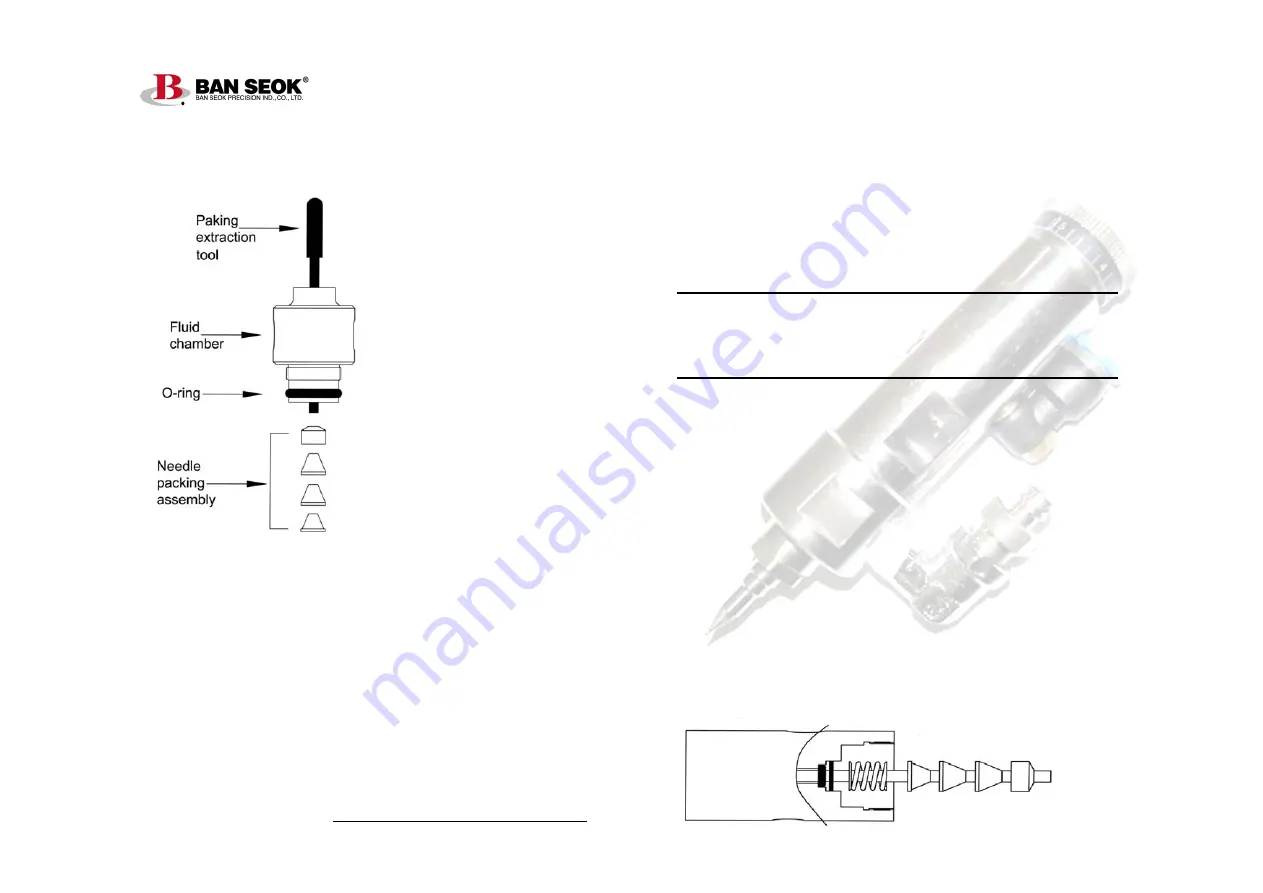
[Figure 2]
[Figure 2]
To thoroughly clean valve chamber and replace needle
packing:
1. Remove the needle stroke control and piston return spring to
prevent damage to the needle and seat during reassembly. Turn
counterclockwise until free.
2. Remove the inlet fitting and seat assembly from the fluid
chamber.
3. Remove the fluid chamber from the cylinder body by turning
counterclockwise until free. Then remove the O-ring from the fluid
chamber.
4. Remove the needle packings from the fluid chamber. Insert
through outlet end of the fluid chamber and gently push out the
packings (see Figure 1). – Packing extraction tool is not included.
[Figure 1]
[Figure 1]
Do not use sharp instruments to scrape or clean these
components. Scratches may cause the valve to leak.
5. Remove any remaining packings and the packing spring from
the needle.
Note:
The lower cylinder needle O-ring is held in place by a flat
retaining washer that also serves as the packing spring seat. The
washer may come out with the spring. Ensure that it is back in
place before reinstalling the packing spring (see Figure 2).
6. Clean the needle with a cloth dampened in solvent.
7. Lubricate the needle with lubricant. Reinstall the needle packing
spring and new packing kit in accordance with Figure 2.
8. Install a new O-ring on the fluid chamber. Screw the cylinder
onto the fluid chamber. Hand tighten only. The chamber can be
turned back out up to one turn to orient the fluid inlet fitting to the
desired position.
9. Reinstall the tip adapter/seat assembly.
10. To reinstall the piston return spring, first put one thrust washer
over the spring pilot (at the top of the piston), then the other thrust
washer into the needle stroke control, followed by the spring.
11. Reinstall the needle stroke control by aligning the piston return
spring with the spring pilot. Turn the needle stroke control
clockwise until it stops and then back it out the the desired setting.


