Bamato KP-210 Скачать руководство пользователя страница 24

24

GB

B

A

M

A

T

O

Bavarian Machine Tools

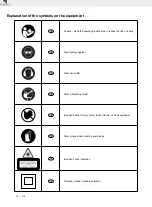
Instructions for proper and safe sawing:

a) 

Clamp  the  workpiece  always  at  the  saw  table 
firmly. Therefore please use the supplied clamp

­

ing device.

b) 

Make sure that the machine is secured before 
each sawing;

c) 

If necessary attach the ma­
chine to a workbench or the like. 


Fasten the machine to the workbench, using the 

holes at the fixed saw table.

d) 

Support long workpieces (e.g. with a roller ta­
ble) to prevent them sagging at the end of a cut. 

e) 

Make sure that the saw blade does not 
touch the rotary table in any position by pull­
ing out the mains plug and rotating the 
saw blade by hand in the 45° and 90° posi­
tion. If necessary, readjust the saw head. 

Warning!

 This electric tool generates an electro­

magnetic field during operation. This field can impair 

active or passive medical implants under certain con­
ditions. In order to prevent the risk of serious or dead­
ly injuries, we recommend that persons with medical 
implants consult with their physician and the manu­
facturer of the medical implant prior to operating the 
electric tool.

SAFETY INSTRUCTIONS FOR THE HANDLING OF 

SAW BLADES

Only use insertion tools if you have mastered their use.

Observe the maximum speed. The maximum 

speed specified on the insertion tool may not be 
exceeded. If specified, observe the speed range.

Observe the motor / saw blade direction of rotation.

Do not use any insertion tools with cracks. Sort out 
cracked insertion tools. Repairs are not permitted.

Clean grease, oil and water off of the clamping 

surfaces.

Do not use any loose reducing rings or bushes for 
the reducing of holes on saw blades.

Make sure that fixed reducer rings for securing the 

insertion tool have the same diameter and have 
at least 1/3 of the cutting diameter.

Make sure that fixed reducer rings are parallel to 

each other.

Handle insertion tool with caution. They are ideally 
stored in the originally package or special contain­
ers. Wear protective gloves in order to improve 
grip and to further reduce the risk of injury.

10 

Prior to the use of insertion tools, make sure that 
all protective devices are properly fastened.

11 

Prior to use, make sure that the insertion tool 
meets the technical requirements of this electric 
tool and is properly fastened.

12 

Only use the supplied saw blade for cutting wood, 
never for the processing of metals.


Wear gloves when handling saw blades and 

rough materials. Carry saw blades in a con

­

tainer whenever practical.


Wear goggles. Sparks generated during work 
or splinters, chippings and dust coming from 
the device can lead to loss of eyesight.  


Connect a dust collecting device to the electric 

tool when sawing wood. The emission of dust 

is influenced, among other things, by the type 
of material to be processed, the significance of 

local separation (collection or source) and the 
correct setting of the hood/guide plates/guides.


Do not use saw blades made of high­speed alloy 
steel (HSS steel).

Maintenance and repair


Pull out the mains plug for any adjustment or 
repair tasks.


The generation of noise is influenced by vari

­

ous factors, including the characteristics of saw 
blades, condition of saw blade and electric tool. 
Use saw blades which were designed for re­
duced noise development, insofar as possible. 
Maintain the electric tool and tool attachments 
regularly and if necessary, initiate repairs in or­
der to reduce noise.


Report faults on the electric tool, protective de­
vices or the tool attachment to the person respon­
sible for safety as soon as they are discovered.

Safe work


­  Make sure that a suitable saw blade for the ma­

terial to be cut is selected.


­  Never use the machine to cut other materials as 

specified.


­  To transport the machine follow the procedure 

of point 9. 
 When transporting the electric tool, only use the 
transport devices. Never use the protective de­
vices for handling or transport.


­  Operate the machine only if the protective de­

vices are functional, in good condition and in 
the correct position.


­

 The  floor  around  the  machine  must  be  level, 

clean and free of loose particles, such as chips 
and cutting residues. 


­  Only use saw blades for which the maximum 

permissible speed is not lower than the maxi­
mum spindle speed of the machine and which 
are suitable for the material to be cut.


­  Be sure to only use spacers and spindle rings 

specified by the manufacturer as suitable for the 

intended purpose.


­  Attention! 

Do not replace 

the laser by a different type.  
Repairs may only be carried out by the manu­
facturer or an authorized representative.


­  Do not remove any cutting residues or other parts 

of workpieces from the cutting zone while the ma­
chine is running and the saw unit is not at rest.

Содержание KP-210

Страница 1: ...riebsanleitung 5 18 GB Sliding cross cut mitre saw Translation from the original instruction manual 19 31 FR Scie onglet Traduction des instructions d origine 32 45 Nachdrucke auch auszugsweise bed rf...

Страница 2: ...2 BAMATO Bavarian Machine Tools 1 1 2 3 4 5 6 7 8 9 10 11 13 12 15 16 17 14 4 26 5 8 15 9 3 24 25 33 2 18 19 20 21 22 23 16a 7a...

Страница 3: ...3 BAMATO Bavarian Machine Tools 10 11 6 7 12 13 22 27 6 19 18 a 14 c c 28 d 6 b 14 22 4 7 4 7 14 9 7 4 11 14 13 8 4 3 1 7 15 14 16a 16b e 8 16 4 3 2 1 7 15 14 16a 16b e 14...

Страница 4: ...4 BAMATO Bavarian Machine Tools 16 17 14 15 18 19 25 24 30 29 5 d 31 6 32 35 36 34 e 37 20 36 21 33 38 38...

Страница 5: ...ieferumfang 8 4 Bestimmungsgem e Verwendung 8 5 Wichtige Hinweise 8 6 Technische Daten 12 7 Vor Inbetriebnahme 13 8 Aufbau und Bedienung 13 9 Transport 16 10 Wartung 16 11 Lagerung 16 12 Elektrischer...

Страница 6: ...anleitung und Sicherheitshinweise lesen und beachten DE Schutzbrille tragen DE Geh rschutz tragen DE Bei Staubentwicklung Atemschutz tragen DE Achtung Verletzungsgefahr Nicht in das laufende S geblatt...

Страница 7: ...d Feuchtigkeit bei dem Elektrowerkzeug auf Sie muss von jeder Bedienungsperson vor Aufnahme der Arbeit gelesen und sorgf ltig beachtet wer den An dem Elektrowerk zeug d rfen nur Personen arbeiten die...

Страница 8: ...Maschine bedienen und warten m ssen mit dieser vertraut und ber m gliche Ge fahren unterrichtet sein Dar ber hinaus sind die geltenden Unfallverh tungs vorschriften genauestens einzuhalten Sonstige al...

Страница 9: ...mmt ist Benutzen Sie das Kabel nicht um den Stecker aus der Steckdose zu ziehen Sch tzen Sie das Kabel vor Hitze l und scharfen Kanten 12 Sichern Sie das Werkst ck Benutzen Sie Spannvorrichtungen oder...

Страница 10: ...arnung Besch digte oder deformierte S ge bl tter nicht verwenden Tauschen Sie einen abgenutzten Tischeinsatz aus Verwenden Sie nur vom Hersteller empfohlene S gebl tter die EN 847 1 entsprechen Achten...

Страница 11: ...ssene Einsatzwerkzeuge aus Eine Instandsetzung ist nicht zul ssig 5 Reinigen Sie die Spannfl chen von Verschmut zungen Fett l und Wasser 6 Verwenden Sie keine losen Reduzierringe oder buchsen zum Redu...

Страница 12: ...f r Notf lle 17 Batterien die ausgelaufen sind NIEMALS ohne entsprechenden Schutz anfassen Wenn die aus gelaufene Fl ssigkeit mit der Haut in Ber hrung kommt sollten Sie die Haut in diesem Bereich sof...

Страница 13: ...en bereinstimmen Das Werkzeug nicht verwenden wenn der Schal ter defekt ist 8 Aufbau und Bedienung 8 1 S ge aufbauen Abb 1 2 3 4 5 Zum Verstellen des Drehtisches 14 die Feststell schraube 26 ca 2 Umdr...

Страница 14: ...fixiert werden ffnen Sie die Feststellschraube 16b der ver schiebbaren Anschlagschiene 16a und schieben Sie die verschiebbare Anschlagschiene 16a nach innen Die verschiebbare Anschlagschiene 16a muss...

Страница 15: ...die Schnitttiefenbegrenzung 25 nach au en stellen Die gew nschte Schnitttiefe durch Eindrehen oder Herausdrehen der Schraube 24 einstellen An schlie end die R ndelmutter wieder an der Schrau be 24 fe...

Страница 16: ...t sich der Motor wieder einschalten 8 11 Betrieb Laser Abb 3 19 20 Einschalten Ein Ausschalter Laser 34 in Stel lung 1 bewegen Auf das zu bearbeitende Werk st ck wird eine Laserlinie projiziert die di...

Страница 17: ...en entstehen oft Iso lationssch den Ursachen hierf r k nnen sein Druckstellen wenn Anschlussleitungen durch Fenster oder T rspalten gef hrt werden Knickstellen durch unsachgem e Befestigung oder F hru...

Страница 18: ...fekt Motor durch einen Fachmann kontrollieren lassen Motor erreicht volle Leistung nicht Stromkreise in Netzanlage berlastet Lam pen andere Motoren etc Verwenden Sie keine andere Ger te oder Moto ren...

Страница 19: ...cope of delivery 21 4 Intended use 22 5 Safety information 22 6 Technical data 25 7 Before starting the equipment 26 8 Attachment and operation 26 9 Transport 29 10 Maintenance 29 11 Storage 29 12 Ele...

Страница 20: ...e operating instructions to reduce the risk of inquiry GB Wear safety goggles GB Wear ear muffs GB Wear a breathing mask GB Important Risk of injury Never reach into the running saw blade GB Wear glov...

Страница 21: ...damages to the product or damages caused by the product that occurs due to Improper handling Non compliance of the operating instructions Repairs by third parties not by authorized service technician...

Страница 22: ...clothing Do not wear wide clothing or jewellery which can become entangled in moving parts If possible store the packaging until the warranty period has expired ATTENTION The device and packaging mat...

Страница 23: ...hearing impaired Respiratory protection to avoid the risk of inhaling harmful dust When working outdoors anti slip footwear is recommended Tie long hair back in a hair net 9 Use protective equipment...

Страница 24: ...ric tool and is properly fastened 12 Only use the supplied saw blade for cutting wood never for the processing of metals Wear gloves when handling saw blades and rough materials Carry saw blades in a...

Страница 25: ...ironment from acci dents using suitable precautionary measures Do not look directly into the laser beam with un protected eyes Never look into the path of the beam Never point the laser beam towards r...

Страница 26: ...with the screw 9 It is possible to tilt the machine head 4 a max 45 to the left by loosening the set screw 22 Noise Total noise values determined in accordance with EN 61029 sound pressure level LpA 9...

Страница 27: ...ighten the retaining screw 8 2 Precision adjustment of the stop for crosscut 90 Fig 1 6 7 No stop angle included Lower the machine head 4 and secure using the locking bolt 23 Loosen the set screw 22 P...

Страница 28: ...k to see that it spins freely in the table insert 11 in both perpendicular and 45 an gle settings 8 6 Mitre cut 0 45 and turntable 0 Fig 1 2 12 The crosscut saw can be used to make mitre cuts of 0 45...

Страница 29: ...nformation In the event of an overloading the motor will switch itself off After a cool down period time varies the motor can be switched back on again Important The work to change and align the saw b...

Страница 30: ...onnection cable The insulation on electrical connection cables is of ten damaged This may have the following causes Passage points where connection cables are passed through windows or doors Kinks whe...

Страница 31: ...ive Arrange for inspection of the motor by a special ist The motor does not reach its full power Circuits in the network are overloaded lamps other motors etc Do not use any other equipment or motors...

Страница 32: ...ourniture 34 4 Utilisation conforme l affectation 35 5 Notes importantes 35 6 Caract ristiques techniques 39 7 Avant la mise en service 40 8 Structure et commande 40 9 Transport 43 10 Maintenance 43 1...

Страница 33: ...lisez le mode d emploi FR Portez des lunettes de protection FR Portez une protection de l ou e FR Portez un masque anti poussi re FR Attention Risque de blessure Ne mettez pas vos doigts dans la lame...

Страница 34: ...lors de l uti lisation de la machine dans votre pays Conservez le manuel d utilisation dans une pochette plastique pour le prot ger de la salet et de l humi dit sur la machine Avant de commencer trava...

Страница 35: ...cher l outil ou le prolongateur et les maintenir loign es de la zone de travail V rifiez que l appareil et les accessoires n ont pas t endommag s lors du transport Conservez si possible l emballage ju...

Страница 36: ...fs de protection et les autres pi ces fonctionnent parfaitement et conform ment aux dispositions 5 Conserver les outils lectriques non utilis s en s curit Les outils lectriques non utilis s doivent tr...

Страница 37: ...par exemple par le dispositif de protection Veillez n utiliser que des disques des cales et des bagues de serrage de l arbre consid r es par le fabricant comme appro pri es et adapt es l al sage de l...

Страница 38: ...pe Ne retirez pas de chutes de coupes ni d autres morceaux d tach s de la pi ce usiner dans la zone de coupe pendant que la machine fonc tionne que la lame de scie ne s est pas compl tement arr t e et...

Страница 39: ...et de fonctionnement au repos en plus du temps de d clenchement Limitez le niveau sonore et les vibrations un minimum Utilisez exclusivement des appareils en excellent tat Entretenez et nettoyez l app...

Страница 40: ...tion la machine peut fonctionner en mode inclin Mettez l appareil hors circuit lorsque vous ne l utilisez pas La machine est construite la pointe de la tech nique et selon les r gles techniques de s c...

Страница 41: ...a et la lame de scie 6 En cas de largeur de coupe sup rieure 100 mm il convient de veiller ce que la vis de fixation 20 soit desserr e et ce que la t te de machine 4 soit mobile Attention a but e mobi...

Страница 42: ...de lame de scie il faut contr ler si la lame de scie 6 tourne bien sans obstacle dans l insertion de table 10 lorsque la lame est en position verticale et lorsqu elle est inclin e de 45 Resserrer la...

Страница 43: ...nt avec lequel vous voulez exploiter le produit r pond l exigence cit e Attention Le remplacement et l alignement de la lame de scie 6 doit tre r alise dans les r gles de l art 8 11 Service laser figu...

Страница 44: ...que consommateur vous tes l gale ment tenu de porter les piles et accus qu ils contiennent des polluants ou non un centre de collecte de votre commune quartier ou du commerce de sorte qu ils puissent...

Страница 45: ...ur par un sp cialiste Le moteur ne fonc tionne pas plein r gime Circuit de l installation lectrique surcharg lampes autres moteurs etc N utilisez aucun autre appareil ou moteur sur le m me circuit lec...

Страница 46: ...46 BAMATO Bavarian Machine Tools...

Страница 47: ...normelor UE pentru articolul BG 2014 29 EU 2014 35 EU X 2014 30 EU 2004 22 EC 2014 68 EU X 2011 65 EU 89 686 EC_96 58 EC 90 396 EC Der oben beschriebene Gegenstand der Erkl rung erf llt die Vorschrif...

Страница 48: ...las de material o de fabricaci n Las piezas que no son fabricadas por nosotros mismos ser n garantizadas hasta el punto que nos corresponda garant a del suministrador anterior Los costes por la coloca...

Отзывы: