background image


© 2010 Bakker Hydraulic Products B.V. 

Nijverheidsweg 6 

6662 NG     Elst (Gld)  The Netherlands 

Tel : + 31 481 374757         Fax : + 31 481 375280 

Site 

www.bakker-hydraulic.com

        E-mail : 

[email protected]


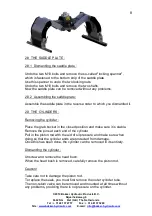
2.  ASSEMBLING/DISMANTLING : 


2.0  THE SUSPENSION PLATE : 
 
Assembly : 
 
Place the suspension plate on the saddle plate. Check that the bolt-holes 
in the suspension plate and the saddle plate correspond with each other. 
Fit the 4 bolts and nuts) supplied. Tighten everything properly.  
After using the product the next time, check the bolts for tightness and 
retighten them if necessary. 
 
N.B.:  
 
Always fit the nut on top. Before fitting the suspension plate, determine 
first how the hoses will run from your rotator to the cylinder. 
 
2.1  THE ROTATOR : 
 
2.1.1  Assembling the rotator drive shaft : 
 
Place the rotator drive shaft in the suspension plate.  
If the outside measurements of the rotator shaft do not correspond with 
the inside measurements of the suspension bush, you probably have the 
wrong suspension plate for your rotator. If so, contact your supplier. 
Rotate your rotator shaft until the hole in the rotator shaft is in front of the 
suspension bush hole. After this, mount the suspension pin and the hairpin 
spring. 
 
2.1.2  Assembling the rotator with flange fitting : 
 
If you are using a rotator with a flange fitting, the drill-hole pattern in the 
saddle plate must correspond with the drill-hole pattern in the rotator. 
 
Now, you just fasten the rotator to the saddle plate with a bolt joint, 
according to the instructions of the rotator supplier. 
 

Содержание BDV 2020

Страница 1: ...OPERATING MANUAL Grab Bucket BDV 2020 ...

Страница 2: ...duct CONTENTS 1 OPERATIONAL CONDITIONS 3 2 ASSEMBLING DISMANTLING 2 0 THE CONNECTOR PLATE 4 2 1 THE ROTATOR 4 2 2 THE HOSES FROM CRANE TO ROTATOR 5 2 3 THE HOSES BETWEEN ROTATOR AND CYLINDER 5 2 4 THE LINK 6 2 5 THE DETACHABLE SIDE PLATES 6 2 6 USE OF THE HOISTING HOOK 6 2 7 THE RUBBER JAWS 7 2 8 THE SADDLE PLATE 8 2 9 THE CYLINDERS 8 3 MAINTENANCE AND REPAIR 9 4 TROUBLE SHOOTING 9 TECHNICAL DATA ...

Страница 3: ...ravel grit and the like Special separate rubber jaws can be supplied for moving complete packages of tiles These rubber jaws can be very easily fastened to the grab bucket casing in a single action This product is not suitable for breaking asphalt uprooting trees or loading scrap onto lorries etc if it is unevenly loaded crowbar effect Notes When designing this product account was taken not only o...

Страница 4: ... will run from your rotator to the cylinder 2 1 THE ROTATOR 2 1 1 Assembling the rotator drive shaft Place the rotator drive shaft in the suspension plate If the outside measurements of the rotator shaft do not correspond with the inside measurements of the suspension bush you probably have the wrong suspension plate for your rotator If so contact your supplier Rotate your rotator shaft until the ...

Страница 5: ...rotator purchased from Bakker Hydraulic Products BV the hoses that connect this rotator and the hydraulic cylinder should be ordered from the manufacturer You can then be sure that the hoses are the right length and diameter If required reinforced hoses can be supplied as extras by and in consultation with the manufacturer 2 3 1 Mounting the hoses on a rotator with drive shaft Fit a hose to one of...

Страница 6: ...set four plates which are supplied as extras can be fixed to the sides of the grab bucket by means of a few bolts To do this mount two side plates to one side of the grabber and adjust them so that the grab bucket closes properly using the slotted holes in the detachable side plates Now tighten the bolts well Do the same on the other side of the grab bucket Your grab bucket with side plates is now...

Страница 7: ...Total length 1700 mm When mounting the tile jaws ensure that the grab bucket is in the open position Lay the tile jaws on the ground with the rubbers opposite each other roughly 1400 mm apart Position the grab bucket above the rubber jaws and slowly lower it until the blades of the grab bucket are in the appropriate position for the rubber jaws After this slide the hooks on the load binders over t...

Страница 8: ... plate in the reverse order to which you dismantled it 2 9 THE CYLINDERS Removing the cylinder Place the grab bucket in the closed position and make sure it is stable Remove the pins at each end of the cylinder Pull in the piston rod with the aid of oil pressure and make sure when doing so that the cylinder ends are protected from damage Once this has been done the cylinder can be removed in its e...

Страница 9: ...ng properly Check pins and bushes every year for slack maximum 0 8 mm If the exchangeable blades are worn they must be replaced by new blades maximum 25 mm per blade edge Regularly grease the pivots steady link cylinder suspension and pins to prevent penetration of sand dirt etc After 20 working hours check all bolted connections and tighten if necessary Caution With all maintenance activities on ...

Страница 10: ...on disconnect the hoses from the crane and check whether the grab bucket automatically closes when freely suspended If it does the non return valve and or seals are is defective check the piston seals and replace if necessary TECHNICAL DATA Grab type BDV 2020 Width 65 cm 90 cm 120 cm 80 cm 100 cm Capacity 300 L 450 L 600 L 400 L 500 L Weight 340 kg 415 kg 505 kg 385 kg 545 kg Max working pressure ...

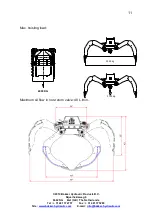
Страница 11: ...V Nijverheidsweg 6 6662 NG Elst Gld The Netherlands Tel 31 481 374757 Fax 31 481 375280 Site www bakker hydraulic com E mail info bakker hydraulic com Max hoisting load Maximum oil flow in non return valve 40 L min 4000 KG 2000 kg 3150 Kg ...

Страница 12: ...12 2010 Bakker Hydraulic Products B V Nijverheidsweg 6 6662 NG Elst Gld The Netherlands Tel 31 481 374757 Fax 31 481 375280 Site www bakker hydraulic com E mail info bakker hydraulic com BDV 2020 ...

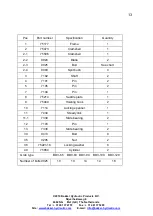
Страница 13: ... 1 2 1 75506 Clamshell 1 2 2 9024 Blade 2 2 3 9025 Bolt See chart 2 4 9003 Split bush 4 3 7102 Shaft 2 4 7101 Pin 2 5 7105 Pin 2 7 7104 Pin 1 8 75214 Saddle plate 1 9 75049 Hoisting hook 2 10 7114 Locking spanner 1 11 7434 Steady link 1 11 1 7339 Slide bearing 2 12 7103 Pin 1 13 7338 Slide bearing 2 30 9413 Bolt 8 35 9205 Nut 2 38 75221 16 Locking washer 8 40 75854 Cylinder 2 Grab type BDV 65 BDV ...

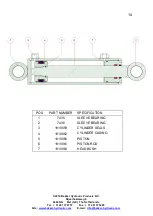
Страница 14: ...nds Tel 31 481 374757 Fax 31 481 375280 Site www bakker hydraulic com E mail info bakker hydraulic com POS PART NUMBER SPECIFICATION 1 7435 SLEEVE BEARING 2 7436 SLEEVE BEARING 3 1919059 CYLINDER SEALS 4 1919062 CYLINDER CASING 5 1919060 PISTON 6 1919061 PISTON ROD 7 1919063 HEAD BUSH ...

Страница 15: ...he Netherlands Tel 31 481 374757 Fax 31 481 375280 Site www bakker hydraulic com E mail info bakker hydraulic com POS PART NUMBER SPECIFICATION 1 1919207 BRAKE VALVE COMPLETE SET 2 3100001 NON RETURN VALVE COMPLETE SET COMPLETE SET 3 7436 SLEEVE BEARING 4 7435 SLEEVE BEARING ...

Отзывы: