background image

Consolidated 1511 Series Safety Valve Instruction Manual 

 |  15

© 2020 Baker Hughes Company. All rights reserved.

XI. Maintenance Instructions (Cont’d)

After the parts have been determined to be reusable, 

proper machining technique must be employed in 

reestablishing disc and seat bushing dimensions.

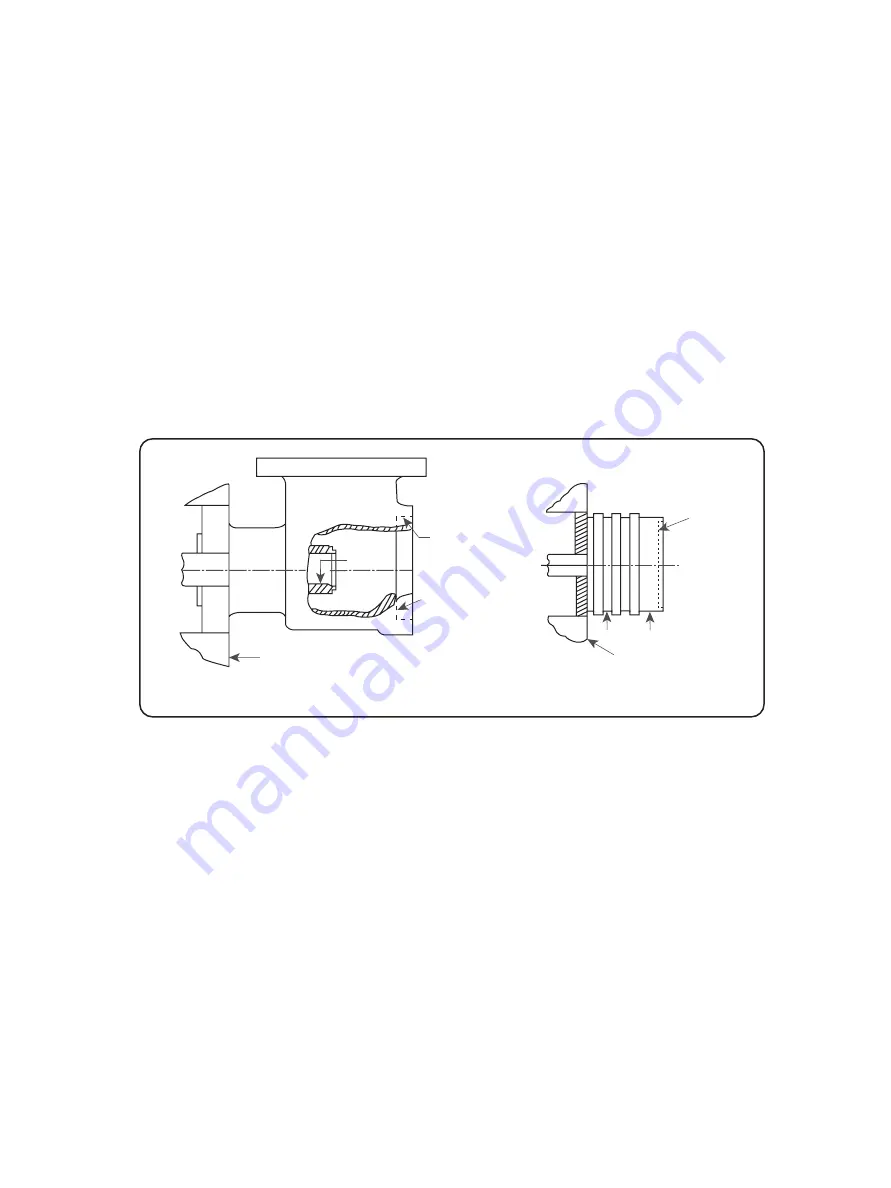
On 1511 Series safety valves, the seat bushing should 

be machined in the valve base to ensure proper parts 

alignment. When chucking the valve base or disc into 

a lathe, alignment must be within .001” (0.03 mm) total 

indicator runout at the points indicated in Figure 4 as “A”, 

“B”, and “C”.

Figure 4

A

A

B

B

C

C

Chuck Jaws

Chuck Jaws

Note:  See Section XII.B for rework dimensions for the Seat Bushing and Flat Solid Discs.

B. Machining

All of the above tools can be purchased from Baker 

Hughes, with prices in effect at the time of delivery. 

It may not be necessary to use all of the ring laps at 

any one time, but having a sufficient supply on hand 

will save reconditioning time during a boiler outage. 

After the boiler is back in operation, the ring laps can 

be reconditioned on the flat lapping plate. Lapping 

compound, when used with ring laps, wears off the seat 

surface on the disc or seat bushing, but it also wears off 

the flat surface of the ring lap. A lap should not be used 

on more than one valve without being reconditioned.

Lapping procedure for reconditioning the seating 

surfaces of the disc and seat bushing is outlined in 

Section XI.C.

C. Lapping Procedures

1. General:

  While the finer points of lapping may be considered 

a mechanical art, it is possible for the average 

mechanic to produce satisfactory results with some 

practice. No effort has been made in this manual 

to establish an exact procedure to cover each and 

every case because different people can achieve the 

same results using their own techniques.

  The following materials will be of assistance when 

lapping bushing and/or disc seats:

a.  Two ring laps per valve
b.  1-A Clover Grinding Compound
c.  1000 grit Kwik-Ak-Shun Grinding Compound
d.  Lint free wipers for cleaning

2.  Lapping the seat bushing or Disc Seat:

  Before lapping the seat bushing and disc, use a 

fine grade sandpaper to lightly break the inner 

edge and outer edge of the bushing and disc seats. 

This chamfer should not exceed .002” (0.05mm). 

If the seating surfaces require extensive lapping or 

reconditioning, machining should be considered prior 

to lapping. See Inspection Section XII.B for criteria. 

Cover one flat surface of a ring lap with a thin coating 

of Clover 1-A Grinding Compound and gently set the 

lap on the seat surface. Thick coatings tend to round 

off edges of the seat.


Lap using a slight oscillating 

motion in various directions. Control the motion of the 

lap to prevent the inside edge or outside edge of the 

lap from running off the seating surface, as this may 

cause the seat to become scratched or uneven.

Содержание Consolidated 1511 Series

Страница 1: ...Consolidated 1511 Series Safety Valves Instruction Manual Rev E Baker Hughes Data Classification Public...

Страница 2: ...UIREMENTS FOR OPERATION OF OTHER EQUIPMENT AT THE SITE THESE INSTRUCTIONS DO NOT PURPORT TO COVER ALL DETAILS OR VARIATIONS IN EQUIPMENT NOR TO PROVIDE FOR EVERY POSSIBLE CONTINGENCY TO BE MET IN CONN...

Страница 3: ...ance All the United States Customary System USCS values are converted to metric values using the following conversion factors USCS Unit Conversion Factor Metric Unit in 25 4 mm lb 0 4535924 kg in2 6 4...

Страница 4: ...16 E Spindle Runout 16 F Spring and Spring Washers 17 G Lift Restrictor 17 XII Inspection and Part Replacement A General Information 17 B Specific Steps 17 XIII Reassembly 20 XIV Setting and Testing A...

Страница 5: ...nstructions if necessary on how to avoid the hazard The top panel of the format contains a signal word DANGER WARNING CAUTION or ATTENTION which communicates the level of hazard seriousness The center...

Страница 6: ...the valve is removed Exercise care when examining a safety valve for leakage Prior to each actuation assure that no personnel are near the valve Steam escaping from the valve during actuation can poss...

Страница 7: ...not so satisfied contact Baker Hughes if there are any questions relative to tools methods The installation and start up of valves and or valve products may involve proximity to fluids at extremely hi...

Страница 8: ...essure is the static pressure existing at the outlet of a safety valve device due to pressure in the discharge system Blowdown Blowdown is the difference between actual popping pressure of a safety va...

Страница 9: ...its function in holding one or more pressure containing members in position Rated Lift Rated lift is the design lift at which a valve attains its rated relieving capacity Safety Valve A safety valve...

Страница 10: ...ed to prevent dirt from entering the outlet port while bolting in place While hoisting to the installation care should be exercised to prevent bumping the valve against steel structures and other obje...

Страница 11: ...Pin 6 Upper Adj Ring 7 Upper Adj Ring Pin 8 Yoke 9 Yoke Cap Screws 10 Spindle Assembly 11 Spring Washer 12 Spring 13 Compression Screw 14 Compression Screw Nut 15 Cap 16 Cap Set Screw 17 Lever 18 Rele...

Страница 12: ...ing backward through the drip pan In no case should the pipe connected to the valve be of a smaller size than the valve outlet Know all valve exhaust leakage points to avoid possible severe personal i...

Страница 13: ...e preventing variation in the set pressure Valves must be readjusted if insulation is installed Weather shielding should be used to protect the spring and to minimize rain or snow from entering the va...

Страница 14: ...ight up to remove the disc from the valve body Engage the drop through threads of the disc and unscrew it from the spindle 11 Measure from the top of the combination guide and upper ring to the top of...

Страница 15: ...procedure for reconditioning the seating surfaces of the disc and seat bushing is outlined in Section XI C C Lapping Procedures 1 General While the finer points of lapping may be considered a mechani...

Страница 16: ...rface is flat clear and mirror like wipe all traces of grinding compound from the part and begin reconditioning the other seat Note Do not place the disc in a vice to accomplish lapping procedures as...

Страница 17: ...F Spring and Spring Washers Spring wire that is irregularly spaced or the ends are not parallel are sufficient causes for replacement The spring washers are machined to fit the ends of the spring the...

Страница 18: ...ection Dimensions Orifice F 002 003 in 0 05 0 08 mm 1 G in mm in mm H 028 0 71 062 007 1 57 0 18 J 028 0 71 062 005 1 57 0 13 K 028 0 71 062 007 1 57 0 18 L 028 0 71 062 007 1 57 0 18 M 028 0 71 062 0...

Страница 19: ...e disc and upper adjusting ring Instructions Section XI B When the E dimension is reduced by machining or lapping to the minimum given in Table 8b the valve seat bushing should be remachined to the gi...

Страница 20: ...asher and spindle to disc pocket should each be ground together to attain a perfect match This is done by applying a lapping and grinding compound of about 500 grit on one of the surfaces and rubbing...

Страница 21: ...duct two more verification tests b If in raising the boiler pressure the valve does not pop open within 3 percent overpressure for ASME Section I valves or 10 percent overpressure for ASME Section VII...

Страница 22: ...notch that provides a minimum of simmer and does not interfere with the blowdown of the valve f If the valve pops open then drops out of lift like it was going to close but remains open at a very low...

Страница 23: ...in Table 9 8 Once the valve has tested in compliance with the appropriate standard conduct two more verification tests All external adjustments should be sealed after completing final setting 9 Proce...

Страница 24: ...Section I of the ASME Code and should be adjusted for the particular application C Presetting the Adjusting Rings B 2 Application of Test Gags All Pressures 1 Refer to Figures 1 2 on Section VIII Remo...

Страница 25: ...o 13 Notches Q 60 48 Down Two Turns Down 9 to 15 Notches Periodic tests may be required for verification of valve set pressure The Consolidated EVT provides for this capability However set pressure is...

Страница 26: ...spindle straightness etc C Operating too close to set pressure C Lower operating pressure D Discharge stack binding on valve outlet D Correct source of binding Hang up or valve does not close complet...

Страница 27: ...Ball End Spindle Washer Bearing Radius Compression Screw Bearing End Lapping Compounds Brand Grade Grit Lapping Function Size Container Part No 1 Clover 1A 320 General 4 oz 1993 2 Clover 3A 500 Finish...

Страница 28: ...ation PART CLASSIFICATION REPLACEMENT FREQUENCY PREDICTED AVAILABILITY CLASS I MOST FREQUENT 70 percent CLASS II LESS FREQUENT BUT CRITICAL 85 percent CLASS III SELDOM REPLACED 95 percent CLASS IV HAR...

Страница 29: ...the serial number is stamped on the top edge of the outlet flange Be sure to include the one or two letters preceding the figures in the serial number A typical valve nameplate is shown in Figure 11 C...

Страница 30: ...11 Spring Washers 2 1 Set 5 1 Set 3 12 Spring 1 5 1 3 13 Compression Screw 1 5 1 3 IV 9 Yoke Cap Screws 1 5 1 3 99 percent 14 Compression Screw Nut 1 5 1 3 15 Cap 1 5 1 3 16 Cap Set Screw 1 5 1 3 17 L...

Страница 31: ...to perform specialized repairs and product modi cations e g bushing replacements hydroset calibrations electromatic relief valve repairs code welding pilot replacement etc For further information plea...

Страница 32: ...t information The Baker Hughes logo Consolidated EVT and Green Tag are trademarks of Baker Hughes Company Other company names and product names used in this document are the registered trademarks or t...

Отзывы: