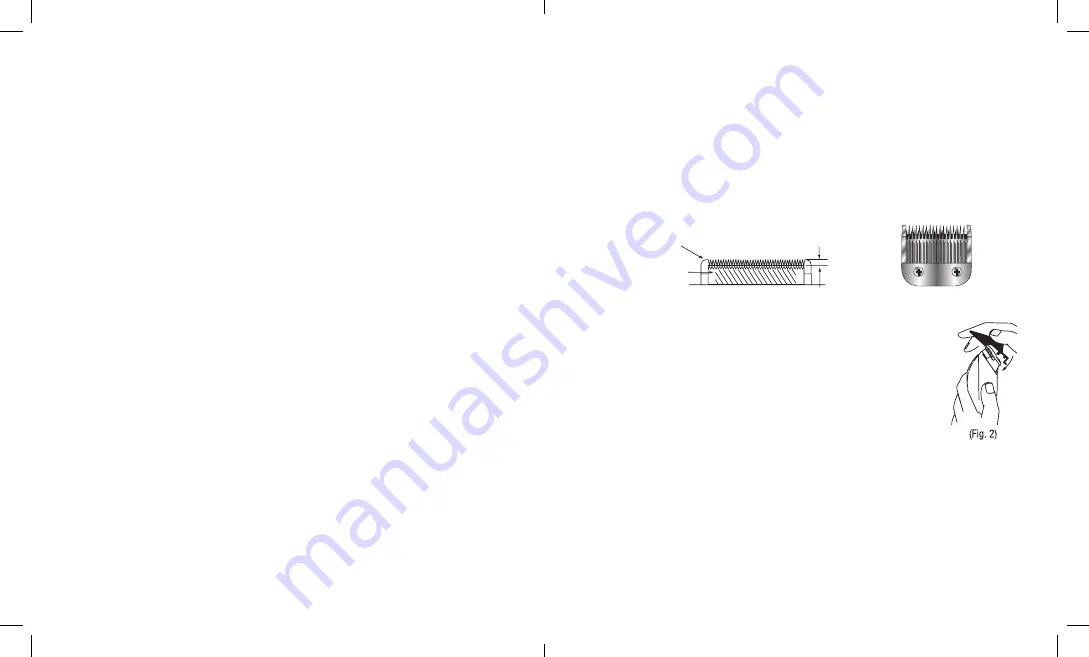
• The top edge of the cutting comb should be 1/32" to 1/16" (.8mm to 1.6mm)
higher than the top edge of the cutter. This is important so that the clipper does
not cut too close, or come in contact with the skin.
• The extreme left tooth of the cutting comb must cover or be to the extreme left
of the first small tooth of the cutter.
• Be sure that the extreme right big tooth of the cutter touches the extreme right
tooth of the cutting comb.
Be sure to add a few drops of lubricating oil to the blades before running.
Don’t forget to tighten the screws after the blades have been aligned.
HOW TO USE COMB ATTACHMENTS
To use the comb attachments, turn the clipper to the OFF position.
Slide the comb attachment onto the top of the clipper blades,
and then pull down and over the back of the blade set (Fig. 2). To
remove, pull up on the back of the comb attachment and then pull
away from the blades.
BLADE SHARPENING
BabylissPro cutting blades are ground from the finest quality steel with carbon and
are hardened to extend the cutting performance. As with any cutting appliance, the
cutting edges become dull from repeated usage. Increasing blade tension to force
the blade cutting that would cause the clipper to overheat and reduce its motor life.
When the blade is no longer to cut smoothly, sharpening is required or replace it
with new BabylissPro blade set.
USER MAINTENANCE INSTRUCTIONS
MAINTENANCE OF THE BLADES
Always apply oil to the blades before and after use. This will ensure maximum
cutting performance. Hold clipper away from your body in a downward position
and apply oil on the front and sides of the cutter blade. Wipe off excess oil with a
soft, dry cloth.
To maintain optimal performance, the blades should be cleaned and oiled regularly.
Remove hair from the blades using the cleaning brush. Oil the blades with the oil
provided with the clippers. Never use any other product; the oil provided is specially
formulated for clippers and won’t evaporate or slow the blades down.
Any other servicing should be performed by an authorized service representative
since the appliance has no other user-serviceable parts. The product is for
professional use.
Do not pull, twist, or wrap line cord around appliance.
REPLACEMENT OF FX810B BLADE SET
To remove cutting comb and cutter only: Turn the clipper to the OFF position, facing
away from you. With the cutting comb and cutter assembly in place, use a screw-
driver to loosen and remove the fastening screws from the cutting comb (save
the screws). Remove the cutting comb and lift the cutter from the white plastic
oscillating head.
To replace cutting comb and cutter after removal for cleaning, replacement or
because they are out of alignment, slide the cutter back onto the white plastic
oscillating head. Next, you must make sure that the cutter (small blade) and the
cutting comb (large blade) are properly aligned. Line up the new or existing cutting
comb with the two screw holes. Place the original screws, one in each hole, and
lightly tighten with a screwdriver.
Then match the two blades up, point to point, conforming with the illustration (Fig.
1).
Cutting Comb (large blade)
1/32" to 1/16"
Cutter
(small blade)
(Fig. 1)
FX810B IB-00000.indd 7-8
2019/3/25 3:02 PM


