background image

11

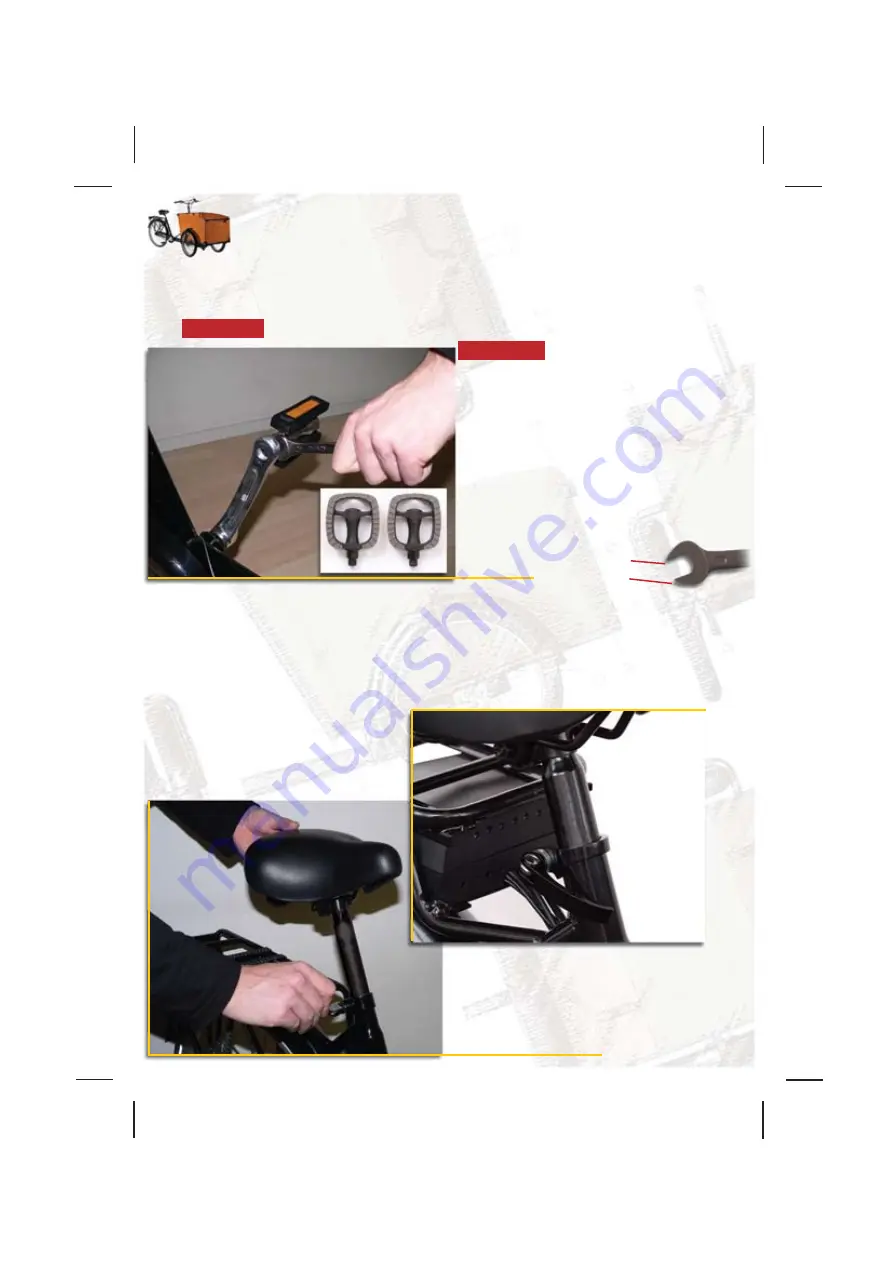
11. Attaching the pedals

15 mm

12. Attaching the saddle

Nr.17 (2x)

Nr.1

Screw the seat onto the narrow end of the seat post (Nr. 1).  Insert the

seat post into the frame.  Tighten the seat post clamp using its quick

release lever.

Attach the pedals (Nr. 17) to the crank arms.

Important:  First tighten the pedals by hand as much as you can.  Then

finish tightening using the open-ended spanner of 0.59 inch (15mm).

Attention: 

Turn the right hand pedal to the right when attaching it.


  Attention:  

Turn the left hand pedal


  to the left when attaching it.

Содержание E-Power

Страница 1: ...E Power ...

Страница 2: ...our bike mechanic or bike repair shop to have them re adjusted Perform regular maintenance on your Babboe You can find maintenance suggestions on www bakfietsen com The frame number required for bicycle insurance is printed at the top or bottom of the frame on the round part of the crank set where the crank arm is attached to the frame You can find the warranty conditions on www bakfietsen com For...

Страница 3: ...de Panel Nr 06 Front Panel Nr 07 Bottom Panel Nr 08 Rear Panel Nr 09 Bench Seat x2 Nr 10 Right Side Panel Nr 11 1smallhole SeatBelt x2 Nr 11A 2smallholes SeatBelt x2 Nr 12 Sidebars x2 Nr 13 Back Light Nr 14 Front Wheel x2 Nr 15 Plastic Ties Nr 16 Mudguards x3 Nr 17 Bike Pedals x2 Nr 18 Toy Bar and Protective Tubes Nr 19 Chassis Nr 20 Rear Frame and Stem with Handle Bars ...

Страница 4: ...onsibility for any damage or injuries that may result from incorrect assembly 35 inches 88 cm Unfold both this page and the last page of the instruction manual so all parts and the position of all bolts are always visible You will need the following tools before your start Phillips Screwdriver The Babboe Toolkit located in the shipment to you o 2 open ended spanners of 0 70 inch 12 mm o 0 39 inch ...

Страница 5: ...with the pictured charger for the Protanium Lithium Polymeer battery The Protanium battery that comes with your Babboe E Power can only be charged with this charger Using another charger will impact the capacity of your battery and will end the warranty on the battery In daily use The battery does NOT have to be completely empty before you recharge it We advise you to ALWAYS recharge the battery a...

Страница 6: ...the regulator which is located on the handle bars you will activate additional assistance up to a speed of 14 miles per hour 22 5 km per hour on a flat road This makes cycling on the Babboe E Power in a hilly terrain a fantastic experience When using the mountain gear the engine is de activated when you exceed 14 miles per hour You can cycle faster but the engine will then no longer assist you Han...

Страница 7: ...heat source The battery can explode if it becomes too hot Make sure that the space where the battery is charged is well ventilated Remove the battery from the power point as soon as it has been fully charged Do not use the Protanium charger to charge Ni Cd or Ni Mh batteries We strongly advise you to charge the Protanium battery only during daytime and only under supervision Liability 1 Babboe Pro...

Страница 8: ...D BY DAMAGE INTERRUPTIONS OR DEFECTS TO ANY PRODUCT INCLUDING BUT NOT LIMITED TO CLAIMS RELATED TO LOSS OF PROFITS THIS WARRANTY IS EXCLUSIVE AND OVERRIDES ALL OTHER WARRANTIES OR CONDITIONS WRITTEN OR ORAL EXPLICIT OR IMPLICIT WARRANTY CONDITIONS 1 The Babboe Protanium battery has been designed for transportation of people and recreational use of a Babboe Protanium electrical family bike The batt...

Страница 9: ... are identical over the tubes A on top of the frame Use nuts and bolts to attach the sidebars B Only screw the nuts finger tight Further tightening should only be done when all the panels of the box have been put in place B A 10 mm F Place a washer before the nuts Result Nr 12 Nr 19 A Screwdriver ...

Страница 10: ...of the side bars to attach the mudguards to the sidebars A Use the bolts that are already in the chassis to attach a mudguard on each side B B A A Result Nr 16 Attention To ensure the mudguards are well aligned with the wheels you should only tighten the screws after the wheels have been inserted ...

Страница 11: ...own Put the front wheels Nr 14 in the chassis and place the brake arm A in the hinge B in the chassis Tighten the bolts C Place the chassis upright Attention The locknut which is used to attach the wheel C can stay in the black cover B A C 15 mm Result ...

Страница 12: ...des of the bolt Important Only screw the nuts finger tight for now C Use a 0 67 inch 17 millimetres open or box end spanner Attention Add the nut and screw tight again after a couple of weeks 1 Put the washer on the bolt 2 Stick the bolt through the frame 3 Put the second washer on the bolt 4 Add the nut and screw finger tight Result ...

Страница 13: ...n on the picture A Make sure that the nuts are pointing outwards B Suggestion You only have to attach one or even no seats belt if you are planning to use one or two baby or toddler seats If you are planning to use just one seat then we recommend you place it on the right hand side of the box so larger children can climb into the box by themselves from the left hand side pavement side Result Nr 11...

Страница 14: ...her tightened when all panels of the box have been put in place E Important When the stem with handlebars has been mounted the rear frame should be held straight Only then should the large nuts H be screwed as tightly as possible Suggestion 1 When aligning the rear frame make sure that the seat post is aligned with the stem Suggestion 2 Make sure that one person is carefully aligning the rear fram...

Страница 15: ...ub brake E To do this you should push the calliper black metal hook towards the cable 3 Lead the short cable of the right front brake on the inside of the tilt stopper and lead it through hinge C which is also used for a brake arm 4 Use the plastic ties Nr 15 to attach the cables to the tilt stoppers strakker stellen losser stellen 1 1 A1 Topside A2 Bottom Side Suggestion The brakes can be tighten...

Страница 16: ...ntally on the chassis Attention It does not need to be attached Insert the side panels and attach them to the sidebars and other parts Attention Make sure that the nuts are inserted from the outside C Attention Only tighten nuts and bolts when they have all been inserted If the foam protective tubes around the iron bars are missing you can also use felt strips or window strips ...

Страница 17: ... hinges Nr 4 to each of the wooden benches Nr 9 using bolts C First attach the rear bench the one closest to the handle bars Insert the bolts from the inside Then attach the front bench 2 Attach the nuts on which the benches rest on the inside of the box 3 Attach the seat belts underneath the rear bench ...

Страница 18: ... nuts are facing outwards 4 Attach the seat belts to the front bench Make sure that the nuts are facing downwards C C G C Nr 03 Place the additional corner fittings Nr 03 on the top corners of the front end of the box These will be required to attach the rain tent which is an optional accessory that needs to be ordered separately IMPORTANT YOU SHOULD NOW TIGHTEN ALL THE NUTS AROUND THE BOX To make...

Страница 19: ... Tighten the seat post clamp using its quick release lever Attach the pedals Nr 17 to the crank arms Important First tighten the pedals by hand as much as you can Then finish tightening using the open ended spanner of 0 59 inch 15mm Attention Turn the right hand pedal to the right when attaching it Attention Turn the left hand pedal to the left when attaching it ...

Страница 20: ...pen each clip If required remove the protective tube when attaching the clips onto the toy bar Insert the batteries into both front lights and into the rear light Attach the clips onto the toy bar with the screw facing towards the front Slide the lights back onto the clips Place the foam protective tubes around the toy bar and make sure that the seat belts cannot move sideways ...

Страница 21: ...r wheel has a disc brake The brake cable is fully assembled Double check that the brake cables are properly inserted in their holders A1 A2 and A3 Please view the instruction videos on www babboe co uk to learn how to adjust the rear brakes when necessary ...

Страница 22: ... the straps for carrying luggage before attaching the bar Attention The label of the lock should point towards the front of the bicycle Insert the bolts through the second hole from the top in the lock and attach the lock onto the bike by tightening the nuts A In case the frame lock is not already attached to the back wheel of your Babboe it can be attached as follows Remove the two bolts A from t...

Страница 23: ...o it might be necessary to re adjust them from time to time You can find an instructional video on www babboe co uk which demonstrates how to do this To have the best riding experience and to ensure durability of brakes and gears we advise you to follow the instructions carefully ...

Страница 24: ...you This will give you more control over the bike 3 Braking Because the majority of the weight of the Babboe is in the front of the bike you should primarily rely on the front brakes and only use the back brakes to assist The Babboe uses disc brakes which prevents tires from slipping in the rain 4 Standing on the pedals On a normal bicycle you can stand on the pedals to apply extra power We do not...

Страница 25: ... will stretch during regular use of the bike We advise you to regularly re adjust and lubricate the brake cables to optimize their effectiveness At the start of the winter season you should lubricate your brake cables This will prevent the inner cable from freezing to the outer cable which would reduce the effectiveness of the brakes Lubricating the chain You can lubricate your chain with chain lu...

Страница 26: ...res is around 4 2 bars or 65 psi Rust Spots Should you despite precautions find any rust spots on the Babboe then we advise you to immediately apply a silicone spray from a bike shop to the spot This will avoid further rusting of the Babboe Damaged paint To prevent rusting due to damaged paint we advise you to treat any damaged spots with a touch up paint in the right colour An example is MOTIP BL...

Страница 27: ...ms should be carried out Re adjustment of the brakes Re adjustment of the gears Re adjustment and lubrication of the chain Lubrication all moving parts Checking spokes and crank which can loosen after first use Your mobile bike mechanic or local bike repair shop can perform this service for you Attention Please keep your receipt in case you need to make a warranty claim ...

Отзывы: