background image

10  

  Operation


Functional Checkout 

The Functional Checkout procedure is to help you confirm that your GenePix 
Professional 4200A microarray scanner is performing according the specifications 
set by Axon Instruments, Inc.  A similar, but much more detailed procedure was 
performed at the factory prior to shipping this unit to you.  We recommend that you 
follow the procedure once upon receiving the instrument and then any time after 
that if you wish to check the performance of the instrument.   

The GenePix 4200A microarray scanner has been designed to provide robust, long-
lived microarray scanning for years of normal use.  However, if the images you 
acquire on the GenePix scanner do not appear correct and if you believe there is a 
problem with the scanner, it is important to follow these instructions before 
contacting Technical Support: 

1.  Start the GenePix Pro software and click the Report tab. 

2.  Click the Functional Checkout link. 

3.  Follow the Functional Checkout procedure. 

GenePix Pro automatically logs hardware performance into the Hardware 
Diagnostics Report every two hours during operation. 

Installing Additional Filters 

Your GenePix 4200A Professional scanner comes with one standard filter for each 
installed laser.  The standard filters are not accessible by the user.  You can install 
additional filters in any of the twelve remaining filter positions.  

The installation process involves two steps: 

1.  Install the filters in the scanner; 

2.  Record the information for the new filters in GenePix Pro. 

GenePix 4200A User’s Guide,  Copyright 2005  Axon Instruments / Molecular Devices Corp. 

Содержание GenePix Professional 4200A

Страница 1: ...n Instruments Molecular Devices Corp No part of this manual may be reproduced stored in a retrieval system or transmitted in any form or by any means electronic mechanical photocopying microfilming recording or otherwise without written permission from Molecular Devices Corp QUESTIONS See Axon s Knowledge Base http support axon com ...

Страница 2: ......

Страница 3: ...oroughly calibrated before leaving the factory Nevertheless researchers should independently verify the basic accuracy of the instrument using suitable test samples WARNING If this equipment is used in a manner not specified by the manufacturer the protection provided by the equipment may be impaired DISCLAIMER This equipment is not intended to be used and should not be used in human experimentati...

Страница 4: ......

Страница 5: ...d 5 Installing the GenePix Pro Software 6 Connecting the GenePix Scanner to the Computer 7 Windows 2000 and Windows XP Installation 7 Connecting the Security Key 8 Troubleshooting Installation 8 SCSI Card Installation Problems 8 Chapter 3 Operation 9 Inserting a Slide 9 Functional Checkout 10 Installing Additional Filters 10 Chapter 4 Imaging System Hardware 15 Discussion of Hardware Components 15...

Страница 6: ...imit 25 Specifications 25 Technical Assistance 27 Warranty and Repair Service 29 Licensing Notice 33 Declaration of Conformity 35 Important Safety Information 37 Index 57 GenePix 4200A User s Guide Copyright 2005 Axon Instruments Molecular Devices Corp ...

Страница 7: ...neutral density wheel permitting 5 100 laser transmission Data Scan resolution from 5 µm to 100 µm Fast Preview Scan at 40 µm Uses 16 bit ultra low noise digitization Dynamic range of 104 Easy access 16 position emission filter wheel with standard filters for each laser installed at the factory Full integration with GenePix Pro and Acuity software Axon Instruments has consulted widely among the sc...

Страница 8: ......

Страница 9: ...n GenePix Pro press F1 For information on setting up your GenePix Professional 4200A scanner and software please refer to Chapter 1 For a guided tutorial on scanning your first slide see Chapter 4 of the GenePix Pro Software User s Guide Computer Requirements Please refer to the Axon Instruments website for up to date information Should you choose to purchase your own computer Axon recommends that...

Страница 10: ...ties exe executable file located in the GenePix Pro installation directory Instructions 1 Close GenePix Pro if open and start GenePix Utilities program 2 Press Park Scanner button 3 Wait for status message indicating that scanner has been successfully parked 4 Immediately turn off scanner power do not reopen GenePix Pro as this will un park the scanner 5 Place one or two pieces of adhesive tape to...

Страница 11: ...ePix scanner 5 Turn on the GenePix scanner 6 Turn on the computer Installing the SCSI Card Included with your GenePix scanner is a SCSI adapter card for your host computer This card is used to transfer data and instructions between the host computer and the GenePix scanner The SCSI card that is included with the GenePix scanner is a PCI based Plug n Play card from AdvanSys that will install easily...

Страница 12: ...rst and wait for approximately 15 seconds before turning on computer If you already have a SCSI card installed on your host computer and do not want to replace it with the included SCSI card you must verify that it is a SCSI 2 device that is Win ASPI compliant You must also ensure that you have the proper cabling to connect the SCSI card to the GenePix scanner While it is possible that an existing...

Страница 13: ...wer supply and then turn on your computer Windows 2000 and Windows XP Installation If the connections have been made correctly and GenePix Pro software has already been installed when you restart your computer Windows will show a message that indicates that New Hardware has been detected Windows 2000 will automatically install the necessary driver for the GenePix scanner Windows XP requires that y...

Страница 14: ...act Technical Support If you are using a SCSI card that was not provided with your GenePix scanner you should contact the supplier of that SCSI card for technical support GenePix Pro automatically detects the GenePix Professional 4200A scanner If this does not occur please verify the following items The data cable between the computer and the scanner is securely connected The GenePix scanner has p...

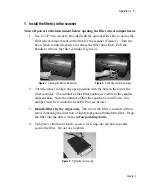
Страница 15: ...he flat spring positioner will ensure proper positioning of the slide Do not push the slide into position Gently close the slide holder lid and close the door You are now ready to scan your sample See Image Acquisition in the Tutorial section of the GenePix Pro User s Guide for scanning instructions Note The slide holder is a precision component designed to ensure proper focusing and field uniform...

Страница 16: ...correct and if you believe there is a problem with the scanner it is important to follow these instructions before contacting Technical Support 1 Start the GenePix Pro software and click the Report tab 2 Click the Functional Checkout link 3 Follow the Functional Checkout procedure GenePix Pro automatically logs hardware performance into the Hardware Diagnostics Report every two hours during operat...

Страница 17: ...he filter cartridge 2 Turn the wheel to align any open position with the hole in the top of the filter cartridge The number of that filter position is visible in the smaller adjacent hole Note the number of the filter position you will use this number must be recorded in GenePix Pro see below 3 Handle filters by the edges only The rim of the filter is marked with an arrow indicating the direction ...

Страница 18: ... door and turn the hex key clockwise to secure the latch 2 Record the information for the new filters in GenePix Pro 1 Turn on the scanner and computer If GenePix Pro is running shut it down 2 From the Windows Start menu go to Programs Axon Laboratory GenePix Pro Filter Tool GenePix 4200A User s Guide Copyright 2005 Axon Instruments Molecular Devices Corp ...

Страница 19: ... entered as 530 For a long pass filter enter the peak emission of the dye you will use with that filter 5 In GenePix Pro you can display either the filter s Formal name e g 530DF30 or an Alternate name e g Alexa 488 or Blue Filter Enter both names here so that each user can choose their preferred nomenclature in GenePix Pro 6 After you have entered this information for each new filter click Save 7...

Страница 20: ......

Страница 21: ...tem to its optical mechanical and electrical components Optics Fundamentally the GenePix scanner uses a laser excitation based fluorescence scanning and imaging system The optical system can be considered in terms of excitation light mirrors lenses filters and photo detection The optical lens is located beneath the slideholder therefore the specimen must be placed feature side down into the slide ...

Страница 22: ... blue laser with 488 nm excitation can be used with fluorescein and similar dyes and a yellow laser with 594 nm excitation can be used with Texas Red and similar dyes The Alexa Fluor dyes from Molecular Probes offers a number of dyes compatible with all four lasers excitation sources available in the GenePix 4200A scanner Laser excitation sources are often used in scanning systems instead of conve...

Страница 23: ... autofluorescence reagent background etc The GenePix scanner comes with standard emission filters installed one for each laser installed at the time of purchase Each standard emission filter is optimized for the emission spectrum of the respective dye The factory installed Cy5 red filter is a bandpass filter with cut on frequency at a wavelength of 655 nm and cut off frequency at 695 nm This is id...

Страница 24: ...ission peak of the chosen dye and must be narrow enough to exclude light from the laser other dyes etc but not so narrow that too many emission photons are excluded otherwise sensitivity will be lost We also strongly recommend that a reject filter of OD 8 be employed to eliminate laser excitation Installing Filters Before installing filters turn the scanner power off To gain access to the filter w...

Страница 25: ...procedure in reverse order The filter information is stored in the PC board of the scanner not the computer After each filter installation or change is made turn on the scanner and open the Filter Tool program located in the Axon Laboratory GenePix Pro 5 folder of the start menu Activate the filter position by pressing on the check box and enter a description that will help you identify the filter...

Страница 26: ...ity imaging First since different photocathodes have varying sensitivities to specific wavelengths of light quantum efficiency the PMT has been carefully chosen for the typical wavelengths of fluorescence emission light produced by microarrays Second the PMT has been further selected for its reliability and optimal signal to noise performance Mechanical The GenePix scanner is a mechanical device I...

Страница 27: ... for more information Proper Use of Slide Holder The slide holder retracts into the scanner when the scanner door is closed Opening the door or pressing the Eject button in GenePix Pro will return the slide holder to the loading position It takes a few moments to fully eject the slide holder do not open the slide holder before it has come to a complete stop as this can cause misalignment This type...

Страница 28: ...m the digitized signals from the PMT The spatial resolution of the system refers to the size of the pixel It determines the minimum distance that can be distinguished between two points of light In the GenePix scanner the highest spatial resolution is 5 microns It is possible to change the resolution of Data Scans by changing the pixel size setting in the Hardware Settings dialog of the GenePix Pr...

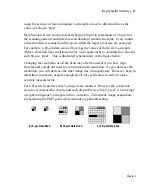
Страница 29: ...xel This is illustrated schematically in the figure below Changing the resolution of a Data Scan may often be useful if you have large features and you do not need to scan at maximum resolution As you decrease the resolution you will decrease the final image size in megabytes However keep in mind that you need to acquire enough pixels for each feature in order to make accurate measurements For a P...

Страница 30: ... On the left side of each image pair is the raw data scan from the GenePix Scanner Each square represents a 5 µm 5 µm spot as scanned by the 5 µm laser beam On the right are the resultant image pixels at various resolutions The shading indicates the spots that are scanned by the GenePix scanner as well as the corresponding pixels in the final image GenePix 4200A User s Guide Copyright 2005 Axon In...

Страница 31: ...near For the GenePix scanner the dynamic range is 104 The dynamic range of an instrument is often considered in conjunction with its detection limit The detection limit is defined as the dye concentration for which the signal to noise ratio 3 Signal to noise ratio is calculated as Signal Background Standard Deviation of Background Although you may be able to see features below this level the quant...

Страница 32: ...on uniformity Dimensions 43 cm 16 9 65 cm 25 6 34 cm 13 4 W D H Weight 45 kg 99 lb Power supply Line voltage 85 to 264 VAC 110 to 340 VDC universal voltage input Line frequency 50 60 Hz Power 150 W Fuse 2 0 A slow 5 20 mm GenePix 4200A User s Guide Copyright 2005 Axon Instruments Molecular Devices Corp ...

Страница 33: ...p to resolve a problem there are several ways to contact Axon Instruments Molecular Devices World Wide Web www axon com Phone 800 635 5577 Fax 1 510 675 6300 E mail axontech axon com Questions See Axon s Knowledge Base http support axon com Technical Assistance ...

Страница 34: ......

Страница 35: ...s returned to our factory for repair should be properly packaged with transportation charges prepaid Axon Instruments Molecular Devices will pay for the return shipping of the product to the customer If the shipment is to a location outside the United States the customer will be responsible for paying all duties taxes and freight clearance charges if applicable The warranty is valid when the produ...

Страница 36: ...resentative will issue a Service Request SR number Our Logistic Coordinator will contact you with specific instructions Out of Warranty Repair Service Out of warranty repair service is available Contact the supplier for current rates or see our web site at www axon com Optional Service Agreement Purchasing an optional Service Agreement extends the coverage of the Standard Warranty Contact the supp...

Страница 37: ...ellet packing and be damaged If you need to ship the GenePix 4200A to another location or back to the factory and you do not have a means to adequately package it Axon Instruments can ship the proper packaging material to you for a small fee This may seem an expense you would like to avoid but it is inexpensive compared to the cost of repairing an instrument that has sustained shipping damage It i...

Страница 38: ......

Страница 39: ...e either been purchased from OGT s licensed suppliers or have been made by the customer under a license from OGT Please contact OGT to enquire about a license under OGT s patents at licensing ogt co uk mailto licensing ogt co uk USE OF THIS INSTRUMENT WITH MICROARRAYS MAY REQUIRE A LICENSE FROM ONE OR MORE THIRD PARTIES THAT HAVE PATENTS RELEVANT TO SUCH USE AXON INSTRUMENTS MOLECULAR DEVICES DOES...

Страница 40: ...S SEPARATELY LICENSED BY AFFYMETRIX NO LICENSE IS CONVEYED BY IMPLICATION ESTOPPEL OR OTHERWISE TO USE THIS INSTRUMENT WITH MICROARRAYS MADE USING IN SITU OR PHOTOLITHOGRAPHIC SYNTHESIS NO OTHER LICENSE IS CONVEYED BY IMPLICATION ESTOPPEL OR OTHERWISE UNDER ANY AFFYMETRIX PATENT OR OTHER INTELLECTUAL PROPERTY RIGHT This instrument is licensed by Affymetrix under the following patents U S Patent No...

Страница 41: ...ation of Council Directives EC EMC Directive 89 336 EEC as amended EC Low Voltage Directive 73 23 EEC as amended Harmonized Standards to which Conformity is Declared EMC EN 61326 04 1997 Emissions EN 61326 04 1997 Immunity Low Voltage EN 61010 1 1993 A1 A2 1995 EN 60825 1 1994 A11 1996 Laser Safety I the undersigned hereby declare that the equipment specified above conforms to the above Directives...

Страница 42: ......

Страница 43: ...hazards can cause severe or fatal injury Caution Indicates that damage to the instrument loss of data or invalid data could occur if the user fails to comply with the advice given Important Highlights information that is critical for optimal performance of the system Note Identifies items of general interest The Protective Housing The protective housing and instrument interlocks are designed to pr...

Страница 44: ...nt of the GenePix 4200A doesn t extinguish when the door is open 3 You cannot scan any slides 4 You can no longer hear the distinctive metal on metal sound that the mechanical interlock makes when it falls into place This normally happens when the slide loading door has opened about Lifting Hazard Warning The GenePix Professional 4200 scanner weighs approximately 99 lbs 45 kg and requires two pers...

Страница 45: ... can cause severe or fatal injury High voltage electronics can also be found in the scanner s controlling computer See the computer manufacturer documentation on the high voltage hazard warnings Make sure you follow the instructions on the safe operation of the computer Moving Parts The GenePix 4200A Microarray Scanner instrument contains moving parts that can cause injury Under normal operating c...

Страница 46: ...please contact Technical Support List of Controls This Guide constitutes a list of controls Caution Use of controls or adjustments or performance of procedures other than those specified herein may result in hazardous radiation exposure Safety Labels If a label becomes illegible or is missing for any reason please contact Microarray System Technical Support for a free replacement label While waiti...

Страница 47: ...l instrument care should be taken to maintain a low dust low vibration environment Temperature and humidity extremes may compromise performance Environmental Temperature 50 86º F 10 30º C Environmental Humidity 5 95 non condensing Power Requirements Universal Input 50 60 Hz 100 240V AC 2A max Space Requirements 25 6 in deep 16 9 in wide 13 4 in high 65 cm 43 cm 34 cm plus additional 6 in 15 2 cm c...

Страница 48: ...es hautes tensions ou à des pièces mobiles Ces dangers peuvent être à l origine de dommages corporels sévères ou fatals Attention Indique un risque de dommage pour l instrument de perte de données ou de données invalides si l utilisateur ne suit pas les recommandations de ce manuel Important Désigne des informations vitales pour le fonctionnement optimal du système Note Identifie des informations ...

Страница 49: ...lissante 2 La DEL Scanning voyant bleu à l avant du GenePix 4200A ne s éteint pas quand la porte est ouverte 3 Il vous est impossible de scanner une lame 4 Vous n entendez plus le bruit métallique caractéristique que provoque le verrouillage mécanique lorsqu il est enclenché Ce clic s entend normalement dès que la porte coulissante est ouverte d un quart de pouce environ 6 mm Attention danger en s...

Страница 50: ...trôlant le scanner Reportez vous à la documentation du fabricant de l ordinateur sur les risques liés à ces hautes tensions Suivez les instructions concernant les précautions d utilisation de l ordinateur Pièces mobiles L instrument à laser Microarray Scanner GenePix 4200A contient des pièces mobiles pouvant entraîner des risques de dommages corporels Dans des conditions d utilisation normales cet...

Страница 51: ...e plus auun service de maintenance n est autorisé de la part d un tiers Liste des Contrôles Ce guide constitue une liste des contrôles à effectuer régulièrement Attention Tout contrôle réglage ou exécution de procédures autres que celles spécifiées ci dessus peut entraîner un risque d exposition dangereuse à des rayonnements Etiquettes de sécurité Si une étiquette devient illisible ou manque pour ...

Страница 52: ...eux de ses performances si les conditions nécessaires sur le site sont satisfaites Comme pour tout autre instrument optique de précision il ne doit pas être exposé à la poussière et aux vibrations Des conditions extrêmes de température et d humidité peuvent compromettre ses performances Température 10 30º C Humidité 5 95 sans condensation Alimentation 100 240V 6A max 47 63 Hz Espace nécessaire 65 ...

Страница 53: ... 4200A puede resultar en exposición peligrosa a radiación láser alto voltaje o a partes móviles Exposición a estos peligros pueden producir lesiones severas o fatales Precaución Indica que puede ocurrir daño del intrumento pérdida o invalidéz de la información obtenida si el usuario no obedece las instrucciones provistas Importante Resalta información fundamental para el funcionamiento óptimo del ...

Страница 54: ...a placa después de abrir la puerta 2 La luz azul emitida por el diodo LED con etiqueta Scanning localizado en la parte delantera del GenePix 4200A no se extingue cuando la puerta está abierta 3 Usted no puede registrar ninguna placa 4 No se puede escuchar el sonido característico del contacto entre metales producido por el circuito de seguridad cuando se ajusta en su lugar Este ocurre normalmente ...

Страница 55: ...es Electrónica de alto voltaje se encuentra en el computador que controla el escáner Revise la documentación del fabricante sobre las advertencias al respecto Cerciorese de seguir cuidadosamente las instrucciones sobre la utilización apropiada del computador Partes Móviles El GenePix 4200A Microarray Scanner contiene partes móviles que pueden causar lesiones El instrumento está diseñado para prote...

Страница 56: ...vor comuníquese al mantenimiento técnico a cualquiera de los números telefónicos indicados en la etiqueta Lista de Controles Este guía provee una lista de controles Precaución el uso de los controles el ajuste o la ejecución de procedimientos diferentes de los especificados aquí puede resultar en exposición peligrosa a la radiación del laser Etiquetas de Seguridad Si una etiqueta se hace ilegible ...

Страница 57: ...operar óptimamente si el lugar de instalación cumple con los requerimientos Como con cualquier instrumento óptico de precisión debe tener cuidado de manterlo en un lugar bajo en polvo y de poca vibración Temperaturas extremas y humedad pueden comprometer su funcionamiento Temperatura ambiental 50 86 ºF 10 30 ºC Humedad ambiental 5 95 sin condensación Energía requerida Entrada 100 240V 6 A máximo 4...

Страница 58: ...zu schweren oder tödlichen Verletzungen führen Achtung Weist darauf hin dass bei Nichtbeachtung der Vorschriften Schaden am Gerät entstehen kann und Datenausfall oder möglicherweise ungültige Daten resultieren können Wichtig Weist auf Information hin die wichtig ist um die optimale Leistung des Gerätes sicherzustellen Anmerkung Deutet auf Themen von generellem Interesse hin Das Schutzgehäuse Das S...

Страница 59: ... Die blaue Scanning Lichtdiode an der Vorderseite des GenePix 4200A erlöscht nicht wenn die Tür geöffnet wird 3 Sie können keine Glasstreifen ablesen 4 Der Benutzer hört nicht mehr das metallene Geräusch welches bei normaler Funktion durch das Einrasten der mechanischen Verriegelung ausgelöst wird Dies passiert normalerweise wenn die Tür ungefähr 6 mm geöffnet ist Warnung Gefahr bei Anhebung Der S...

Страница 60: ...ch im Kontrollrechner des Gerätes Lesen Sie sich bitte die Gebrauchsanweisung über die Hochspannungsgefahr durch Befolgen Sie alle Anweisungen über die Sicherheitsmassnahmen beim Gebrauch des Rechners Bewegliche Teile Der GenePix 4200A Microarray Scanner enhält bewegliche Teile die Verletzungen verursachen können Unter normalen Umständen ist das Gerät so konstruiert um Sie vor den beweglichen Teil...

Страница 61: ...nn rufen Sie bitte den Technischen Hilfsdienst an Liste von Kontrollvorrichtungen Diese Gebrauchsanweisung enthält eine Liste der Kontrollvorrichtungen Achtung Der Gebrauch von Kontrollvorrichtungen oder Einstellungen bzw die Ausführung von Handlungen außer denen die in dieser Anweisung beschrieben sind können zu gefährlichen Strahlungen führen Sicherheitsetiketten Sollte ein Etikett unlesbar werd...

Страница 62: ...setzungen gegeben sind Genau wie bei anderen optischen Geräten sollte auch hier ein staub und schwingungsfreies Umfeld existieren Extreme Temperaturen und Luftfeuchtigkeit können die optimalen Funktionen des Gerätes beeinträchtigen Umgebungstemperatur 10 30 ºC Umgebungsluftfeuchtigkeit 5 95 unkondensiert Stromvoraussetzung Zufuhr 100 240 V 6 A max 47 63 Hz Platzvoraussetzung 65 cm 43 cm 34 cm Bitt...

Страница 63: ...re 17 See Cy3 Cy5 GenePix Installation 3 Hardware 15 Amplifiers 22 Laser Excitation 16 Quantum Efficiency 20 Help On Line 3 Hardware Spatial Resolution 22 Lasers Temperature Fluctuations 16 On line Help 3 Photo Multiplier Tube Gain 20 Pixel Size 22 23 24 Preview Scan 23 24 Spatial Resolution 22 23 Stokes Shift 17 Temperature Fluctuations 16 Index ...

Отзывы: