Avtech AVN211 Скачать руководство пользователя страница 12


For Windows 7 users: 

a) Select 

” (start) 

 “Control Panel” 

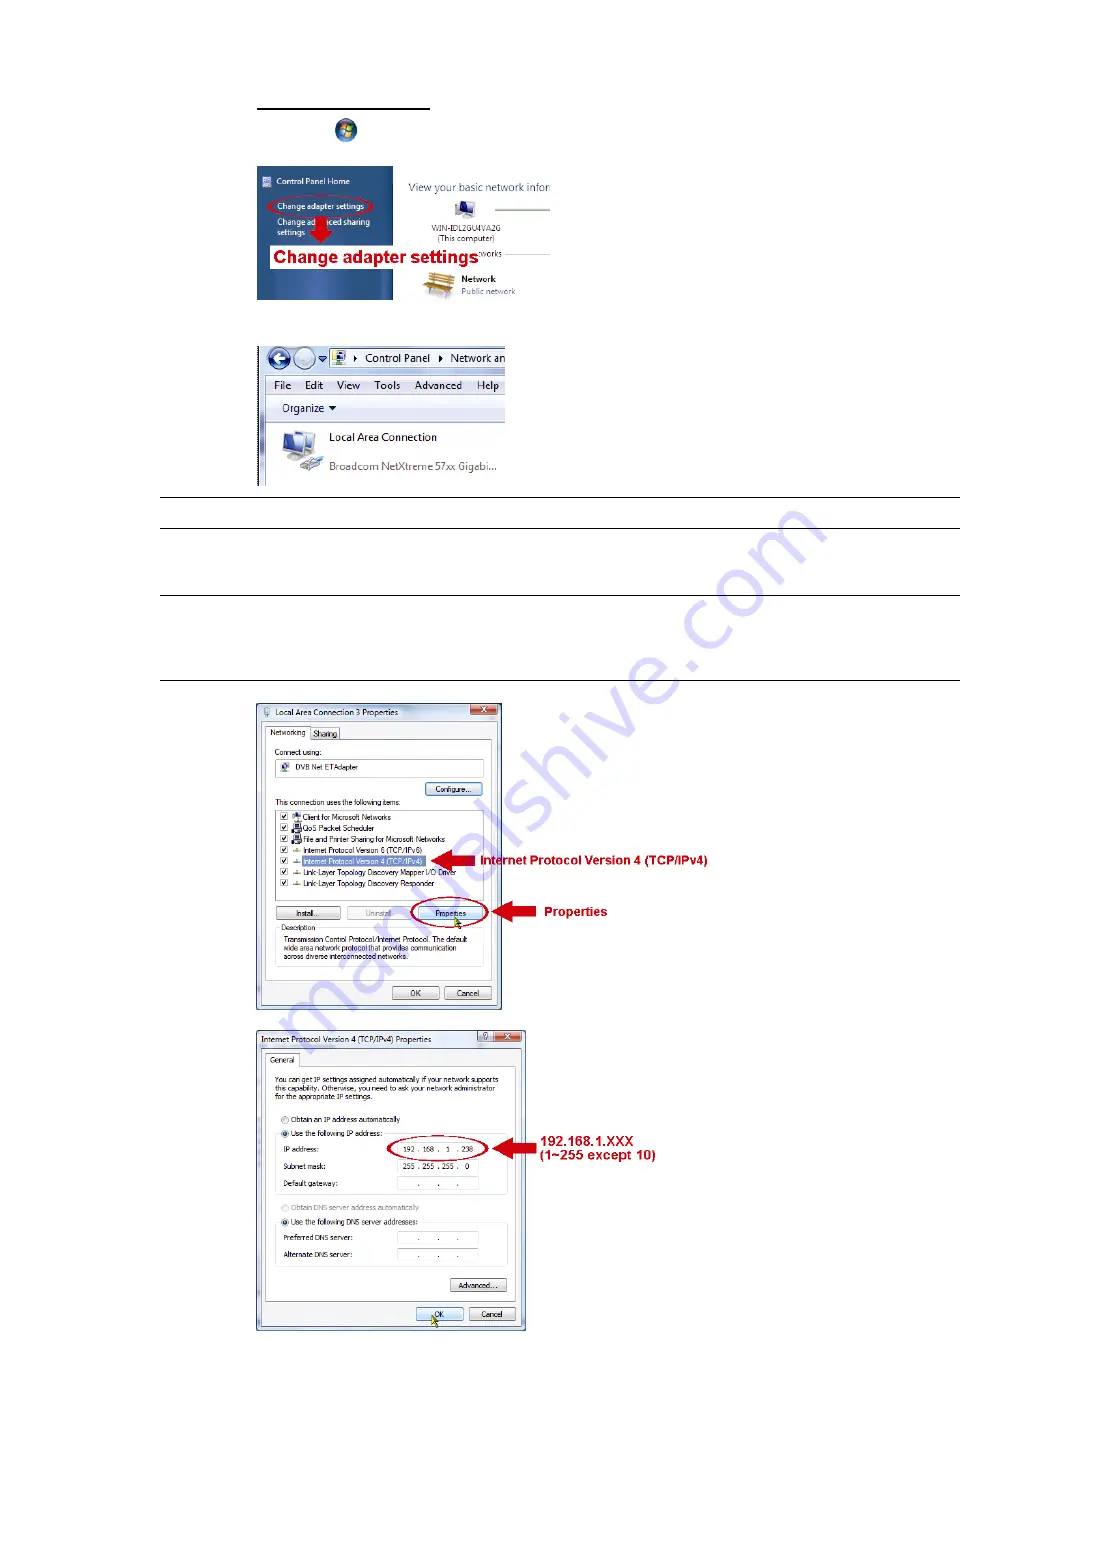
 “Network and Internet” to enter the “Network and Sharing 

Center”. Then, click “Change adapter settings”. 


b)  Right-click on “Local Area Connection”, and select “Properties”. 


Note: 

If your local area connection is not enabled, please also enable it.


c)  In the “Networking” tab, select “Internet Protocol Version 4 (TCP/IPv4)”, and select “Properties”. 

d)  In the “General” tab, select “Use the following IP address”, and set the IP address as described below. 

Note: 

It’s recommended to note down the current settings first and then change as 
instructed. It’s helpful when you need to restore the computer’s network settings 
for connecting to Internet later.


e)  Click “OK” to close the “Internet Protocol Version 4 (TCP/IPv4) Properties” dialog box. Then, click 

“Close” to close the “Local Area Connection Properties” dialog box. 

Содержание AVN211

Страница 1: ...318Z N211_211V_quick_V1 0 H 264 NETWORK CAMERA INSTALLATION GUIDE Please read instructions thoroughly before operation and retain it for future reference...

Страница 2: ......

Страница 3: ...esponsibility for the accuracy completeness or usefulness of this manual The content of this manual is subject to change without notice MPEG4 Licensing THIS PRODUCT IS LICENSED UNDER THE MPEG4 VISUAL...

Страница 4: ...e Hardware 3 2 2 Connect to power 5 3 CAMERA CONNECTION TO INTERNET 6 3 1 Camera Access via LAN 6 3 2 Network Configurations via Wizard 9 APPENDIX 1 CREATING AN ACCOUNT FOR DDNS SERVICE 12 APPENDIX 2...

Страница 5: ...1 1 OVERVIEW 1 1 Package Content Network camera RJ45 network cable Installation Guide Adapter Bracket CD ROM disc including user manuals CMS software Video Viewer 1 2 Hardware Overview...

Страница 6: ...factory default settings Power Indicator When the camera is power supplied this indicator will be on as red Video Output Connect to the video input connector of your monitor with a video cable i e a R...

Страница 7: ...ble connection please refer to 1 3 Rear Panel on Page 2 Tool needed Power drill x 1 not supplied within the sales package Prepare all the parts needed for camera installation Find the network camera b...

Страница 8: ...e as shown in Figure 4 Desktop With the upper side of the camera facing up align the mounting screw hole on the underside with the screw thread of the joint lock and rotate the camera to secure Figure...

Страница 9: ...5 2 2 Connect to power Plug the supplied power adapter to the camera s power connector and power outlet Note The regulated power adapter is DC12V 1A to operate this device...

Страница 10: ...anel Network and Internet Connections Network Connections If you re in Category View b In LAN or High Speed Internet right click on Local Area Connection and select Properties c In the General tab sel...

Страница 11: ...l Version 4 TCP IPv4 and select Properties d In the General tab select Use the following IP address and set the IP address as described below Note It s recommended to note down the current settings fi...

Страница 12: ...Internet Protocol Version 4 TCP IPv4 and select Properties d In the General tab select Use the following IP address and set the IP address as described below Note It s recommended to note down the cu...

Страница 13: ...browser for example Microsoft Internet Explorer and enter http 192 168 1 10 in the URL address box Step2 In the login page key in the default user name admin and password admin and enter the security...

Страница 14: ...our ISP b Continue the DDNS setting by clicking the DDNS button as reminded in this page Select default in System Name In Hostname keep the default value i e the MAC address of this camera Then note d...

Страница 15: ...hange the host name to a more meaningful name to memorize later here Note You can also create a DDNS account from a website which provides free DDNS service For details please refer to APPENDIX 1 CREA...

Страница 16: ...e Account to sign up a DDNS account Step2 Enter all the information necessary for signing up an account according to the website instructions Key in a user name for login for example headoffice523 Set...

Страница 17: ...s service is free Just finish the billing process and NO paying information is required Step6 Click Activate Services after checkout and you re ready to use DDNS services now Step7 Return to your web...

Страница 18: ...14...

Страница 19: ...ng from the 11th message Please follow the steps below for application Step1 Go to http www clickatell com login php In New Customers select Clickatell Central API from the drop down list Step2 Fill i...

Страница 20: ...IVATION CODE The system will send an activation code to that number for verification Check if you receive a text message from Clickatell Step4 Go back to Clickatell and click the tab Manage my Product...

Страница 21: ...vider Your DVR or network camera is powered on and connected to Internet You have noted down the IP address port number user name and password used to access your DVR or network camera from Internet A...

Страница 22: ...18 Note For more details about configuring and operating this program please visit our official website www eagleeyescctv com...

Отзывы: