Avonic AV-REC200 Скачать руководство пользователя страница 32

System Settings

The last page on the menu is the System Settings page, where you can find all the settings regarding licenses,
network settings, firmware upgrades etc.

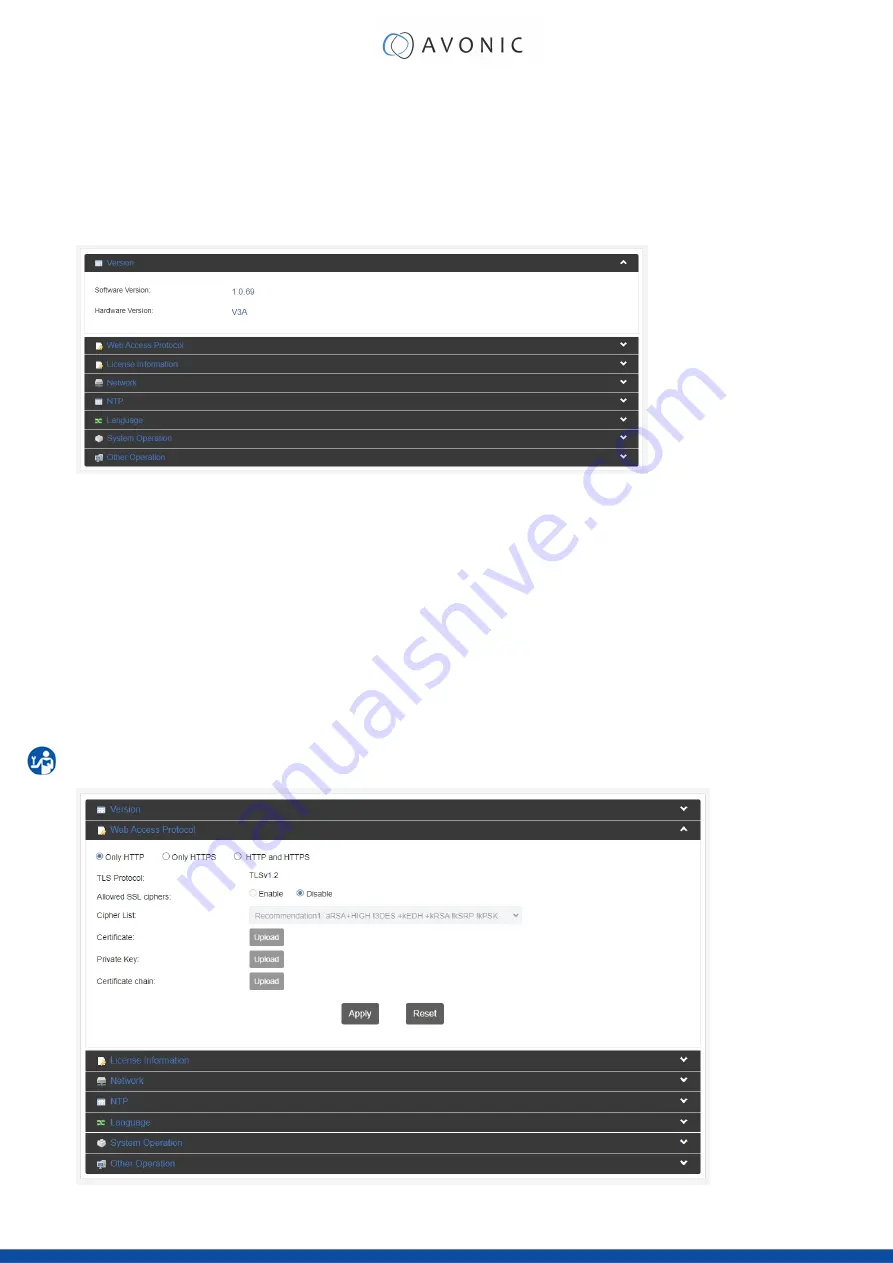
1. Version information

Shows the software and hardware version of the REC200.

Figure 24: WebGUI > Version

2. Web Access Protocol

The Web Access Protocol is for communication security between computersystems in a network, or via
internetsites that are used to stream video’s made with the REC200.

Only HTTP, Only HTTPS, or HTTP and HTTPS

Select one of these options

TLS (Transport Layer Security) Protocol

TLS version

Allowed SSL ciphers

Enable/ Disable

Cipher List

Recommendation1, Recommendation2

Certificate, Private Key, Certificate chain

Upload possibility

Click now on 

“Apply”

 to save the settings.

Figure 25: WebGUI > Web Access Protocol

32

Содержание AV-REC200

Страница 1: ...USER MANUAL Recorder Encoder with HDMI SDI input AV REC200 www avonic com July 2022 Version 1 5...

Страница 2: ...roring to any other computer server Web site or other medium for publication or distribution or for any commercial enterprise without the prior written consent of Avonic Copyright 2022 AVONIC All Righ...

Страница 3: ...vonic Exportweg 11a 2645ED Delfgauw Netherlands 3 This declaration of conformity is issued under the sole responsibility of the manufacturer 4 The object of the declaration described in point 1 is in...

Страница 4: ...NOT designed or intended for use in the diagnosis of disease or other conditions or in the cure mitigation treatment or prevention of any condition or disease Please consult your healthcare provider...

Страница 5: ...Instruction This symbol refers to one or more user instructions that must be followed as is documented in the user manual Recycling Specific parts of the Product can be re used Acronyms The following...

Страница 6: ...0 Repair 10 Power and Adapter 10 Atmospheric Conditions 10 PRODUCT OVERVIEW 11 Description 11 Features 11 UNPACKING 12 Package Contents 12 Unpacking the Recorder 13 Return Procedure 13 MOUNTING AND IN...

Страница 7: ...STORAGE 43 DISPOSAL AND RECYCLING 44 TROUBLESHOOTING 45 General 45 Power Issues 45 WebGUI 45 Cannot enter WebGUI 45 Cannot stream record or playback 45 Firmware update failed 45 API Commands 46 How t...

Страница 8: ...developed for installation technicians who install the Product at client sites and for IT professionals who are responsible for operating the Product Document Structure The Manual is subdivided into t...

Страница 9: ...dling To prevent the risk of injury take the following precautions when handling this Product Handle the Product with care It is made of metal glass and plastic and has sensitive electronic components...

Страница 10: ...et the applicable safety standards They could pose a risk of death or injury when connected Do NOT use damaged cables Do NOT power the Product in a moist wet environment Before you power the Product e...

Страница 11: ...IP control enable ease of use and full integration with 3rd party control systems Features The Avonic REC200 has the following features Resolutions High Definition input resolutions up to 1080p60 Stre...

Страница 12: ...ections 1 Package Contents 2 Unpacking the Camera 3 Return Procedure Package Contents The following tables contains an overview of the package contents of the Product No Quantity Description Avonic SK...

Страница 13: ...its protective foam If this is NOT the case contact Avonic and stop here 4 Take the REC200 out of the protective foam and the box 5 Install the REC200 following the steps as described in the chapter M...

Страница 14: ...cause the unit to fall off resulting in personal injury Mounting construction IF you decide to place the REC200 on a mounted construction make sure that the REC200 is prevented from falling by placin...

Страница 15: ...in two ways 1 Connect a cable with a jack male plug to the REC200 and the other side to a line level audio input device such as a audio transmitter with a connection to a microphone 2 Connect a camer...

Страница 16: ...e REC200 Login Figure 6 WebGUI Login Execute the following steps to log on to the WebGUI 1 Open a webbrowser and enter the default ip address of the REC200 see below The browser will connect to the un...

Страница 17: ...creen The icon changes in a cross and the page will slide out from the left Here you can see the menu of the WebGUI consisting of the following tabs 1 Status 2 Live Service Streaming Setting 3 Record...

Страница 18: ...t settings for live streaming recording and playback status These settings can be configured in the different settings pages in the main menu If you have inserted a USB or SD device you will see also...

Страница 19: ...DP HLS RTSP Automatic connection for a direct connection with youtube or facebook Automatic Connection To make an automatic connection with Youtube follow the instructions below Basic Settings 1 Selec...

Страница 20: ...ction 1 Open the Basic Settings tab You will see the following options Figure 12 WebGUI Basic Settings Manual 1 Input HDMI SDI 2 Mode Manual Youtube Facebook 3 Output UDP RTMP RTMPS HLS RTSP 4 IP URL...

Страница 21: ...Settings 4 Copy the RTSP url or HLS url and paste it in the fieldnetwork url in VLC See the picture below 5 Click Apply and then onStart Streaming in the WebGUI If you are using only the REC200 selec...

Страница 22: ...a connection with Youtube This will also work for a connection with Facebook 1 Login to your Youtube or Facebook account and click the Go Live button Figure 15 Youtube Go Live 2 Click right now or se...

Страница 23: ...outube or Facebook Stream key in the Uploading Node field of the REC200 6 Video Profile 1080p 6000Kbps is the preferred setting for Youtube You can also set up these settings manual according to your...

Страница 24: ...Main Baseline Video Resolution 1920x1080 1680x1200 1600x900 1440x1050 1440x900 1360x768 1280x1024 1280x720 1280x800 1280x768 1024x768 1024x576 960x540 850x480 800x600 720x576 720x540 720x480 720x404...

Страница 25: ...Time or Size of the file kilobytes 8 Loop enable disable loop recording when recording device is full 9 Apply click to save the settings if you changed them 10 Start Recording click on the green butto...

Страница 26: ...ord mode The loop record mode enables the possibility to enable continuously recording a file with a max of 4GB Take note of the following When the 4G is reached the REC200 will start a new file with...

Страница 27: ...35 8 Mbps 4 Gb 1 14 10 Mbps 4 Gb 0 57 FTP Upload The Avonic REC200 has been equipped with an FTP client to upload recordings to a FTP server The now following steps will describe how to install and u...

Страница 28: ...the settings in order to play back video as a stream It works the same as streaming and recording but in this case you can choose the files to be played back Playlist 1 Open the Playback page You will...

Страница 29: ...00 will build up the stream again after a change to its settings It is also not possible to place a running time on the overlay stream Follow the instructions below to select a text and or picture as...

Страница 30: ...ontal location 6 Location Y Vertical location Picture Settings 1 Picture Switch Enable Disable 2 Location Manual Top Left Top Center Top Right Middle Left Middle Center Middle Right Bottom Left Bottom...

Страница 31: ...delete the background in the picture 3 Copy the layer or duplicate it 4 Uncheck the copied layer and select only the original layer 5 Select your imagefile in the original layer window holding the CT...

Страница 32: ...Access Protocol is for communication security between computersystems in a network or via internetsites that are used to stream video s made with the REC200 Only HTTP Only HTTPS or HTTP and HTTPS Sel...

Страница 33: ...absence of a DHCP server you can manually set IP Address Subnet Mask Default Gateway etc Select Static under network mode to do that Network mode Static or DHCP IP Address Fill in IP Address Subnet Ma...

Страница 34: ...hows day date and time Time Zone Choose the time zone you want NTP Server Fill in the name of the NTP server Auto Sync Choose if you want or not to synchronize automatically the time Select enable or...

Страница 35: ...ion Upgrade import or export license if available Import or export a configuration file Figure 30 WebGUI System Operation 8 Other Operation Reboot Restore Factory Settings Export logfile and Clear all...

Страница 36: ...tional mode input stream standard output protocol running status etc 2 Navigation buttons for navigating through front panel display 3 Ok button 4 Menu button 5 Power and status indicator changes colo...

Страница 37: ...ive SeeManual Connection using RTSP HLS UDP 1 Encoding Video Source Sets the source for streaming Choose between HDMI and SDI 2 Encoding Video Profile Sets the image size Choose between different size...

Страница 38: ...e instructions below to play back a recorded a video 1 Select Playback List and Playback Output to select a recording and where to play back the recorded video See picture and description below For pl...

Страница 39: ...recorded video If you see playback playing screen the REC200 is playing back the recorded video Press OK to pause stop playback Playback is paused OK start playing back REC200 is playing back the reco...

Страница 40: ...cording 5 Select again OK to pause or stop the recording If you see the record paused screen the recording is paused Press OK to start record video If you see record starting screen the REC200 is reco...

Страница 41: ...rk 1 Host IP Address of the host IP port Fill only if no DHCP server is used 2 Host gateway Address of the host Gateway Fill only if no DHCP server is used 3 Host Mask Address of the host Mask Fill on...

Страница 42: ...ptor to the outlet Use a soft cloth or tissue to clean the camera cover Please use the soft dry cloth to clean the lens If the REC200 is very dirty clean it with diluted neutral detergent Do not use a...

Страница 43: ...commended to wrap the REC200 in the original plastic bag and to place it in the protective foam Specific guidelines apply to the environmental temperature and humidity when operating and storing the R...

Страница 44: ...electronic equipment and its parts that have been discarded by the owner as waste without the intention of re use Avonic outsources the disposal and recycling of its E Waste camera materials to the St...

Страница 45: ...your browser sometimes cache issues arise when using multiple cameras that have the same default IP address 4 Restore to factory default by pressing MENU and then System Recovery Yes See also Front Pa...

Страница 46: ...button Connect 3 Fill in the commands from the API list below to be sent to the REC200 Because you send commands in a text format HEX should NOT be enabled 4 Click on send and the camera will sent you...

Страница 47: ...onfirmation InputSrc X X ON OFF sta InputSrc ON InputSrc ON AudioSw X X ON OFF sta AudioSw ON AudioSw ON RecordSw X X ON OFF sta RecordSw ON RecordSw ON RecordDev X X USB SD sta RecordDev ON RecordDev...

Страница 48: ...nput resolutions are send from another device to the REC200 and are affected by the camera used quality of the light conditions in the room the optics of the camera and sensor of the camera For an opt...

Страница 49: ...Recorder Encoder with HDMI SDI input AV REC200 July 2022 Version 1 5 Exportweg 11a 2645 ED Delfgauw The Netherlands 31 0 15 7112 712 info avonic com www avonic com...

Отзывы: