


If you want to change the video resolution and Bitrate, you need to set the
Basic Settings > Video Profile
to
User-Defined.
on Facebook to set up a correct stream.
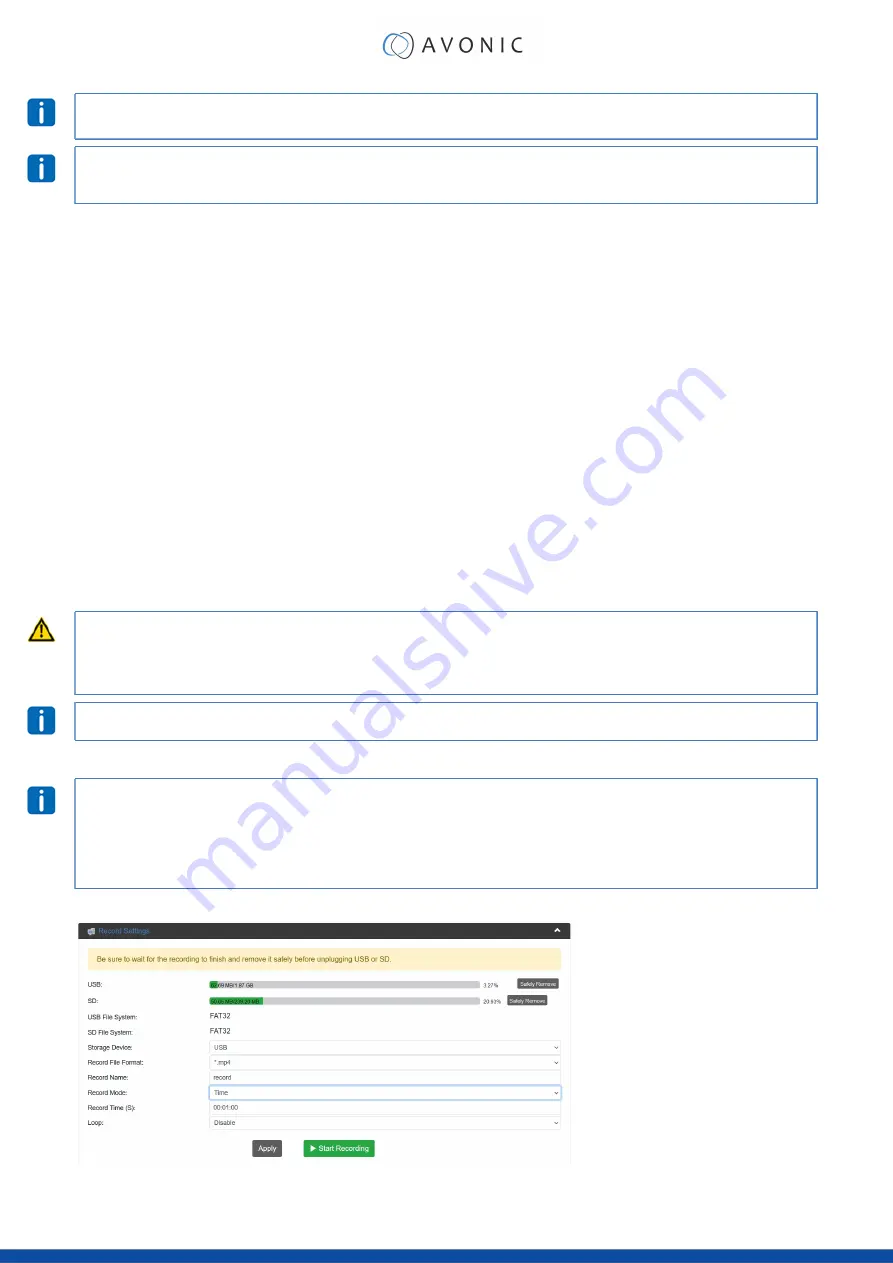
Record Page / FTP Upload Settings
Record Settings
The Record Settings page is shown in the pictures below. Here you can select which way and where a stream is
recorded.
1.
USB
states whether or not a USB device is inserted
2.
SD
states whether or not a SD card is inserted
3.
Storage Device
Select either USB or SD to record
4.
Record File Format
*.ts, *.mp4, *.mov
5.
Record Name
name the recorded file
6.
Record Mode
Loop, Size, Time
7.
Record Time/ Size
Determine maximum recording Time or Size of the file (kilobytes)
8.
Loop
enable/ disable loop recording when recording device is full
9.
Apply
click to save the settings if you changed them
10.
Start Recording
click on the green button
•
MAKE SURE TO SAFELY REMOVE THE USB/SD BEFORE TAKING IT OUT OF THE REC200, IF YOU DO NOT, IT MAY
CORRUPT THE LAST RECORDING!
• YOU CAN ONLY USE FAT32 USB/SD DRRIVES, WITH A MAX OF 128 GB AND RECORD A MAX OF 4 GB FILE SIZE.
AFTER THAT THE REC200 WILL RECORD A NEW FILE WITH A GAP OF 1 OR 2 SECONDS BETWEEN THE TWO FILES.
Appendix B - Input Resolutions
for an optimal quality of the recording.
WebGUI > Record Settings > record modes
Take note of the following before reading further:
• You can see how much space is left on the USB/ SD device at the green bar that is slowly turning full.
• Click
always
on
apply
when you change some settings! This will save the settings.
• You can start recording (green button)
after
you clicked on
apply.
Time record mode
25


