Avocent Single port KVM over IP switch Скачать руководство пользователя страница 29

Single port KVM over IP switch 


29

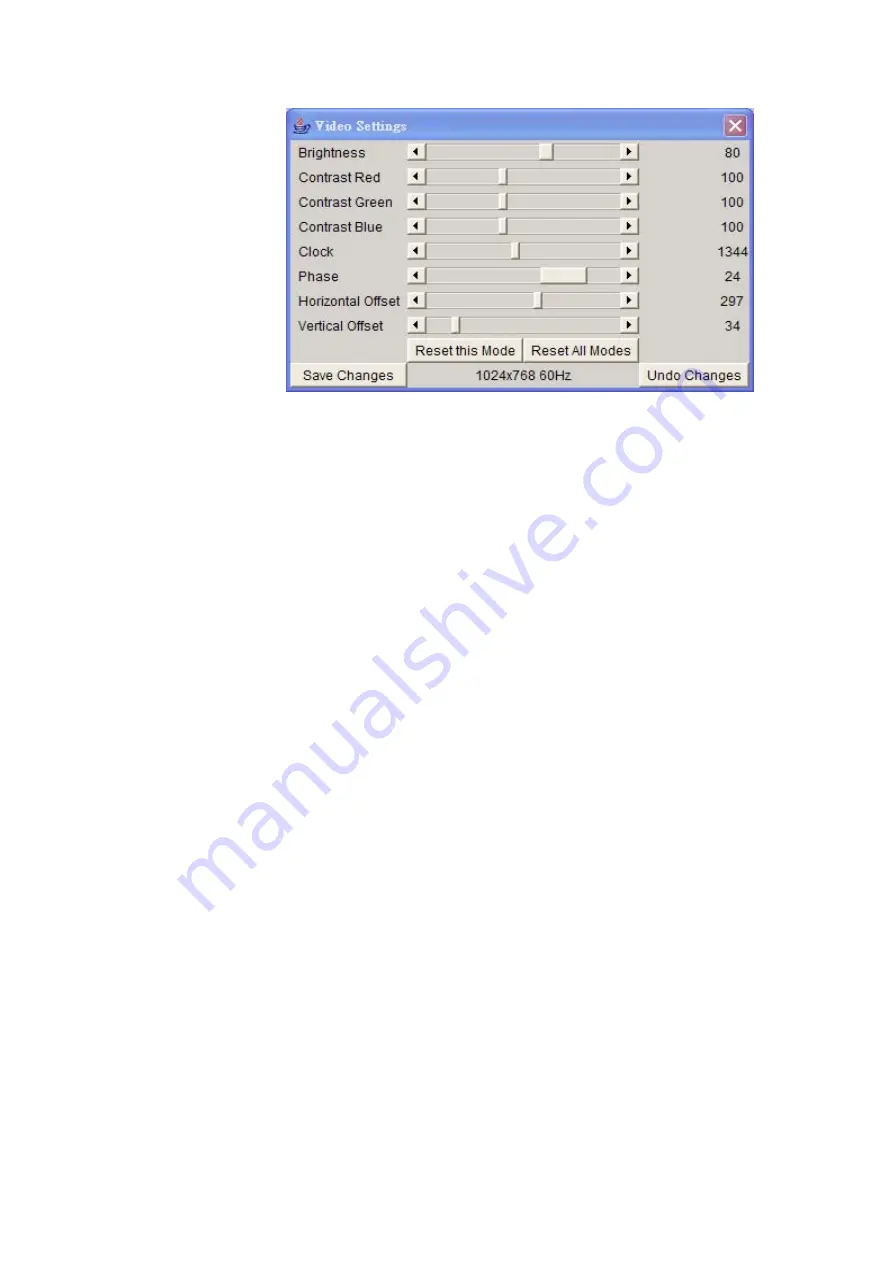
  Video Settings through the remote console


Figure 5-11. Video Settings Panel   


 Brightness 

Controls the brightness of the picture 

 Contrast 

Controls the contrast of the picture 

 Clock 

Defines the horizontal frequency for a video line and depends on the 

video mode. Different video card types may require different values here. The 
default settings in conjuction with the auto adjustment procedure should be 
adequate for all common configurations. If the picture quality is still bad after 
auto adjustment you may try to change this setting together with the sampling 
phase to achieve a better quality. 


Phase 

Defines the phase for video sampling, used to control the display quality 

together with the setting for sampling clock. 


Horizontal Position 

Use the left and right buttons to move the picture in 

horizontal direction while this option is selected. 


Vertical Position 

Use the left and right buttons to move the picture in vertical 

direction while this option is selected. 


Reset this Mode 

Reset mode specific settings to the factory-made defaults. 


Reset all Modes 

Reset all settings to the factory-made defaults. 


Save changes 

Save changes permanently 


Undo Changes 

Restore last settings 

• Soft Keyboard 

Содержание Single port KVM over IP switch

Страница 1: ...Single port KVM over IP switch 1 Single Port KVM over IP SWITCH USER S MANUAL Rev 1 0 ...

Страница 2: ...CONFIGURATION 4 1 Initial Configuration 4 1 1 Initial configuration via DHCP server 4 1 2 Initial configuration via serial console 4 1 3 Keyboard Mouse and Video configuration 4 1 3 1 IP KVM switch keyboard settings 4 1 3 2 Remote Mouse Settings 4 1 3 3 Auto mouse speed and mouse synchronization 4 1 3 4 Host system mouse settings 4 1 3 5 Single and Double Mouse Mode 4 1 3 6 Video Modes 5 USAGE 5 1...

Страница 3: ...s And Groups 6 4 KVM Settings 6 4 1 User Console 6 4 2 Power Control 6 4 3 Keyboard Mouse 6 4 4 Video 6 5 Device Settings 6 5 1 Network 6 5 2 Dynamic DNS 6 5 3 Security 6 5 4 Certificate 6 5 5 Serial Port 6 5 6 Date And Time 6 5 7 Event Log 6 6 Maintenance 6 6 1 Device Information 6 6 2 Event Log 6 6 3 Update Firmware 6 6 4 Unit Reset 7 TROUBLESHOOTING 8 CERTIFICATES A Pin Assignments B Key Codes ...

Страница 4: ...h 6 Connect one purple end of 3 in one cable to the PS 2 mouse port on the computer and the other end of 3 in one cable to the host PS 2 mouse port on the IP KVM Switch 7 Connect one green end of 3 in one cable to PS 2 keyboard port on the computer and the other end of 3 in one cable to the host PS 2 keyboard port on the IP KVM switch 8 Connect the type A connector of USB A B cable to the host sys...

Страница 5: ...ut entering values does not change settings The gateway value must be set to 0 0 0 0 for no gateway or any other value You will be asked if the values are correct and get a chance to correct them After confirming IP KVM switch performs a reset 2 Use a crossover Ethernet cable to connect IP KVM switch to a subnet where a DHCP server is available After the DHCP server has assigned an IP address to I...

Страница 6: ...ity or distorted in some way press this button and wait a few seconds while IP KVM switch tries to adjust itself for the best possible video quality Sync Mouse Choose this option in order to synchronize the local with the remote mouse cursor This is especially necessary when using accelerated mouse settings on the host system In general there is no need to change mouse settings on the host Video S...

Страница 7: ...fine tuning is recommended to receive the best video quality IP KVM switch will accept video streams up to 110 MHz dot clock This results in a screen resolution of 1280x1024 pixels with a frame rate of 60 Hz 2 1 When the server is up and running IP KVM switch gives you a full control over the remote server The Management Console allows you to access the remote server s graphics keyboard and mouse ...

Страница 8: ...rld z KVM keyboard video mouse access over IP and analogous telephone line modem needed z BIOS level access z SSL encryption z No impact on server or network performance z Automatically senses video resolution for best possible screen capture z High performance mouse tracking and synchronization z Port to connect a user console for direct analogous access to KVM switch z Local Mouse suppression on...

Страница 9: ...RJ 45 8P8C 1 10BASE T Ethernet uses Category 3 4 5 5E 6 UTP 100BASE T Ethernet uses Category 5 5E 6 UTP Reset button 1 Keyboard Emulation PS 2 Mouse Emulation PS 2 VGA Resolution Local 1600 X1200 Remote 1280 X1024 Housing Metal Power Adapter DC 5V 2 5A Operation Temperature 0 50 Storage Temperature 20 60 Humidity 0 80 Non Condensing Size Desktop Weight kg 1700g Dimension mm 156 X139 X27 2 6 System...

Страница 10: ... Cable diagrams PS 2 Cable Mini Din 6 pin Male to Male VGA Cable HDB15 pin Male to Male USB 2 0 Cable USB A B cable AT to PS 2 keyboard adapter Optional Din 5 pins Male to Mini Din 6 pin Female CAT5 5E 6 Straight Through UTP STP Cable 8P8C ...

Страница 11: ...n console All data is transmitted with the TCP IP protocol family IP KVM switch can be used in a multi administrator and multi server environment as well Attaching one or several IP KVM switches to a KVM switch matrix allows accessing multiple servers on a single remote console 3 2 Connecting IP KVM switch to the host system In order to connect the IP KVM switch of the host system performs the fol...

Страница 12: ...witch console side Step 5 Connect a VGA cable 15 pin HDDB Male Male with the Male side to both of the PC and the host of the IP KVM switch Step 6 Connect one end to the PS 2 mouse port on the computer and the other end to the host PS 2 mouse port on the IP KVM switch Step 7 Connect one end to PS 2 keyboard port on the computer and the other end to the host PS 2 keyboard port on the IP KVM switch ...

Страница 13: ...bps 10BASE T connection The adapter can sense the connection speed and will adjust to the appropriate operation mode automatically 3 2 1 1 10 Mbps Connection For 10BASE T Ethernet networks the Ethernet adapter uses Category 3 4 5 or 6 UTP cable To establish a 10 Mbps connection the cable must be connected to a 10BASE T hub Make sure that the cable is wired appropriately for a standard 10BASE T ada...

Страница 14: ...switch to the Multi port KVM Switch system 3 4 Connecting the External Reset Power Option Please refer to the manual of the IP KVM 8 16 32 port external power switch option or a third party external power option to connect those external devices to one of the serial interface on the rear side of IP KVM switch By the date of printing this manual supported options are Avocent SPC1 800 1600 Sentry In...

Страница 15: ...s physically connected If a DHCP server is found it may provide a valid IP address gateway address and net mask Before you connect the device to your local subnet be sure to complete the corresponding configuration of your DHCP server It is recommended to configure a fixed IP assignment to the MAC address of the IP KVM switch You can find the MAC address labeled on the bottom side of the metal hou...

Страница 16: ... of the network configuration The values are displayed in the text fields located above If necessary adjust the network settings to your needs To save the changes enter an user name and an according password Then press the Setup Device button Authentication To adjust the authentication settings enter your login as a super user and change your password Super user login Enter the login name of the s...

Страница 17: ...55 255 0 Gateway 0 0 0 0 for none 0 0 0 0 IP autoconfiguration With this option you can specify whether the IP KVM switch should get its network settings from a DHCP or BOOTP server For DHCP enter dhcp and for BOOTP enter bootp If you do not specify any of these the IP autoconfiguration is disabled and subsequently you will be asked for the following network settings IP address The IP address the ...

Страница 18: ...e synchronization Whenever the mouse does not move correctly there are two ways for re synchronizing local and remote mouse Fast Sync The fast synchronization is used to correct a temporary but fixed skew Choose the option using the Remote Console options menu or press the mouse synchronization hotkey sequence in case you defined one Intelligent Sync If the fast sync does not work or the mouse set...

Страница 19: ...ation and repeat the procedure 4 1 3 5 Single and Double Mouse Mode The information above applies to the Double Mouse Mode where remote and local mouse pointers are visible and need to by synchronize The IP KVM switch also features another mode the Single Mouse Mode where only the remote mouse pointer is visible Activate this mode in the open Remote Console and click into the window area The local...

Страница 20: ...recognizes a limited number of common video modes When running X11 on the host system please do not use any custom mode lines with special video modes If you do the IP KVM switch may not be able to detect them We recommend using any of the standard VESA video modes instead ...

Страница 21: ...of your managed host system the browser has to come with a Java Runtime Environment version 1 1 or higher If the browser has no Java support such as on a small handheld device you are still able to maintain your remote host system using the administration forms displayed by the browser itself Important We recommend installing a Sun JVM 1 4 For an insecure connection to the IP KVM switch we can rec...

Страница 22: ...ess or a host and domain name in the case where you have given your IP KVM switch a symbolic name in the DNS For instance type the following in the address line of your browser when establishing an unsecured connection http IP address of IP KVM When using a secure connection type in https IP address of IP KVM This will lead you to the IP KVM switch login page as shown in Figure 5 2 Figure 5 2 Logi...

Страница 23: ...rning Your web browser has to accept cookies or else login is not possible Navigation Having logged into the IP KVM switch successfully the main page of the IP KVM switch appears see Figure 5 3 This page consists of three parts each of them contains specific information The buttons on the upper side allow you to navigate within the front end see Table 5 2 for details The lower left frame contains ...

Страница 24: ...he redirected screen keyboard and mouse of the remote host system that IP KVM switch controls Figure 5 4 Remote Console The Remote Console window is a Java Applet that tries to establish its own TCP connection to the IP KVM switch The protocol that is run over this connection is neither HTTP or HTTPS but RFB Remote Frame Buffer Protocol Currently RFB tries to establish a connection to port number ...

Страница 25: ...em uses a US English keyboard layout for instance special keys on the German keyboard will not work as expected Instead the keys will result in their US English counterpart You can circumvent such problems by adjusting the keyboard of your remote system to the same mapping as your local one The Remote Console window always tries to show the remote screen with its optimal size That means it will ad...

Страница 26: ...the remote mouse cursor This is especially necessary when using accelerated mouse settings on the host system In general there is no need to change mouse settings on the host Single Double mouse mode Switches between the Single Mouse Mode where only the remote mouse pointer is visible and the Double Mouse Mode where remote and local mouse pointers are visible and need to be synchronized Single mou...

Страница 27: ...gs off A change in the access mode is also visible in the status line see Figure 5 7 Figure 5 7 Remote Console Exclusive Mode Scaling Allow you to scale down the Remote Console You can still use both mouse and keyboard however the scaling algorithm will not preserve all display details Figure 5 8 Remote Console Options Menu Scaling Mouse Handling The submenu for mouse handling offers two options f...

Страница 28: ... IP KVM switch video settings IP KVM switch features two different dialogs which influence the video settings Video Settings through the HTML Frontend To enable local video port select this option This option decides if the local video output of IP KVM switch is active and passing through the incoming signal from the host system The option Noise Filter defines how IP KVM switch reacts to small cha...

Страница 29: ...ter auto adjustment you may try to change this setting together with the sampling phase to achieve a better quality Phase Defines the phase for video sampling used to control the display quality together with the setting for sampling clock Horizontal Position Use the left and right buttons to move the picture in horizontal direction while this option is selected Vertical Position Use the left and ...

Страница 30: ...ation machine Mapping Used for choosing the according language and country mapping of the Soft Keyboard Figure 5 13 Soft Keyboard Mapping Local Keyboard Used to change the language mapping of your browser machine running the Remote Console Applet Normally the applet determines the correct value automatically However depending on your particular JVM and your browser settings this is not always poss...

Страница 31: ... Status Line Status line Shows both console and the connection state The size of the remote screen is displayed Figure 4 15 was taken from a Remote Console with a resolution of 800x600 pixels The value in brackets describes the connection to the Remote Console Norm means a standard connection without encryption SSL indicates means a secure connection Figure 5 15 Status line Furthermore both the in...

Страница 32: ...ntrol 6 1 1 KVM Console Figure 6 1 KVM Console To open the KVM console either clicks on the menu entry on the left or on the console picture on the right To refresh the picture click on the button Refresh For the power settings see the Section called Remote Power ...

Страница 33: ...the device The credentials that need to be entered for authentication are identical to those of the web interface That means the user management of the Telnet interface is entirely controlled with the according functions of the web interface Once you have successfully logged into the IP KVM switch a command line will be presented and you can enter according management commands In general the Telne...

Страница 34: ... has an optional parameter 1 or 2 to select the desired serial port for passthrough access 6 2Virtual Media 6 2 1 Floppy Disk Figure 6 3 Virtual Floppy Area Upload a Floppy Image Within two small steps working on the basis of a certain floppy image can be achieved First the path of the image has to be specified You can do that either by hand or by using the file selection dialog of your web browse...

Страница 35: ...ls Second click on the button Upload to initiate the transfer of the chosen image file into the IP KVM switch s onboard memory This image file is kept in the onboard memory of the IP KVM switch until the end of the current session until you logged out or initiated a reboot of the IP KVM switch 6 2 2 CD ROM Use Image on Windows Share SAMBA To include an image from a Windows share select CD ROM from...

Страница 36: ... and its location click on the button Set The specified image file is supposed to be accessible from the IP KVM switch The information above has to be given from the point of view of the IP KVM switch It is important to specify correct IP addresses and device names Otherwise IP KVM switch may not be able to access the referenced image file Furthermore the specified share has to be configured corre...

Страница 37: ...se an appropriate name for the share You may also add a short description for this folder input field Comment If necessary adjust the permissions button permissions Click OK to set the options for this share UNIX and UNIX like OS UNIX Solaris Linux If you like to access the share via SAMBA SAMBA has to be set up properly You may either edit the SAMBA configuration file etc samba smb conf or use th...

Страница 38: ... output in the specified output file tmp floppy image Adjust both parameters exactly to your needs input device etc MS Windows You can use the tool RawWrite for Windows It is included on the CD ROM shipped with IP KVM switch Figure 6 10 RawWrite for Windows selection dialog From the menu select the tab Read Enter or choose the name of the file in which you would like to save the floppy content Cli...

Страница 39: ... both parameters exactly to your needs input device etc MS Windows To create the image file use your favorite CD imaging tool Copy the whole contents of the disc into one single image file on your hard disk For example with Nero you choose Copy and Backup Then navigate to the Copy Disc section Select the CD ROM or DVD drive you would like to create an image from Specify the filename of the image a...

Страница 40: ...Single port KVM over IP switch 40 6 2 3 1 Driver Installation Please follow the KVM Vision Viewer Setup Wizard step by step to install the driver from the attached CD ROM 5 1 5 4 5 3 5 2 ...

Страница 41: ...ect New Device to create a new device Figure 5 17 Create a new Device Figure 5 17 Device Configuration dialog Device Name Enter a name to your device Network Address Enter an IP address the IP KVM switch uses Authentication Port This is a fixed number 443 Username The factory default Username is super Password The factory default Password is pass 5 5 ...

Страница 42: ...N Modem V9 0 Click Ok the new device will be added as below Figure 5 18 New Device 6 2 3 3 Drive Redirection Settings Move the cursor to the new device that has been created Click on Device then select Drive Redirection and Redirect local drive Figure 5 19 Drive Redirection Setting select Figure 5 20 Drive Redirection dialog Drive to redirect ...

Страница 43: ...ystem will hang on boot due to changes in the boot order or the boot manager LILO GRUB This case was reported for some Windows versions 2000 XP other OS might not be fully excluded This behavior depends on the BIOS version used in that machine To set this option press the button Apply Warning Please be cautious that if Allow Write Support is selected all data on the shred media might be destroyed ...

Страница 44: ...nagement 6 3 1 Change Password Figure 6 12 Set password To change your password enter the new password in the upper entry field Retype the password in the filed below Click Apply to submit your changes 6 3 2 Users And Groups Figure 6 13 Set User ...

Страница 45: ...tch While the user account never sees the following options the user super account can change the name and password for both accounts Existing users Select an existing user for modification Once a user has been selected click the lookup button to see the user information New User name The new user name for the selected account Password The password for the login name It must be at least four chara...

Страница 46: ...iver the best result because of optimized adjustment of compression and colour depth for the indicated network speed Manually Allows to adjust both compression rate and the colour depth individually Depending on the selected compression rate the data stream between the IP KVM switch and the Remote Console will be compressed in order to save bandwidth Since high compression rates are very time cons...

Страница 47: ... automatically However in order to make the installation possible you still need to answer the according dialogs with yes The download volume is around 11 Mbytes The advantage of downloading Sun s JVM lays in providing a stable and identical Java Virtual Machine across different platforms The Remote Console software is optimized for this JVM versions and offers wider range of functionality when ru...

Страница 48: ...imulating keystrokes on the remote system that cannot be generated locally The reason for this might be a missing key or the fact that the local operating system of the Remote Console is unconditionally catching this keystroke already Typical examples are Control Alt Delete on Windows and DOS what is always caught or Control Backspace on Linux for terminating the X Server The syntax to define a ne...

Страница 49: ...lected Auto as host interface then the card will select USB if available or otherwise falls back to PS 2 To get USB remote keyboard access during the boot process of the host the following conditions must be fulfilled the host bios must have USB keyboard support the USB cable must be connected or must be selected in the Host interface option PS 2 Keyboard Model Enables a certain keyboard layout Yo...

Страница 50: ...se acceleration involved To set the options click on the button Apply 6 4 3 Video Figure 6 18 Video Settings Miscellaneous Video Settings Noise filter This option defines how the IP KVM switch reacts to small changes in the video input signal A large filter setting needs less network traffic and leads to a faster video display but small changes in some display regions may not be recognized immedia...

Страница 51: ...mediately A small filter displays all changes instantly but may lead to a constant amount of network traffic even if the display content is not really changing depending on the quality of the video input signal All in all the default setting should be suitable for most situations Force Composite Sync Required for Sun Computers To support signal transmission from a Sun machine enable this option If...

Страница 52: ...P or BOOTP server For DHCP select dhcp and for BOOTP select bootp accordingly If you choose none then IP auto configuration is disabled IP address IP address in the usual dot notation Subnet Mask The net mask of the local network Gateway IP address In case the IP KVM switch should be accessible from networks other than the local one this IP address must be set to the local network router s IP addr...

Страница 53: ...itch s Telnet server is listening If left empty the default value will be used Bandwidth limitation The maximum network traffic generated through the IP KVM switch ethernet device Value in Kbit s Enable Telnet access Set this option to allow accessing the LARA express using the Telnet Gateway see the Section called Telnet Console Disable Setup Protocol Enable this option to exclude the IP KVM swit...

Страница 54: ...s This account information together with the hostname is needed in order to determine the IP address of the registered IP KVM switch You have to perform the following steps in order to enable Dynamic DNS Make sure that the LAN interface of the IP KVM switch is properly configured Enter the Dynamic DNS Settings configuration dialog as shown in Figure 6 20 Enable Dynamic DNS and change the settings ...

Страница 55: ...ke sure the time setting of the IP KVM switch is correct see the Section called Date And Time 6 5 3 Security Figure 6 22 Device Security Force HTTPS If this option is enabled access to the web front end is only possible using an HTTPS connection The IP KVM switch will not listen on the HTTP port for incoming connections In case you want to create your own SSL certificate that is used to identify t...

Страница 56: ...ied to the IP KVM switch cards by its user The certificate s underlying secret key is also used for securing the SSL handshake Hence this is a security risk but far better than no encryption at all However it is possible to generate and install a new certificate that is unique for a particular IP KVM switch card In order to do that the IP KVM switch is able to generate a new cryptographic key and ...

Страница 57: ...IP KVM switch there is no way to get it back In case you deleted it by mistake you have to repeat the three steps as described above Common name This is the network name of the IP KVM switch once it is installed in the user s network usually the fully qualified domain name It is identical to the name that is used to access the IP KVM switch with a web browser without the http prefix In case the na...

Страница 58: ...minimal length of this password is 4 characters Confirm Challenge Password Confirmation of the Challenge Password Email The email address of a contact person that is responsible for the IP KVM switch and its security Key length This is the length of the generated key in bits 1024 Bits are supposed to be sufficient for most cases Longer keys may result in slower response time of the IP KVM switch d...

Страница 59: ...ed The speed the IP KVM switch is communicating with the modem Most of all modems available today will support the default value of 115200 bps In case you are using an old modem and discovering problems try to lower this speed Modem Init String The initialization string used by the IP KVM switch to initialize the modem The default value will work with all modern standard modems directly connected ...

Страница 60: ...Date and Time This link refers to a page where the internal real time clock of the IP KVM switch can be set up see Figure 6 27 You have the possibility to adjust the clock manually or to use a NTP timeserver Without a timeserver your time setting will not be persistent so you have to adjust it again after IP KVM switch loses power for more than a few minutes To avoid this you can use a NTP timeser...

Страница 61: ...log file here List logging enabled The common way to log events is to use the internal log list of the IP KVM switch To show the log list click on Event Log on the Maintenance page Since the IP KVM switch s system memory is used to save all the information the maximum number of possible log list entries is restricted to 1 000 events Every entry that exceeds this limit overrides the oldest one auto...

Страница 62: ... event group of the occurred log event In order to use this log destination you have to specify a SMTP server that has to be reachable from the IP KVM switch device and that needs no authentication at all serverip port SNMP Logging enabled If this is activated the IP KVM switch sends a SNMP trap to a specified destination IP address every time a log event occurs If the receiver requires a communit...

Страница 63: ...Single port KVM over IP switch 63 6 6Maintenance 6 6 1 Device Information Figure 6 31 Device Information ...

Страница 64: ... and its activity status is displayed RC means that the Remote Console is open If the Remote Console is opened in exclusive mode the term exclusive mode is added For more information about this option see the Section called Remote Console Control Bar in Chapter 5 To display the user activity the last column contains either the term active for an active user or 20 min idle for an user who is inacti...

Страница 65: ...Single port KVM over IP switch 65 Event Log Figure 6 32 Event Log List Figure 6 32 displays the log list including the events that are logged by the IP KVM switch ...

Страница 66: ...can start updating the firmware of your IP KVM switch the new uncompressed firmware file has to be accessible on the system that you use for connecting to the IP KVM switch Updating the firmware is a three stage process Firstly the new firmware file is uploaded onto the IP KVM switch In order to do that you need to select the file on your local system using the button Browse of the Upload Firmware...

Страница 67: ...hree stage firmware update process and complete consistency check are making a mistake in updating the firmware almost impossible However only experienced staff members or administrators should perform a firmware update Make sure the IP KVM switch s power supply will not be interrupted 6 6 3 Unit Reset Figure 6 34 Unit Reset This section allows you to reset specific parts of the device This involv...

Страница 68: ... g video engine will take some seconds only and does not result in closing connections To reset a certain IP KVM functionality click on the button Reset as displayed in Figure 6 34 Note Only the super user is allowed to reset the IP KVM ...

Страница 69: ...e correct Also verify that all the IP infrastructure of your LAN like routers etc is correctly configured Without a ping functioning IP KVM switch can t work either Q 006 Special key combinations e g ALT F2 ALT F3 are intercepted by the console system and not transmitted to the host A 006 You have to define a so called Button Key This can be done in the Remote Console settings Q 007 In the browser...

Страница 70: ...of the operating system This option needs to be disabled 8 Certificates FCC This equipment has been tested and found to comply with Part 15 of the FCC Rules Operation is subject to the following two conditions 1 This device may not cause harmful interference 2 This device must accept any interference received Including interference that may cause undesired operation CE Certificate This equipment i...

Страница 71: ...Single port PS2 KVM over IP A Pin Assignments A 1 VGA HD 15 A 2 RJ 45 Connector Ethernet ...

Страница 72: ...Single port PS2 KVM over IP A 3 RJ 45 Connector ISDN A 4 Serial SUB D 9 Connector 1 A 5 KVM 15 pin connector ...

Страница 73: ...for this keyboard is shown in Figure C 1 However most modifier keys and other alphanumeric keys used for hotkey purposes in application programs are on an identical position no matter what language mapping you are using Some of the keys have aliases also means they can be named by 2 key codes separated by comma in the table Figure B 1 English US Keyboard Layout used for key codes Key and aliases 0...

Страница 74: ...OLL LOCK BREAK INSERT HOME PAGE UP DELETE END PAGE DOWN UP LEFT DOWN RIGHT NUM LOCK NUMPAD0 NUMPAD1 NUMPAD2 NUMPAD3 NUMPAD4 NUMPAD5 NUMPAD6 NUMPAD7 NUMPAD8 NUMPAD9 NUMPADPLUS NUMPAD PLUS NUMPAD NUMPADMUL NUMPAD MUL NUMPADMINUS NUMPAD MINUS NUMPADENTER WINDOWS MENU Table B 1 Key Names ...

Страница 75: ...KVM switch may not be able to detect them Resolution x y Refresh Rates Hz 640 x 350 70 85 640 x 400 56 70 85 640 x 480 60 67 72 75 85 90 100 120 720 x 400 70 85 800 x 600 56 60 70 72 75 85 90 100 832 x 624 75 1024 x 768 60 70 72 75 85 90 100 1152 x 864 75 1152 x 870 75 1152 x 900 66 1280 x 960 60 1280 x 1024 60 75 Table C 1 Video mode D Rack mount kit installation diagram ...

Отзывы: