


Appendices
Page 61
APPENDIX C: Jacq3G Module Troubleshooting and Adjusting Guide (continued)
Bad hook: Replace the bad hook. CAUTION: Make sure you do not accidentally drop the plunger spring onto the printed circuit boards while it is
powered or you risk shorting the printed circuit board.
Bad plunger spring: Replace the bad plunger spring. CAUTION: Make sure you do not accidentally drop the plunger spring onto the printed
circuit boards while it is powered or you risk shorting the printed circuit board.
Solenoid alignment: See if you can identify which direction the solenoid is cocked. Loosen solenoid screws, carefully turn the solenoid into the
proper alignment then retighten the screws.
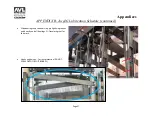
Middle guide alignment: In the center shed position, loosen the three middle guide screws. Adjust the middle guide until the short and long
hook segments are perfectly in alignment. Check this alignment at front, back and middle of the module, then retighten the screws.
Upper guide alignment: If the hooks show any forward or rearward lean, adjust hex nuts for the upper guide until the hooks are vertical. Loosen
the outer hex nuts, then cycle hooks up & down with null picks. Looking down from above while at open shed and hooks down (null pick),
observe the hook alignments in relation to each other and the upper guide. If the hooks appear paired, the solenoid mount bars are misaligned
from front to back. Determine which solenoid mount bar is incorrect by observing hook leaning forwards or backwards, loosen its hex nuts, slide
the solenoid mount bar until the hooks are no longer paired, then retighten the solenoid mount bar hardware. Loosen the outer hex nuts for
the upper guide. Recycle the hooks up & down with null picks. Align the upper guide with slightly more gap between the hooks and guide
towards the back of the loom. Retighten hardware.
Short segment crossover: If you examine a bare hook, you see that it has a longer and shorter segment both terminating in short u-bends, with
the two segments joined by a u-bend. The short segment can become trapped behind the long segment or adjacent hook long segments. When
this occurs, the hook will have a strong tendency to turn. Observation and fixing at a tight sett can be difficult, so opening the sett may be
required. To fix, simply move the short segment from behind to its proper position.
Содержание TECHNICAL EDUCATION LOOM
Страница 27: ...Loom Manual Page 27 Cloth Clamp Closed Cloth Clamp Open Fixed Clamp Open Fixed Clamp Hanging ...
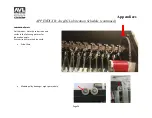
Страница 29: ...Loom Manual Page 29 Module Hooks Exposed Front Cover Removed Hooks Close Up ...
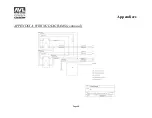
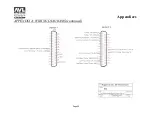
Страница 33: ...Appendices Page 33 APPENDIX A WIRING DIAGRAMS continued ...
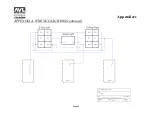
Страница 34: ...Appendices Page 34 APPENDIX A WIRING DIAGRAMS continued ...
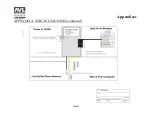
Страница 35: ...Appendices Page 35 APPENDIX A WIRING DIAGRAMS continued ...
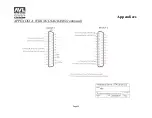
Страница 36: ...Appendices Page 36 APPENDIX A WIRING DIAGRAMS continued ...
Страница 37: ...Appendices Page 37 APPENDIX A WIRING DIAGRAMS continued ...
Страница 38: ...Appendices Page 38 APPENDIX A WIRING DIAGRAMS continued ...
Страница 39: ...Appendices Page 39 APPENDIX A WIRING DIAGRAMS continued ...
Страница 40: ...Appendices Page 40 APPENDIX A WIRING DIAGRAMS continued ...
Страница 41: ...Appendices Page 41 APPENDIX A WIRING DIAGRAMS continued ...
Страница 42: ...Appendices Page 42 APPENDIX A WIRING DIAGRAMS continued ...
Страница 43: ...Appendices Page 43 APPENDIX A WIRING DIAGRAMS continued ...
Страница 44: ...Appendices Page 44 APPENDIX A WIRING DIAGRAMS continued ...
Страница 45: ...Appendices Page 45 APPENDIX A WIRING DIAGRAMS continued ...
Страница 46: ...Appendices Page 46 APPENDIX A WIRING DIAGRAMS continued ...
Страница 47: ...Appendices Page 47 APPENDIX A WIRING DIAGRAMS continued ...
Страница 48: ...Appendices Page 48 APPENDIX A WIRING DIAGRAMS continued ...
Страница 49: ...Appendices Page 49 APPENDIX A WIRING DIAGRAMS continued ...
Страница 50: ...Appendices Page 50 APPENDIX A WIRING DIAGRAMS continued ...
Страница 51: ...Appendices Page 51 APPENDIX A WIRING DIAGRAMS continued ...
Страница 52: ...Appendices Page 52 APPENDIX A WIRING DIAGRAMS continued ...
Страница 53: ...Appendices Page 53 APPENDIX A WIRING DIAGRAMS continued ...
Страница 54: ...Appendices Page 54 APPENDIX A WIRING DIAGRAMS continued ...


