


Appendices
Page 60
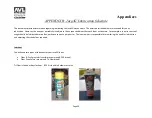
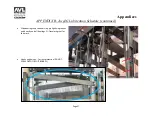
APPENDIX C: Jacq3G Module Troubleshooting and Adjusting Guide (continued)
Test #7: Observe the misbehaving hook in action. Is it frequently crossing over/under with a neighboring hook? Does it have abnormal
movement side-side or front-back as it slides up and down through the guides? If so, it or possibly the adjacent hook is bad.
Test #8: Observe the hook in action and listen carefully. Are the hooks vibrating significantly on this module than on others? Are you hearing
squeaking? The hooks and/or slide bearings need lubrication.
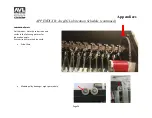
Test #9: Compare upper and lower knives on all modules at open shed with all hooks down. Are they the same heights and angles? An
observable angle difference is a red flag, which must be corrected immediately or it will result in bearing failure. Small variations in knife heights
of less than ¾” are not of concern. Larger knife height variations mean that you have a knife alignment issue.
If you pass these tests but still have a problem, you have a solenoid bar placement issue.
Equipment Fixes
Solenoid bar placement: Incrementally adjust/test the solenoid mount bar until issue goes away. Incremental adjustment is typically ½-1 turn of
the nut; test with tabby with alternately activates the upper and lower solenoid bars. Adjustment can be made independently at front and back
hardware, however it is a good idea to loosen both front and back before making the adjustment to avoid binding/bowing of the solenoid bar.
Pick the side that is closest to the bad hook. If the bad hook is relatively centered, adjust both sets of hardware. Adjust the solenoid mount bar
away from the knife if the hook is lifting when it should not; in when the hook does not lift.
Bad solenoid: Replace the bad solenoid. Note that when pulling the electrical wires from the black plastic connector; gently pry out the tab in the
connector with a pin to release the solenoid wire. CAUTION: Make sure you do not accidentally drop the plunger spring onto the printed circuit
boards while it is powered or you risk shorting the printed circuit board.
Содержание TECHNICAL EDUCATION LOOM
Страница 27: ...Loom Manual Page 27 Cloth Clamp Closed Cloth Clamp Open Fixed Clamp Open Fixed Clamp Hanging ...
Страница 29: ...Loom Manual Page 29 Module Hooks Exposed Front Cover Removed Hooks Close Up ...
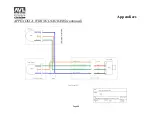
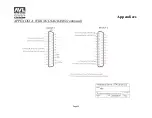
Страница 33: ...Appendices Page 33 APPENDIX A WIRING DIAGRAMS continued ...
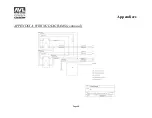
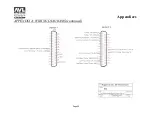
Страница 34: ...Appendices Page 34 APPENDIX A WIRING DIAGRAMS continued ...
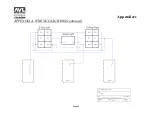
Страница 35: ...Appendices Page 35 APPENDIX A WIRING DIAGRAMS continued ...
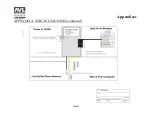
Страница 36: ...Appendices Page 36 APPENDIX A WIRING DIAGRAMS continued ...
Страница 37: ...Appendices Page 37 APPENDIX A WIRING DIAGRAMS continued ...
Страница 38: ...Appendices Page 38 APPENDIX A WIRING DIAGRAMS continued ...
Страница 39: ...Appendices Page 39 APPENDIX A WIRING DIAGRAMS continued ...
Страница 40: ...Appendices Page 40 APPENDIX A WIRING DIAGRAMS continued ...
Страница 41: ...Appendices Page 41 APPENDIX A WIRING DIAGRAMS continued ...
Страница 42: ...Appendices Page 42 APPENDIX A WIRING DIAGRAMS continued ...
Страница 43: ...Appendices Page 43 APPENDIX A WIRING DIAGRAMS continued ...
Страница 44: ...Appendices Page 44 APPENDIX A WIRING DIAGRAMS continued ...
Страница 45: ...Appendices Page 45 APPENDIX A WIRING DIAGRAMS continued ...
Страница 46: ...Appendices Page 46 APPENDIX A WIRING DIAGRAMS continued ...
Страница 47: ...Appendices Page 47 APPENDIX A WIRING DIAGRAMS continued ...
Страница 48: ...Appendices Page 48 APPENDIX A WIRING DIAGRAMS continued ...
Страница 49: ...Appendices Page 49 APPENDIX A WIRING DIAGRAMS continued ...
Страница 50: ...Appendices Page 50 APPENDIX A WIRING DIAGRAMS continued ...
Страница 51: ...Appendices Page 51 APPENDIX A WIRING DIAGRAMS continued ...
Страница 52: ...Appendices Page 52 APPENDIX A WIRING DIAGRAMS continued ...
Страница 53: ...Appendices Page 53 APPENDIX A WIRING DIAGRAMS continued ...
Страница 54: ...Appendices Page 54 APPENDIX A WIRING DIAGRAMS continued ...


