background image


33 

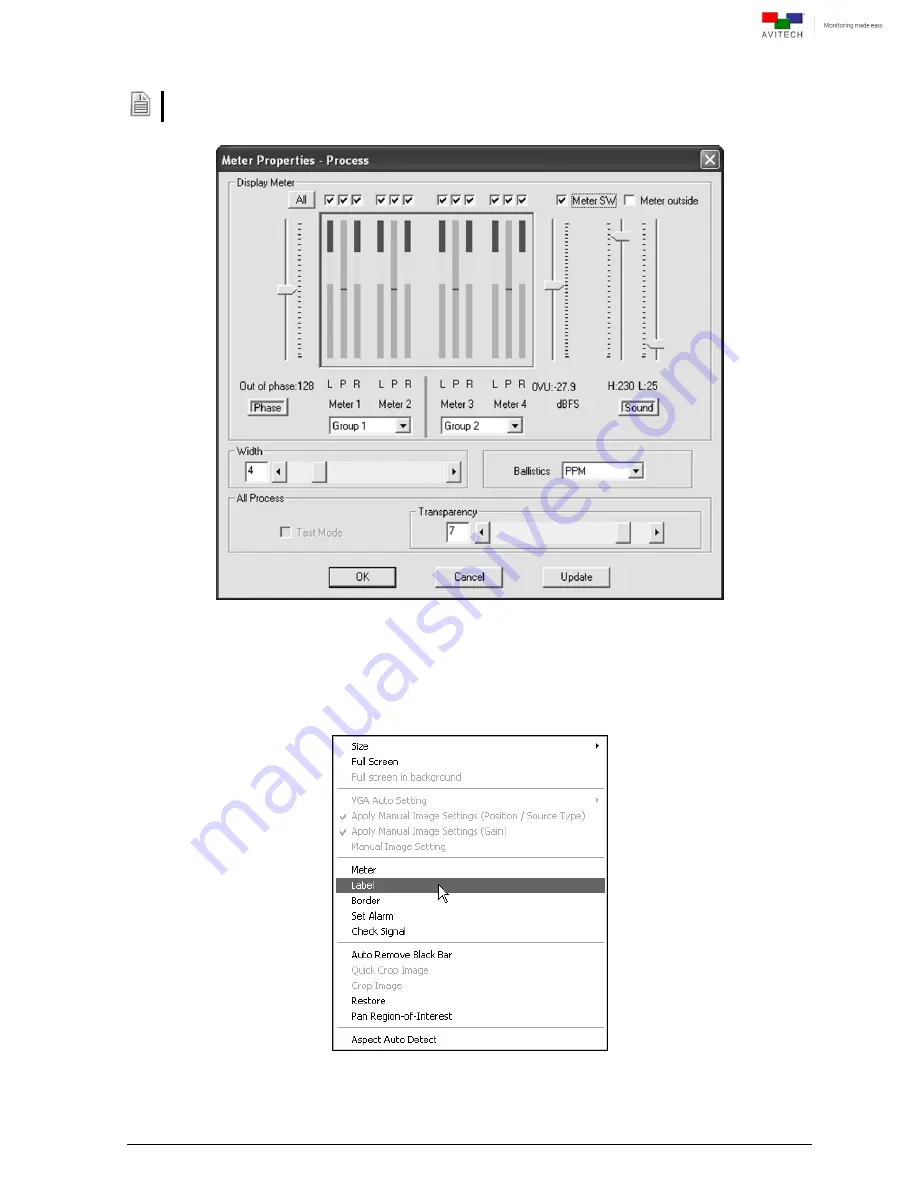
2.11.2 Setting Meter Properties 


Upon right-clicking a particular window, select 

Meter

 to change the audio meter properties. Refer to a 

previous section for details on setting the 

Meter Properties


Figure 2-62

 Phoenix-G Software: 

“Meter Properties – Process” Window 


2.11.3 Setting Label Properties 


Step 1.  Right-click a window and select 

Label

 to enter text. 


Figure 2-63

 Phoenix-G Software: Right-click Window and Click 

“Label” 


Содержание Sequoia 2H2U

Страница 1: ...User Manual Sequoia 2H2U One of a kind multiviewing Revision 1 0 0 May 2014 ...

Страница 2: ...MARKS All brand and product names are trademarks or registered trademarks of their respective companies COPYRIGHT The information in this manual is subject to change without prior notice No part of this document may be reproduced or transmitted in any form or by any means electronic or mechanical for any purpose without the express written permission of Avitech International Corporation Avitech In...

Страница 3: ... G Software 3 2 1 Group Layout Menu 3 2 2 Select Menu 3 2 3 Settings Menu 4 2 4 System Parameter Menu 8 2 5 Module Parameter Menu 12 2 6 GUI View Menu 21 2 7 Special Screen Layout Menu 21 2 8 Help Menu 23 2 9 Quick Keys Change Window to from Full Screen Mode Swap Window Contents27 2 10Window Layout 28 2 10 1 Default Window Layouts 28 2 10 2 Arranging Windows 29 2 11Mouse Right click Menu 30 2 11 1...

Страница 4: ...sh File 40 2 14Saving a Preset 42 2 15Loading File 43 2 16Making Adjustments 44 2 17Audio Setup 45 2 18Control Video Fade 46 Appendix A Setting Up Static IP 47 A 1 Method 1 Change IP Address of Sequoia 2H2U Chassis 47 A 2 Method 2 Change IP Address of the Controlling Computer 49 For Windows XP 49 For Windows 7 49 ...

Страница 5: ...y Period Avitech makes its best offer to repair a product that is outside the warranty period provided the product has not reached its end of life EOL The minimum charge for such repair excluding shipping and handling is 200 US dollars AVITECH INTERNATIONAL CORPORATION 15377 NE 90th Street Redmond WA 98052 USA TOLL FREE 1 877 AVITECH PHONE 1 425 885 3863 FAX 1 425 885 4726 info avitechvideo com ht...

Страница 6: ...151 factory default setting Or change the IP address of the Sequoia 2H2U to a similar range as the controlling computer See Appendix A for details 1 2 Pinging the Sequoia 2H2U Make sure you can ping the chassis at 210 100 100 151 factory default IP address Step 1 Click Start All Programs Accessories Command Prompt The Command Prompt screen will appear Step 2 Type ping 210 100 100 151 and press Ent...

Страница 7: ...nfiguration Phoenix G Control and Option window will appear Control window is for creating and configuring the layout Logo icon Avitech Phoenix G Galaxy proprietary logo and the name of the software 1920 1200 60Hz shows the output resolution and frequency of the monitor Option window is for video window label setup save load file adjust image window size position setting monitor audio and fader co...

Страница 8: ...he Group Layout menu Select from 2 2 up to 8 8 as possible grid positions on the monitor The layout size available for your particular model will depend on the monitor s resolution as well as the smallest window size limitation Figure 2 1 Phoenix G Software Group Layout Menu 2 2 Select Menu Figure 2 2 Phoenix G Software Select Menu Open Option Menu Toggle on off the Option window Dock Option Menu ...

Страница 9: ...eckmark the Detect Display Resolution option Figure 2 4 Phoenix G Software Settings Module Parameter Detect Display Resolution 1 When the monitor is unable to provide the EDID signal it will display at 1024 768 60Hz The extended display identification data EDID is a data structure provided by a computer display to describe its capabilities to a graphics card 2 When the Detect Display Resolution op...

Страница 10: ...ted resolution is displayed on the title bar of Phoenix G software Figure 2 6 Phoenix G Software Select Refresh Frequency and Mode Upon changing the output resolution the output windows appearing on the monitor may overlay or in the case of fixed window layout e g 2 2 3 3 4 4 etc misalignment may occur Choose a new window layout to fix this When the Flashing Window Border option is enabled with ch...

Страница 11: ...gs Reconnect Network Import Export txt allows you to import a label from export label to Microsoft Office Word or Notepad to be edited externally Figure 2 9 Phoenix G Software Settings Import Export txt Step 1 The convenient way is to export file label as a Label ANSI txt file by assigning a filename Figure 2 10 Phoenix G Software Export Label as Text File ...

Страница 12: ...below save the txt file and import it The on screen labels will be updated Figure 2 11 Phoenix G Software Edit the Label Step 3 Export all firmware hardware information to a text file by clicking Export txt and assigning a filename Figure 2 12 Phoenix G Software Export Information as Text File ...

Страница 13: ... 2 14 Phoenix G Software System Parameter Menu Save System Files to Flash allows you to save all configuration settings to flash memory If the system configuration has been changed save the changes first before continuing the other configuration settings The progress of saving to flash memory will be displayed Figure 2 15 Phoenix G Software Save System Files to Flash ...

Страница 14: ...e command allowing for simultaneous execution of the command This feature should always be enabled Automatically Backup Files to Hard Drive When enabled with checkmark the Phoenix G software will save all backup files to the computer hard drive s c Avitech_VCC Backup IP210 100 100 151 folder You may change this by clicking Browse to select different location to save backup information ...

Страница 15: ... can be set to be the same color All lines by clicking the radio button to select the Line Then click Select color to choose the color There are eight options for choosing the 3D border Click the radio button for one of the 3D borders to select it Switch primary and secondary buttons Swap the two mouse buttons so that you can use the right button as the left button click the checkbox to enable thi...

Страница 16: ...io button for Remain full screen upon pressing Pause Break key under the item When returning from full screen to host mode if you wish to remain in full screen mode upon pressing the Pause Break key Default setting is Return to previous layout upon pressing Pause Break key Swap with active window When enabled with checkmark the action of entering a computer window other than the current active win...

Страница 17: ... the next time you change the settings in the Sequoia Properties window or you return the system to the factory default state 2 5 Module Parameter Menu Figure 2 19 Phoenix G Software Module Parameter Menu Reset Allows you to refresh the module the current settings on the Phoenix G software will be the same as for the module Detect Display Resolution Sequoia 2H2U can automatically detect the displa...

Страница 18: ... Color and font Size for all labels in the group Make sure to turn on all labels see previous item before setting the label properties Figure 2 20 Phoenix G Software Label Properties Window Each window supports one line of text up to 31 characters ...

Страница 19: ... the following screen appears Remove the Enable checkmark or change the Border Width to 0 to turn off the border Figure 2 21 Phoenix G Software Border Properties Window Step 2 You can also change the border color Each pixel line 3D border can have a different color ...

Страница 20: ...y contain up to sixteen channels 8 pairs of embedded audio Typically 48kHz 20 bit audio extendable to 48kHz 24 bit audio Figure 2 22 Phoenix G Software Meter Properties Module Window Step 2 Click the All button to display all meters or click the checkbox individually to display the desired meter only Meter 1 L Phase 1 Meter 1 R Meter 2 L Phase 2 Meter 2 R Meter 3 L Phase 3 Meter 3 R Meter 4 L Phas...

Страница 21: ...l without embedded audio will cause the secondary channel to lose its audio output Step 5 Use the slider to adjust the Width and the Transparency of the meter appearing on screen Step 6 Select the meter s Ballistics absolute movement of the meter s pointer Meters which monitor audio levels are typically one of two varieties VU Volume Unit or PPM Peak Program Meters Though both perform the same fun...

Страница 22: ...quoia s OSD on screen display feature Click the item to toggle between on off There are three Window Sizes that can be selected to display the windows in a group 4 3 16 9 or Lock Aspect Ratio When changing the width of the window the height will automatically adjust to match the aspect ratio When Lock Aspect Ratio is set On the aspect ratio of the video display will be maintained even if the windo...

Страница 23: ... on Enable or off the display of background picture Figure 2 25 Phoenix G Software Background Picture Window Step 1 Click the Enable checkbox to toggle between on off Step 2 When only one or no BMP picture file has been saved to your module s flash memory click the Save button Figure 2 26 Phoenix G Software Select File to Save to Module Window Step 3 Select the desired background picture file Then...

Страница 24: ... Resolution Warning The background picture file must conform to the following conditions 1 BMP file format 2 24 bit color 3 Size up to 1920 1200 pixels only 4 Up to two background picture files can be stored to flash memory only Progress of updating the background picture to flash memory would be shown Figure 2 28 Phoenix G Software Progress of Updating Background Picture to Flash Memory Step 4 Cl...

Страница 25: ...tton to remove a previously saved background picture file from flash memory Then click OK to confirm Figure 2 32 Phoenix G Software Confirm File Deletion For all types of NTSC programming captions are encoded into line 21 of the vertical blanking interval a part of the TV picture that sits just above the visible portion and is usually unseen Display Closed Caption line 21 allows you to turn on wit...

Страница 26: ...e is 800 600 the GUI View set at 50 would give you a 400 300 Phoenix G control window display size while a GUI View set at 25 would give you a 200 150 Phoenix G control window display size Figure 2 34 Phoenix G Software GUI View Menu 2 7 Special Screen Layout Menu Figure 2 35 Phoenix G Software Special Screen Layout Menu Special screen layouts are available for the Sequoia Layout 1 Default 2 2 qua...

Страница 27: ...he Time H M S then select the previously saved preset File Click OK to continue Continue adding new processes as necessary Figure 2 37 Phoenix G Software Add Process Window Step 3 Select Auto Play Play Manually or Repeat Click play to start viewing the slideshow Figure 2 38 Briefing Select Type of Playback ...

Страница 28: ... BIOS Version perform the following steps Step 1 Click Help and then click Read BIOS Version Step 2 Click Export Figure 2 40 Phoenix G Software Display BIOS Version Window Step 3 Assign a filename and click Save to save the data Figure 2 41 Phoenix G Software Export All Information Window ...

Страница 29: ...ftware Old Information Deletion Confirmation Step 3 When backup is successful click OK to continue This will backup all saved presets and system configuration files to the computer s c Avitech_VCC Backup IPxxx xxx xxx xxx xxxx _ Figure 2 44 Phoenix G Software Backup Successful Everything in the Backup folder will be erased If you have previously backed up presets they will all be written over when...

Страница 30: ...lp and then click Restore Module Information Step 5 If the checking result confirms that everything is normal All Normal click Cancel to exit the restoring of preset s If the checking result shows an Abnormal report continue on Figure 2 45 Phoenix G Software Check Module Information Window Step 6 Confirm if the backup Path is correct If backup Path is incorrect click Browse to select correct locat...

Страница 31: ... Galaxy Figure 2 47 Phoenix G Software Restart Phoenix G If upon clicking Restore Module Information on the Help menu and the error message appears click OK Figure 2 48 Phoenix G Software Module Information Not Found Click Browse Figure 2 49 Phoenix G Software Click Browse ...

Страница 32: ...de Swap Window Contents Two quick keys are available to quickly bring a window to from full screen mode as well as swap the contents from one window to another by performing the following steps Step 1 To change to full screen mode double click the window Double click again to return from full screen mode Step 2 To access the swap window quick key move your cursor to the bottom left hand corner of ...

Страница 33: ...you want to swap the contents from the source This will swap all the contents and properties of the source window to the destination window 2 10 Window Layout 2 10 1 Default Window Layouts Three default window layouts are available Figure 2 53 Phoenix G Software layout1 GP1 Figure 2 54 Phoenix G Software layout2 GP1 ...

Страница 34: ...uickly setup the layout for your video windows right click the title bar to access the Group Layout menu Select from 2 2 up to 8 8 as possible grid positions on the monitor The layout size available for your particular model will depend on the monitor s resolution as well as the smallest window size limitation Figure 2 56 Phoenix G Software Group Layout Menu ...

Страница 35: ...any window on a pixel by pixel basis Keep in mind that width increases in 16 pixel increments and height in 1 pixel increments Figure 2 57 Phoenix G Software Position Fine Adjustment Window 2 11 Mouse Right click Menu To change the properties of an individual window right click the particular window to access the window s menu Figure 2 58 Phoenix G Software Window Right click Menu ...

Страница 36: ...e selection Figure 2 59 Phoenix G Software Size Menu Step 2 Alternatively resize a window by dragging the border of a window to the desired size Step 3 Another option is to use Size Fine Adjustment menu to adjust each window on a pixel by pixel basis Keep in mind that width increases in 2 pixel increments and height in 1 pixel increments Figure 2 60 Phoenix G Software Size Fine Adjustment Window ...

Страница 37: ...full screen mode Figure 2 61 Phoenix G Software Full Screen Mode Window Full screen in background If so desired select this with checkmark to allow the window image in full screen mode to appear in the background Select Full screen in background without checkmark to allow the window image in full screen mode to reappear in the foreground fill up the whole screen ...

Страница 38: ... meter properties Refer to a previous section for details on setting the Meter Properties Figure 2 62 Phoenix G Software Meter Properties Process Window 2 11 3 Setting Label Properties Step 1 Right click a window and select Label to enter text Figure 2 63 Phoenix G Software Right click Window and Click Label ...

Страница 39: ...ure 2 64 Phoenix G Software Label Properties Window 2 11 4 Setting Border Properties Borders are turned on by default To turn off the border perform the following steps Step 1 Click Border Figure 2 65 Phoenix G Software Set Border Width Step 2 Change the Border Width to 0 ...

Страница 40: ...e Window Module Process Alarm Switch to turn on the alarm setting make sure that both options are enabled with checkmark Video Alarm Switch to turn on off the no video signal Response Time Second to set the no video alarm response time from 0 to 23 seconds Audio Alarm Switch to turn on the alarm setting make sure this is enabled with checkmark Response Time Second to set the signal in out alarm re...

Страница 41: ...left behind when the video does not fill up the entire frame Usually the video will be blown up to fit the frame but in order to avoid distorting the picture or cutting off part of the video the item you are placing inside the frame will maintain its aspect ratio this is a good thing When you notice black bars right click the particular window and select Auto Remove Black Bar with checkmark to try...

Страница 42: ... markers Example 1 if the Sequoia s output resolution is set at 1920 1200 but the input source resolution is 1920 1080 then pressing any of the four buttons on a 25 magnification would effect a proportionally four pixel horizontal adjustment while a 50 or 100 magnification would effect a proportionally two pixel horizontal adjustment Example 2 if the Sequoia s output resolution is set at 1024 768 ...

Страница 43: ...idth plus or minus buttons to make smaller adjustments Figure 2 70 Phoenix G Software Pan Region of Interest Window To pan is to move the image around in the image window usually when the image is larger than its window Panning changes the image view in the same way that scrolling moves the image up down to the left or to the right in the image window When the entire image is not displayed you can...

Страница 44: ...on dragging the window border Select Custom default instead of Auto detect under Sync Type to set the input signal s aspect ratio for a particular window If the input signal is a different aspect ratio than the monitor in which it is displayed you may change the monitor s aspect ratio to display the signal without deformation Figure 2 71 Phoenix G Software Aspect Auto Detect Window For example 136...

Страница 45: ...check to enable or un check to disable the Window or Label 2 13 Saving to a Flash File There are 2 instances for which you will need to use the save to flash feature After creating the master layout and you want the Sequoia to load it again when the unit is power cycled shutdown and restart After you are done saving presets and you want to save all the presets that were created up to 23 into the i...

Страница 46: ...the following steps Step 1 Click Save File in the Option window Figure 2 73 Phoenix G Software Click Save File in Option Window Step 2 Click Update to Module Flash and then click OK Figure 2 74 Phoenix G Software Save File Window ...

Страница 47: ...teps Step 1 Configure the layout you want the Sequoia to display Step 2 Click Save File in the Option window Step 3 Enter a unique filename for the preset and select OK to save The file extension GP will be automatically added to the file name Figure 2 75 Phoenix G Software Save File Window Enter Unique Filename Step 4 Repeat the above steps for each additional preset Step 5 After you are done cre...

Страница 48: ...m s default preset filename layout1 GP1 layout2 GP1 layout3 GP1 2 The sequence for loading the preset file when using the hotkeys arrow keys is based on the time when the preset file was first created and saved Subsequent modification and saves will not affect this sequence order 3 The hotkey Ctrl S can save the latest preset to flash memory so that on the next boot up the preset will be loaded ...

Страница 49: ...28 127 Saturation 0 2047 Contrast 0 1023 and Hue 1024 1023 parameters directly by using the sliders or clicking the radio button Click the Default button on the lower right portion of the screen to reset the values to the factory default Figure 2 76 Phoenix G Software Image Adjustment Window Saturation and Hue is not available for HDMI DVI signal input ...

Страница 50: ... Step 5 Select the desired input Channel Channel 1 to 4 Step 6 Select the type of output Sound Stereo Mono Left Mono Right Step 7 Select the desired Output channel Speaker HDMI OUT Step 8 Use the slider to set the Audio Delay time Millisecond Step 9 Use the slider to select the desired Volume level 0 to 9 Click the Mute checkbox to quickly turn off the volume Step 10 Use the slider to set the Audi...

Страница 51: ...g window will fade into the background when another window becomes the active window Step 1 In the Option window click Fader Control Step 2 Adjust Fading Speed directly by using the slider to select Slow 1 Fast 10 Then click OK Figure 2 78 Phoenix G Software Fader Control Window ...

Страница 52: ...gned to the Sequoia or select Automatically Search Figure A 1 Phoenix G Software Set Communication Mode Step 2 Before clicking OK next step press the Ctrl Esc keys to make sure that you are not in host MKC mouse keyboard controller mode The following warning message may appear in case Ctrl Esc keys was not pressed Click OK Figure A 2 Phoenix G Software Press Ctrl Esc Keys Step 3 The computer will ...

Страница 53: ...d Option window will appear Figure A 4 Phoenix G Software Control and Option Window Step 4 Click Settings then Module Parameter Then click IP Address Figure A 5 Phoenix G Software Click Settings Module Parameter IP Address ...

Страница 54: ...dows XP Step 1 Click Start and then right click My Network Places and click Properties Step 2 When the next screen appears right click the Local Area Connection icon and click Properties Step 3 When the next screen appears click to highlight Internet Protocol TCP IP and click Properties Step 4 When the next screen appears click the radio button to select Use the following IP address and then enter...

Страница 55: ...ies Step 4 When the next screen appears click to highlight Internet Protocol Version 4 TCP IPv4 and click Properties Step 5 When the next screen appears click the radio button to select Use the following IP address and then enter the IP address 210 100 100 x where x is any value from 1 253 and Subnet mask 255 255 255 0 Step 6 Click OK to exit ...

Отзывы: