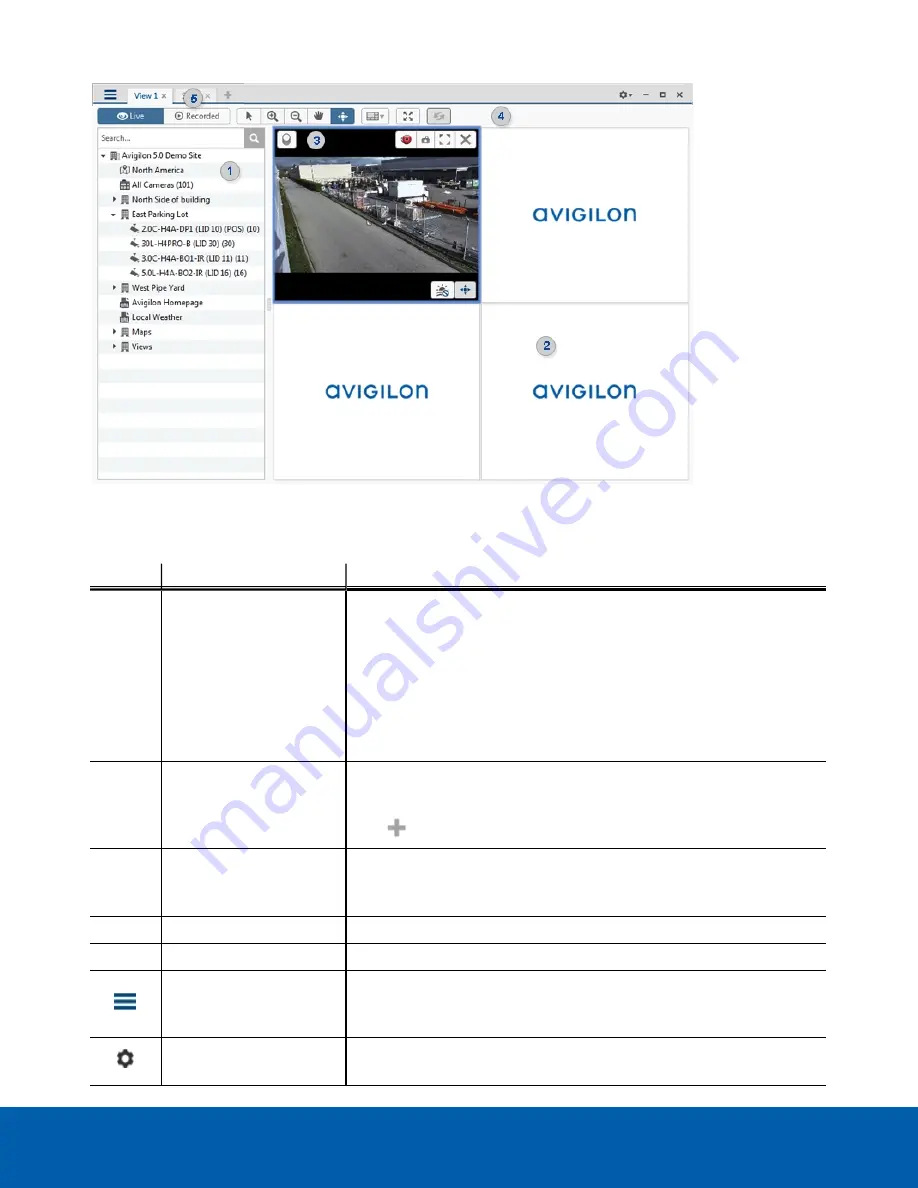
Avigilon HD-RMWS3-2MN Скачать руководство пользователя страница 13

Figure 3:

The Avigilon Control Center Client application window

Application Window Features

Area

Description

1

System Explorer

Displays all the elements in your surveillance system.

Use the

Search...

bar to quickly locate anything that is available in the

System Explorer. You can search for items by name, and devices can
also be searched for by location, logical ID, serial number and IP
address.

Tip:

The content of the System Explorer changes depending on the tab

you have open. For example, servers are not listed in the View tab.

2

View tab

Allows you to monitor video and organize image panels. You can have
multiple Views open at once.

Click

to open a new View tab.

3

Image panel

Displays live or recorded video from a camera. The video control
buttons are displayed when you move your mouse into the image
panel.

4

Toolbar

Provides quick access to commonly used tools.

5

Task tabs

Displays all the tabs that are currently open.

New Task menu

Opens the New Task menu so you can select and open new task tabs.
You can access advanced tools like Search and Export, or system
administrative features like Site Setup.

The Application Menu
menu

This menu gives you access to local application settings like Client
Settings. You can also open a new window from this menu.

Application Window Features

9

Содержание HD-RMWS3-2MN

Страница 1: ...User Guide Avigilon Remote Monitoring Workstation HD RMWS3 4MN and HD RMWS3 2MN ...

Страница 2: ...gn trademark patent or other intellectual property rights of Avigilon Corporation or its licensors This document has been compiled and published covering the latest product descriptions and specifications The contents of this document and the specifications of the products discussed herein are subject to change without notice Avigilon Corporation reserves the right to make any such changes without...

Страница 3: ...ut of a Site 7 Logging In 8 Logging Out 8 Navigating the Client 8 Application Window Features 9 System Explorer Icons 10 Monitoring Video 10 Adding and Removing Cameras in a View 10 Adding a Camera to a View 10 Removing a Camera from a View 10 Viewing Live and Recorded Video 11 Maximizing and Restoring an Image Panel 11 Maximizing an Image Panel 11 Restoring an Image Panel 11 Zooming and Panning i...

Страница 4: ...Hard Drive Activity Indicator 15 Specifications 16 Limited Warranty and Technical Support 17 4 ...

Страница 5: ...any existing NVR products or Avigilon surveillance systems to add an additional monitoring station Overview Front View Figure 1 Left 4 monitor remote monitoring workstation right 2 monitor remote monitoring workstation 1 Power button Controls the power supply to the workstation For more information see Power Status Indicator on page 15 2 Optical drive Accepts a CD or DVD 3 Headphone connector Acce...

Страница 6: ...nformation see Hard Drive Activity Indicator on page 15 Back View Figure 2 Left 4 monitor remote monitoring workstation right 2 monitor remote monitoring workstation 1 Power supply connector Accepts power supply connection 2 USB connectors Accepts USB connections to external devices 3 Headphone connector Accepts a line out audio connector 4 Microphone connector Accepts a line in audio connector Ba...

Страница 7: ...ports Accepts an Ethernet connection to the network 7 Security cable connector Accepts a security cable to prevent theft 8 Padlock ring Allows a padlock to secure the computer cover to the chasis 9 DisplayPort connector Accepts a DisplayPort DP connection to a display monitor BackView 3 ...

Страница 8: ...Client software and the Windows recovery software l Avigilon 2 Monitor Remote Monitoring Workstation o Power cable o Keyboard and mouse o 1 DP to DVI adapter o 2 DVI to HDMI adapters o Recovery USB contains a copy of the Avigilon Control Center Client software and the Windows recovery software Connecting Cables Refer to the diagrams in the Overview section for the location of the different connect...

Страница 9: ...P to DVI and DVI to HDMI adapters 3 Connect the workstation to your network using an Ethernet network cable 4 Connect the power cable to the power supply at the back of the workstation 5 It is recommended to connect a security cable and use a padlock to prevent theft of the workstation 6 Press the power button on the front of the workstation The workstation turns on and loads the Windows operating...

Страница 10: ...ing Workstation acquires an IP address on the network through DHCP If you need to set up the workstation to use a static IP address or any specific network configuration see the Windows Help and Support files for more information Networking 6 ...

Страница 11: ...g steps if it doesn t Starting Up the Client Software Perform one of the following l In the Start menu select All Programs or All Apps Avigilon Avigilon Control Center Client l Double click or desktop shortcut icon When you are prompted log in to your site You can only access cameras and video after you log in Once the application has started it will automatically display a list of all the sites t...

Страница 12: ...Notify me when additional sites become available check box If you want to see the login page each time you launch the Client software select the Show this tab on startup check box If you prefer not to login each time you can disable this option and configure automatic login from the Client Settings dialog box Logging Out You can log out of one or all sites at any time To Do this Log out of one or ...

Страница 13: ...s you to monitor video and organize image panels You can have multiple Views open at once Click to open a new View tab 3 Image panel Displays live or recorded video from a camera The video control buttons are displayed when you move your mouse into the image panel 4 Toolbar Provides quick access to commonly used tools 5 Task tabs Displays all the tabs that are currently open New Task menu Opens th...

Страница 14: ...eras Once you open a camera in a View tab you can control the camera s live and recorded video stream NOTE Some features are not displayed if the server does not have the required license or if you do not have the required user permissions Adding and Removing Cameras in a View To monitor video add a camera to a View tab Camera video can be removed from a View tab at any time Adding a Camera to a V...

Страница 15: ...mage Panel Do one of the following l Right click an image panel and select Maximize l Inside the image panel click l Double click the image panel Restoring an Image Panel In a maximized image panel do one of the following l Right click the maximized image panel and select Restore Down l Inside the image panel click l Double click the image panel Zooming and Panning in a Video Use the zoom and pan ...

Страница 16: ...ure 4 Playback controls on the Timeline To Do this Select a playback time l Click the dark gray date display and select a specific date and time l Click a point on the Timeline Start playback Click l Click to fast forward Tap the arrow again to increase the playback speed l Click to rewind Tap the arrow again to increase the playback speed You can play the video up to eight times the original spee...

Страница 17: ...n the Cameras pane select all the cameras that need to be attached to this bookmark NOTE You can only bookmark multiple cameras from the same site 4 In the Time Range to Bookmark area enter the full duration of the bookmark You can also move the black time range markers on the Timeline to adjust the time range 5 In the Description field enter any extra information that you want to include with the...

Страница 18: ...bjects such as persons or vehicles l If you do have an analytics camera motion search can be used to search for tiny pixel changes in the camera s field of view l Thumbnail search can be used to do a visual search of the search results which are a series of thumbnail images l Bookmark search allows you to search through all the listed bookmarks for a specific bookmark l Export l Recorded video can...

Страница 19: ... off Flashing white Power is being supplied and the workstation is in sleep state Flashing green There is a known problem with the power supply unit Steady green There is an unknown problem with the power supply unit Steady white The power supply unit is working and the workstation is powered on Hard Drive Activity Indicator The hard drive activity indicator on the front of the workstation functio...

Страница 20: ...witching Power Consumption HD RMWS3 4MN 685 W HD RMWS3 2MN 290 W Power Supply Single non redundant Environmental Operating Temperature HD RMWS3 4MN 10 C to 35 C 50 F to 95 F HD RMWS3 2MN 5 C to 35 C 41 F to 95 F Storage Temperature 40 C to 65 C 40 F to 149 F Humidity 20 to 80 relative humidity non condensing Operating Vibration 0 26 GRMS Storage Vibration 2 20 GRMS Operating Shock 40 G Storage Sho...

Страница 21: ... Avigilon warranty terms for this product is provided at avigilon com warranty Warranty service and technical support can be obtained by contacting Avigilon Technical Support avigilon com contact us Limited Warranty and TechnicalSupport 17 ...

Отзывы: