background image

05/09 Rev. 5.02-01

USER MANUAL

Setup & Operation

AP4.4 – AP5.4

18

Basic Operating Procedures

Connecting the Printer

1. Ensure that the printer power switch is set to “0” (Off).

2. Connect the printer to the power supply using the cable provided.

3. Using the data cable supplied, connect the Centronics interface on the 

printer to the host computer.

4. Turn on the printer using the power switch (switch to position “1”).

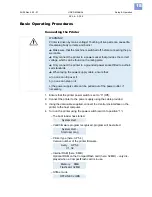
– The boot loader has started.

– Valid firmware program recognized, program will be started.

– Printer type (here: AP 5.4)

Version number of the printer firmware.

– Internal RAM (here: 8 MB)

Optional RAM on the CompactFlash card (here: 32 MB) – only dis-
played when a CompactFlash card is in use.

– Offline mode

WARNING!

Printer is driven by mains voltage! Touching of live parts can cause life-
threatening body currents and burns!

«

Make sure, that the machine is switched off, before connecting the po-

wer cable.

«

Only connect the printer to a power socket that provides the correct 

voltage, which can be found on the rating plate.

«

Only connect the printer to a grounded power socket fitted to authori-

zed standards.

«

When laying the power supply cable, ensure that:

a) no one can trip over it.

b) no one can step on it.

c) the power supply cable can be pulled out of the power outlet, if 
necessary.

System start...

System start...

Start user prog

Avery     AP 5.4

V 1.02

Memory:    8MB

Flashcard: 32MB

OFFLINE 0 JOBS

Содержание AP5.4

Страница 1: ...nser Internal Rewinder 11 Arrangement of the Connections 12 Warning Signs at the Printer 14 Control Panel Display 15 Operating State 16 Basic Operating Procedures 18 Connecting the Printer 18 Setting the Interface 19 Activate Deactivate Internal Rewinder 19 Activate Deactivate Dispenser 20 Configure Dispenser 21 Operation in Offline Mode 21 Operation in Online Mode 22 Creating a Print job 23 Trans...

Страница 2: ...r Hav ing someone else help you with this will also make it easier 4 Place the printer on an even surface Carrying the Printer One person can easily carry the AP 4 4 5 4 because it only weighs 14 kg To carry the printer grip the baseplate from the front and rear 2 2 When lifting the printer grip under the baseplate Packaging Please retain the original packaging for later use when transporting the ...

Страница 3: ...ply cable 3A The plug for the power supply is different depending on the country of delivery Data cable 3B Centronics IEEE 1284 CA Cable 2 m The cable connector for the printer is a type C connector Core adapters 3C There are two core adapters each for the material rolls with a core internal diameter of 76 2 mm 3 and 101 4 mm 4 On delivery the core adapt ers are placed on the printer material disp...

Страница 4: ...rinter packaging You can find instructions on how to mount the cutter in the Cutter Manual The cutter hook a part which is required to mount the cutter can be found fixed to the printer bottom AP 5 4 with Internal Rewinder Printer with mounted deflector Housing front part bottom side with screw 5B Cutter flange cover with screws 5A It is recommended to mount the housing parts if the printer is use...

Страница 5: ... with screw 6A Cutter flange cover with screws 6B Deflector 6C Enables the AP 5 4 Dispenser to be operated with internal label material rewinder It is recommended to mount the housing parts if the printer is used as a standard device without dispensing or rewinding function 6 These housing parts are shipped loose with the AP 5 4 Dispenser A B C ...

Страница 6: ...ead in place 7A For this use side cutting pliers or strong scissors 7 AP 4 4 5 4 transportation lock A AP 5 4 Dispenser Remove the connector from its transport position at the printer bottom and connect it to the connector at the frontside of the printer CAUTION Observe the following to avoid damaging the printhead Do not use a knife to cut the cable tie A ...

Страница 7: ... Control panel LCD graphics display 4 buttons displays printer operating status enables parameter menu settings B Connection for additional devices Not at AP 4 4 and AP 5 4 basic Connection for optional cutter or take up C Front cover Open to insert material and foil D Window Allows material foil supply check without opening the front hood A B C D ...

Страница 8: ...n here To do this you will need to remove the plastic cover D Pressure lever Opening the pressure lever raises the printhead This is required when in serting the material or foil or to clean the printhead or printing roller E Material rewinder Labelling material roller inserted here F Material strain relief Ensures even feed of the labelling material G Guide plate Prevents the material roll from s...

Страница 9: ... Dispenser A Dispensing edge Peels the labels off the backing paper B Connector Connection of the dispensing edge sensor C Dispensing roller Holds the material web tight over the dispensing edge D Dispensing roller release button Press the red button to release the dispensing roller E Deflector Deflects the backing paper F Rewinder Wraps up the backing paper A B C D E F ...

Страница 10: ...P4 4 AP5 4 10 AP 5 4 Internal Rewinder 11 Additional operating parts of the AP 5 4 Internal Rewinder A Deflector Deflects the printed label web without dispensing any labels B Deflector Deflects the label web C Rewinder Wraps up the label web A B C ...

Страница 11: ...irst punch at reduced print speed The label material is wound forward by the distance between the punch sensor and the printhead 70 mm This distance is used by the rewinder s control electronics to calculate the diameter of the backing paper roll already wound up To enable the control electronics to calculate di ameters even when using continuous material printing is also suspended for the first 7...

Страница 12: ...nal input Optional Connection for a treadle switch signal starts the printer or a stacker signal stops the printer B Serial Interface RS232 or RS422 485 on the optional available I O board C Signal interface 4 inputs 3 outputs belongs to the optional available I O board CAUTION Additional equipment of poor quality can damage the printer Connect only devices that fulfill SELV circuit requirements t...

Страница 13: ... of print data F USB connection For serial transfer of print data G Card insert For CompactFlash cards which can be used to save fonts logos or graphics H RS232 interface For serial transfer of print data I Status LED Ethernet J Network connection Connection for an Ethernet 10 100 Base T network K Power supply Connection to the power supply using the supply cable provided L Power switch Turns prin...

Страница 14: ... risk of getting hands fin gers loose clothing jewellery etc drawn in between rotating parts of the print er part no A5346 The warning sign pictured in 13 below warns of the risk of getting hands or fingers burned at hot surfaces close to the printhead part no A5640 Immediately replace missing or unreadable warning signs WARNING Pinch point Keep hands clear of rollers A5346 ...

Страница 15: ...ording to the operating condition and the menu item Additionally spe cial functions have been programmed for certain button combinations Despite this diverse range it is possible to identify the following main func tions C Online Button Switches between online and offline mode Confirms inputs menu items or displays Selecting print jobs and inputting field values in standalone mode D Cut Button Tri...

Страница 16: ...directly after you have switched it on set SYSTEM PARAMETER Turn on mode to Online Online Mode In the online mode print jobs are received and processed immediately No jobs are waiting to be processed Current data transfer to the printer is shown on the display This is indicat ed on the right underneath the number of loaded jobs Another point on half line height above the first shows the interprete...

Страница 17: ...s if the printer is set for using la belling material with perforation but continuous form material without perfora tion is inserted In this example the printer will continue to feed the material for a few seconds before it finally sends an error message More information on message reports and a detailed list of all messages can be found in topic section Status Messages Standalone Mode For AP 5 4 ...

Страница 18: ...onal RAM on the CompactFlash card here 32 MB only dis played when a CompactFlash card is in use Offline mode WARNING Printer is driven by mains voltage Touching of live parts can cause life threatening body currents and burns Make sure that the machine is switched off before connecting the po wer cable Only connect the printer to a power socket that provides the correct voltage which can be found ...

Страница 19: ...d Applications Activate Deactivate Internal Rewinder Only applies to the model AP 5 4 with internal rewinder and deflector Deactivate Set SYSTEM PARAMETER Periph Device to None If you do not insert printing material before activating the rewind function an error message will be displayed For details on how to insert printing material see topic Setup section In serting Label Stock Activate 1 Call S...

Страница 20: ...ing paper much heavier than label Labels stuck to backing paper Backing paper perforated along label contour Basic initialisation settings may only be changed by a qualified authorised service technician Activate Deactivate Dispenser Only applies to the model AP 5 4 with internal rewinder and dispensing edge Deactivate Set SYSTEM PARAMETER Periph Device to None Activate Call SYSTEM PARAMETER Perip...

Страница 21: ...ENSER PARA Start Source to Foot switch Label length 40 mm If very short lables are supposed to be printed PRINT PARAMETERS Material length is set to a value 40 mm the printer performs automatically a material initialization which improves the impression accuracy of the printout More details can be found in the description of parameter DISPENSER PARA Calibration mode in topic section Info Printouts...

Страница 22: ...is used this measurement will not work properly In this case it is adviseable to measure and set the label length manually label length punch length Operation in Online Mode Switching to offline mode Setting the print contrast Press the Feed button to increase and the Cut button to decrease the print contrast Interrupting the print job The device will finish printing the current label Switching to...

Страница 23: ... file format does require some programming knowl edge Furthermore you will not be able to preview the resulting printout on the screen Instead you have to run a test print to see a copy of the finished result You can find a practice example of a print job together with instructions in the Easy Plug Manual in the section Program Example under General Defini tions Commands Overview Transferring a Pr...

Страница 24: ...it at least 5seconds after switching off the printer before remo ving or inserting the CF card Manufacturer Card type Nominal capacity in MB Usable capacity a in MB Hama USB CF Card 64MB 64 63 USB CF Card 128MB 128 126 Intenso CF 32MB 32 32 Kingmax KCF032MHT 32 32 KCF096MHT 96 94 Pretec 16MB 16 16 32MB 32 32 64MB 64 62 128MB 128 123 SanDisk 16MB 16 16 128MB 128 123 Silicon Tech SLCF032A 32 31 Tosh...

Страница 25: ...rds 16 Insert the CF card into the designated slot until the release button 16A is pushed outwards The insert card will sit flush with the back casing 16 Inserting a CF card If the CF card has been inserted correctly then it will sit flush with the printer s back casing right For more detailed information on how to use CF cards please refer to the Plugin Card Manual topic section Application secti...

Страница 26: ...Type in date and time pressing the cut button shifts the cursor pressing the feed button changes the setting and by pressing the online button the setting is acknowledged How to set parameters read topic section Info Printouts and Parameters Reading out real time with Easy Plug AP 5 4 AP 5 4 only Reading out real time is done by using one of the following Easy Plug com mands YC realtime as text YS...

Отзывы: