background image

FCC NOTICE 

This device has been tested and found to comply with the limits for a Class B digital device, pursuant to Part 15 of the 
FCC Rules. These limits are designed to provide reasonable protection against harmful interference in a commercial, 
industri al or business environment. This equipment can generate, use and radiate radio frequency energy and, if not 
installed and used in accordance with the instruction, may cause harmful interference to radio communications. 
However, there is no guarantee that interference will not occur in a particular installation. If this equipment does cause 
harmful interference to radio or television reception, which can be determined by turning the equipment off and on, the 
user is encouraged to try to correct the interference by one or more of the following measures : 


Reorient or relocate the receiving antenna. 


Increase the separation between the equipment and receiver.  


Connect the equipment into an outlet on a circuit different from that to which the receiver is connected.


Consult the dealer or an experienced radio/TV technician for help.


This device complies with Part 15 of the FCC Rules. Operation is subject to the following two conditions:  (1) this 
device may not cause harmful interference, and  (2) this device must accept any interference received, including 
interference that may cause undesired operation.


C A U T I O N   O N   M O D I F I C A T I O N S 

To comply with the limits for the Class B digital device, pursuant to Part 15 of the FCC Rules, this device must be 
installed in computer equipment certified to comply with the Class B limits. All cables used to connect the computer 
and peripherals must be shielded and grounded. Operation with non-certified computers or non-shielded cables may 
result in interference to radio or television reception. 

Any changes or modifications not expressly approved by the grantee of this device could void the user's authority to 
operate the equipment. 

CE NOTICE  

This is a Class B product. 

D I S C L A I M E R  

No warranty or representation, either expressed or implied, is made with respect to the contents of this documentation, 
its quality, performance, merchantability, or fitness for a particular purpose. Information presented in this 
documentation has been carefully checked for reliability; however, no responsibility is assumed for inaccuracies. The 
information contained in this documentation is subject to change without notice.  

In no event will AVerMedia be liable for direct, indirect, special, incidental, or consequential damages arising out of 
the use or inability to use this product or documentation, even if advised of the possibility of such damages. 

T R A D E M A R K S  

AVerMedia and AVerTV are registered trademarks of AVerMedia TECHNOLOGIES, Inc. IBM PC is a registered 
trademark of International Business Machines Corporation. Macintosh is a registered trademark of Apple Computer, 
Inc. Microsoft is a registered trademark and Windows is a trademark of Microsoft Corporation. All other products or 
corporate names mentioned in this documentation are for identification and explanat ion purposes only, and may be 
trademarks or registered trademarks of their respective owners. 

C O P Y R I G H T  

©

 2002 by AVerMedia TECHNOLOGIES, Inc. All rights reserved. No part of this publication may be reproduced, 

transmitted, transcribed, stored in a retrieval system, or translated into any language in any form by any means without 
the written permission of AVerMedia TECHNOLOGIES, Inc.  


ENG 01 

Содержание TV TUNER BOX

Страница 1: ...EXTERNAL TV TUNER BOX...

Страница 2: ...and peripherals must be shielded and grounded Operation with non certified computers or non shielded cables may result in interference to radio or television reception Any changes or modifications not...

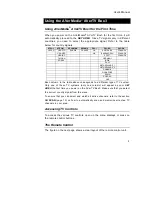
Страница 3: ...Power Adapter 6 Connecting a Video Source 7 Composite Video 7 S Video 6 Connecting to a Video Output Device 7 Using the AVerMedia AVerTV Box 8 Using AVerMedia AVerTV Box for the First Time 8 Accessing...

Страница 4: ...your computer Just plug it into your monitor or LCD projector and you re ready to watch TV or play video games AVerTV Box3 is completely plug n play There is no software driver required What s in the...

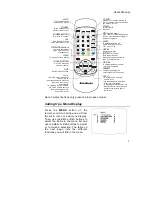
Страница 5: ...ss this button to toggle between TV Video and PC display VOLUME Press the button to and RIGHT button to increase LEFT decrease the volume level CHANNEL Press the button to go and to go up to the next...

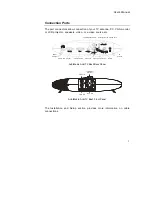
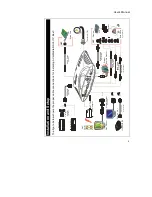
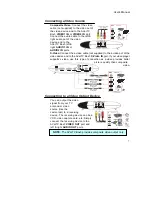
Страница 6: ...e etc S Video Audio In from PC s sound card TV Antenna Power Adapter VGA Out to monitor Left Right Audio2 In VGA In from PC Video2 In Speaker Connection AVerMedia AVerTV Box3 Back Panel Video Out Audi...

Страница 7: ...nna 75 Wall Outlet Power Adapter Audio Cable supplied External Amplified Speaker Sound Card OUT S Video Cable not supplied OUT V G A M o n i to r Video Game e g Nintendo VCR Camcorder Example Audio Ca...

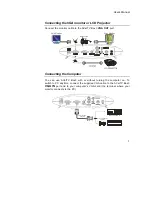
Страница 8: ...optional VGA Monitor LCD PROJECTOR Connecting the Computer You can use AVerTV Box3 with or without turning the computer on To switch to PC anytime connect the supplied VGA cable to the AVerTV Box3 VG...

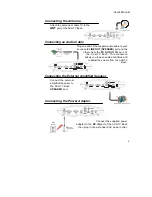
Страница 9: ...he other end to the PC AUDIO IN port of the AVerTV Box3 This connection allows you to have audio at all times and to adjust the volume from the AVerTV Box3 Connecting the External Amplified Speaker Co...

Страница 10: ...quality than composite video Connecting to a Video Output Device You can output the video signal from your TV antenna or video source like the camcorder to a receiving device The receiving device can...

Страница 11: ...TALY NETHERLANDS_1 NETHERLANDS_2 RUMANIA SINGAPORE SPAIN SWEDEN UAE Each column in the table above corresponds to a different type of TV system Only one of these TV systems only one column will appear...

Страница 12: ...y selected channel AV PC To toggle between TV Video or PC display SOURCE Switch between TV or external video sources NUMBER BUTTONS To select a TV channel 100 Press this button first for cable channel...

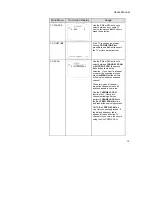
Страница 13: ...n press Vol button to make the selection If you want to interrupt or cancel the scanning process press the MENU button but this will only memorize the scanned channel These two types of channel preset...

Страница 14: ...actual time and the time to automatically turn on the AVerTV Box3 If you want to clear or change the time press Vol Under CLOCK menu select number three 3 Press Vol button to select ALARM ON to activa...

Страница 15: ...o remove add Use the CH or CH buttons to select ADD to include or DEL to remove the channel number in the channel line up then press Vol Note To browse through channels while setting the USER CH and C...

Страница 16: ...ion Use the CH or CH buttons to select from different languages then press Vol The available languages for NTSC version are English and For PAL and SECAM the available languages are English Espa ol De...

Страница 17: ...avel TV program listings and more Teletext Control Buttons The figure and descriptions in this section show how to use the teletext function using the remote control FASTEXT LINK BLUE Jump to the tele...

Страница 18: ...th page which is page 300 Press Vol button To select your desired teletext information use the FASTEXT LINK buttons In the last display line of the index page or any teletext page text appears in four...

Страница 19: ...uct defect 3 Cartons cases batteries cabinets tapes or accessories used with product 4 AVerMedia does not warrant that this product will meet your requirements it is your responsibility to determine t...

Отзывы: