background image

9

8

RF1-21-US(V1)

RF1-21-US(V1)

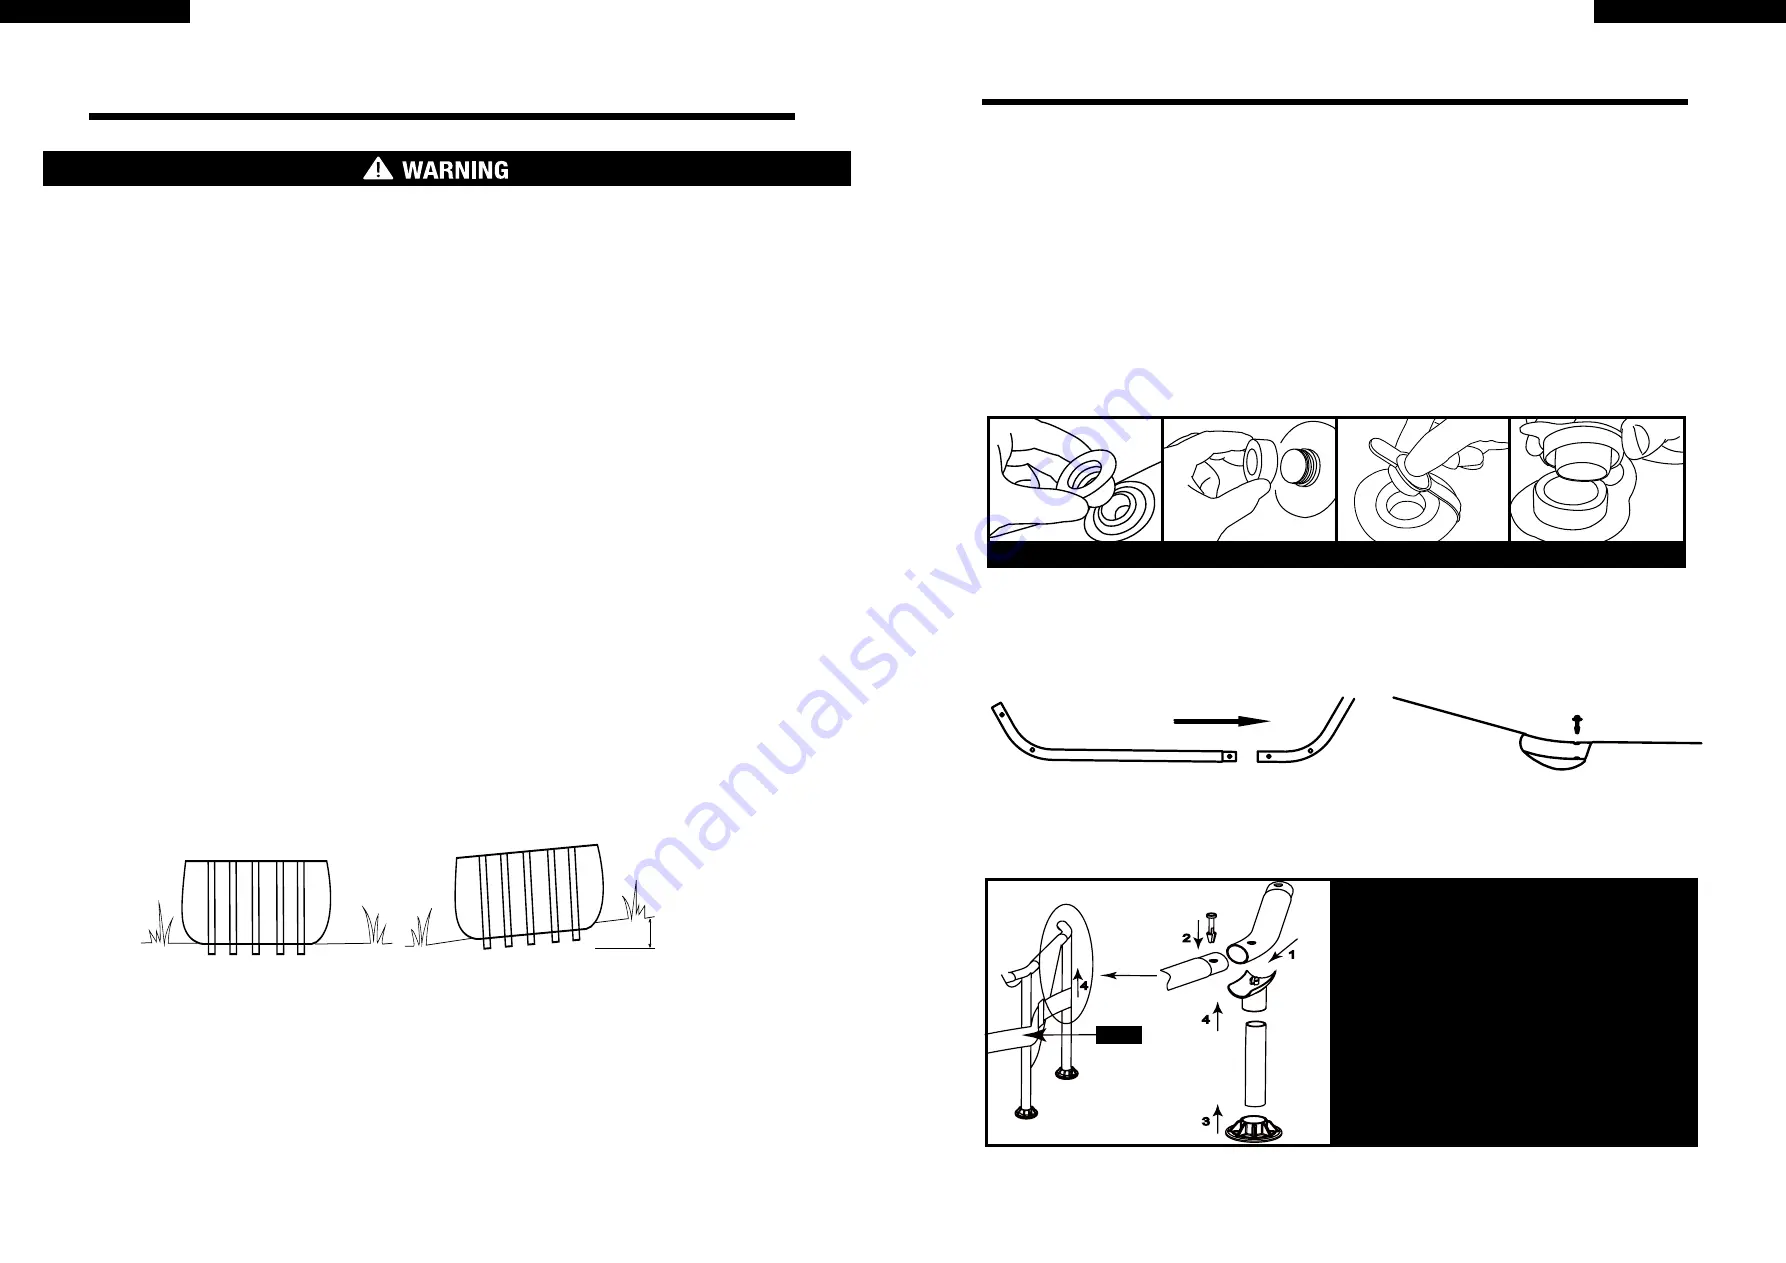
Select an outdoor location for the pool in accordance with the following requirements:

1.The area where the pool is set up must be completely flat and level.Do not set up the pool on a slope or 

inclined surface.

2.The ground surface must be compacted and firm enough to withstand the pressure and weight of a fully 

set up pool. Do not set up the pool on mud, sand, soft, or loose soil.

3.Do not set up the pool on a deck, balcony, or platform.

4.Be sure that the pool is set up in an area that is free and clear of stones, branches, or other sharp objects 

that may puncture the pool liner or cause injury.

+3°

Bumpy,Sloping Ground-INCORRECT

Flat,Level Ground-CORRECT

SETUP INSTRUCTIONS

•Portable pools must be set up in compliance with local safety and building codes.

•The pool location must allow you to secure all doors, windows, and safety barriers to prevent 

unauthorized, unintentional, or unsupervised pool entry.

•Install a safety barrier that will eliminate access to the pool for young children and pets.

•Failure to set up the pool on flat, level, compact ground and in accord with the following instructions 

could result in the pool’s collapse or the possibility that a person lounging in the pool could be swept 

out, resulting in serious injury or property damage.

•Risk of electric shock: The pool must be accessible to a 110 or 230V AC outlet protected by a 

Ground Fault Circuit Interrupter (GFCI). The pool should be set no closer than 10 ft. to the power 

source, but no further than the length of the filter pump cord. Under no circumstances should an 

extension cord be used to extend the range of the connection.

SETUP INSTRUCTIONS

Step1. ACCOUNT FOR ALL PARTS. 

Remove all the parts from the carton(s) and place them on the ground in the location where they are to be assembled  
Check each part according to “PART REFERENCE” .Make sure all the pieces to be assembled are accounted for. 

IMPORTANT:

 Do not start assembly if any pieces are missing. For replacement pieces call the Consumer Service 

telephone number in your area.
The number of persons required for installation: 2 adult at least.

Total installation time except the time for site preparation and water filling : 
30 minutes for size  Ф10’×30”/Ф12’×30”        
45 minutes for size  Ф14’x33”

Step2. INSTALL DRAIN VALVES COVER AND STOPPER

Make sure that outer drain plug is inserted into the outer drain cap and drain valve cover is screwed on tightly.Plug the con-
nection holes with the stoppers. (The out drain plug changes according to different size of pool.)

STOPPER

Out Drain Plug A

Out Drain Plug B

Drain Vavle Cover

Step3.


INSTALL HORIZONTAL BEAM

Step4.


INSTALL  T-JOINT

1. Use the connection end of the T-Joint to connect 

the adjacent horizontal tubes.

2. Insert the Pin into the hole of connected horizon-

tal tube and T-Joint firmly.

3. Install the vertical leg cap onto the vertical leg.

4. Insert the vertical leg into the T-Joint through the 

belt.

  TIP: If you can’t find the hole on the horizontal 

tube or vertical leg please rotate the tubes until the 

pin meets the hole.

BELT

4

3

4

1

2

Содержание 12146 Series

Страница 1: ...efully and keep for future reference DO NOT RETURN PRODUCT TO STORE Drawing for illustration purpose only Actual product may vary Not to scale Detailed information of product model and size is shown a...

Страница 2: ...ract a child to the pool Position furniture for example tables chairs etc away from pool so that children cannot climb on it to gain access to pool After using pool remove water to a level of in 1 cm...

Страница 3: ...the bottom which reduce the openings to no more than 1 3 4 inches 7 Where the barrier is composed of diagonal members such as a lattice fence the maximum opening formed by the diagonal members should...

Страница 4: ...64 1 290364 9 Pool Liner 1 393343 1 393585 1 393464 Model Size Water Capacity Pump Ladder 17813XX 12 x 30 3 6m x 76cm 1617Gal 6125L 17813 12 x 30 3 6m x 76cm 1617Gal 6125L 12146XX 12 x 30 3 6m x 76cm...

Страница 5: ...The pool should be set no closer than 10 ft to the power source but no further than the length of the filter pump cord Under no circumstances should an extension cord be used to extend the range of t...

Страница 6: ...y require include but are not limited to Tabular Granular or Liquid Chlorine Disinfects pool water and inhibits algae growth PH Adjusting Chemicals These are used to correct PH level and make water mo...

Страница 7: ...t the vinyl from sticking together Step1 Please fold the protrusion sides inside to gain rectangle shape PIC 2 Step2 Fold each half of the rectangle to gain a smaller rectangle shape PIC 3 Step3 Fold...

Страница 8: ...orination is inadequate Foreign debris in water Bathers are not cleaning their feet prior to entering pool Adjust pH Check with a swimming pool supply retailer for correct water treatment Ensure prope...

Страница 9: ...attentivement et le conserver pour r f rence future NE RETOURNEZ PAS LE PRODUIT AU MAGASIN Dessin des fins d illustration uniquement Le produit en r alit peut varier Ce n est pas l chelle Des informa...

Страница 10: ...urveillant de baignade fournie Surveillez attentivement les enfants lorsqu ils sont dans ou pr s de la piscine ou lorsque vous la remplissez ou la videz Lorsque vous recherchez un enfant disparu veuil...

Страница 11: ...les l ments verticaux ne doit pas d passer 1 3 4 pouces de largeur Lorsqu il y a des d coupes d coratives l espacement entre les d coupes ne doit pas d passer 1 3 4 pouces de largeur 5 Lorsque la barr...

Страница 12: ...0318 10 290318 12 290183 4 Montant 10 290188 10 290188 12 393132 5 Capuchon de montant 10 290185 10 290185 12 290185 6 Capuchon de vanne de drain 1 290366 1 290366 1 290366 7 Bouchon 3 290311 3 290311...

Страница 13: ...ui pourraient percer le rev tement de la piscine ou causer des blessures graves 3 Bumpy Sloping Ground INCORRECT Flat Level Ground CORRECT INSTRUCTIONS DE MONTAGE Les piscines mobiles doivent tre inst...

Страница 14: ...UCHON Bouchon A du drain ext rieur Bouchon B du drain ext rieur Capuchon de vanne de drain TAPE 3 INSTALLER LA BARRE HORIZONTALE tape 5 REMPLISSEZ LA PISCINE D EAU AVERTISSEMENT ne laissez pas la pisc...

Страница 15: ...s dans l eau Cela signifie que le chlore granulaire ou tabulaire doit tre pr alablement dissous dans un seau d eau avant de le verser dans l eau de la piscine et de m me le chlore liquide doit tre ver...

Страница 16: ...in gale Les plis au bas du rev tement n ont pas t correctement liss s avant le remplissage Le c t n a pas t correctement largi pendant le remplissage de la piscine ce qui a fait que la circonf rence...

Страница 17: ...98 17812 3 0m 76cm 17802 17817 4 5m 1 22m 17793 17807 3 0m 76cm 17794 17808 3 6m 76cm 300GAL EU GB FR BR IL DE CH US CA AU 17801 17816 4 5m 90cm 17799 17813 3 6m 76cm 17795 17809 3 6m 90cm 17796 17810...

Страница 18: ...ion du probl me Photo LWC 21 FRC V1 17798 17812 3 0m 76cm 17802 17817 4 5m 1 22m 17793 17807 3 0m 76cm 17794 17808 3 6m 76cm 300GAL EU GB FR BR IL DE CH US CA AU 17801 17816 4 5m 90cm 17799 17813 3 6m...

Страница 19: ...ntrum en dien een serviceticket voor meer hulp Het is belangrijk dat u alle benodigde informatie invult op de aanvraagtabel zoals de klantnaam een geldig e mailadres de aankoopdatum het serienummer en...

Отзывы: