background image

Chapter 11

 101

Avaya Network Management Console User Guide

Filtering By 
Device Type

To view only traps from a specific device type:

1.  

Click 

. The cursor changes to a hand.

2.  

Click on the 

Device Type 

column of a trap from the desired device 

type. Only traps from devices of the selected device type are 
displayed in the Trap Table.

Or

1.  

Select 

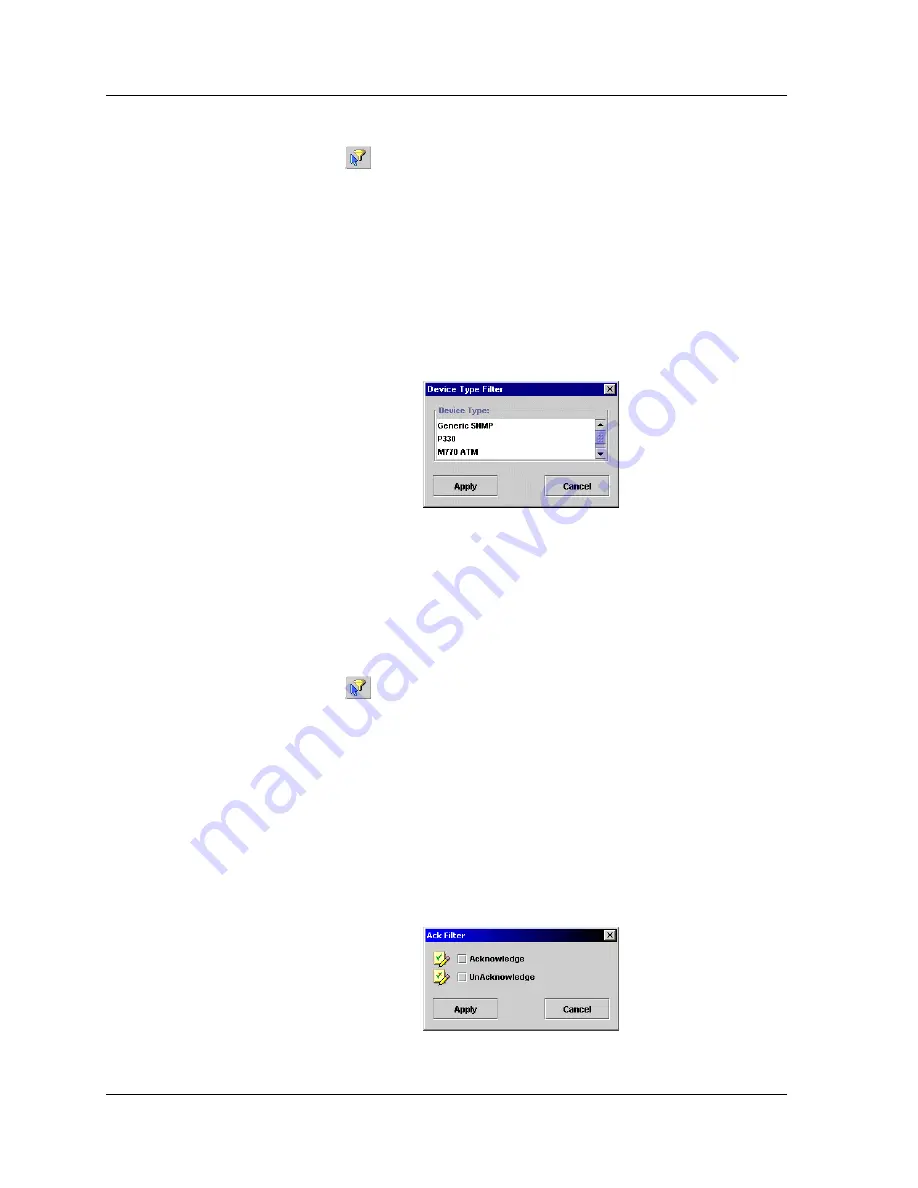
View > Filter > Device Type Filter

. The Device Type Filter 

dialog box opens.

Figure 11-4.  Device Type Filter Dialog Box

2.  

Select device types from the listbox. 

3.  

Click 

Apply

. Only traps from devices of the selected types are 

displayed in the Trap Table.

Filtering By 
Acknowledged

To filter traps by the 

Acknowledged

 field:

1.  

Click 

. The cursor changes to a hand.

2.  

Click on the 

Ack

 column of a trap with the desired 

Acknowledgement. Only traps with the same value in the 

Acknowledged

 field are displayed in the Trap Table.

Or

1.  

Select 

View > Filter > Acknowledge Filter

. The Acknowledged Filter 

dialog box opens.

Figure 11-5.  Acknowledged Filter Dialog Box

Содержание Network Management Console

Страница 1: ...Avaya Network Management Console User Guide May 2004...

Страница 2: ...or their application of any products specified in this document Avaya disclaims responsibility for errors which may appear in this document and it reserves the right in its sole discretion and without...

Страница 3: ...Management Server 10 Introduction to Avaya Network Management Server 10 Starting Avaya Network Management Server 10 Stopping Avaya Network Management Server 12 Chapter 3 Avaya Network Management Conso...

Страница 4: ...ustom Views 37 Adding Branches in Custom Views 37 Modifying Branches in Custom Views 38 Deleting Branches in Custom Views 38 Printing the Network Tree 39 Searching the Tree 40 Chapter 5 Avaya Network...

Страница 5: ...Chapter 9 Discovering Your Network 67 Setting Discovery Options 67 Configuring Discovery Method and Range 68 Configuring Discovery s Naming Method 70 Selecting Device Types to Discover 73 Using the D...

Страница 6: ...evel 99 Filtering By IP Address 100 Filtering By Device Type 101 Filtering By Acknowledged 101 Viewing All Traps 102 Acknowledging Traps 102 Deleting Traps 103 Editing Severity Levels 103 Saving the T...

Страница 7: ...e Help Menu 123 Discovery Menus 123 Discovery File Menu 123 Discovery Edit Menu 124 Discovery View Menu 124 Discovery Actions Menu 124 Discovery Help Menu 124 Event Log Browser Menus 125 Event Log Bro...

Страница 8: ...andalone Mode efficiently and effectively Who Should Use This Manual This manual is intended for network managers familiar with network management and its fundamental concepts Organization of This Man...

Страница 9: ...on how to launch device specific and network wide applications from Avaya Network Management Console Network Maps An explanation of Network Maps instructions on how to create open save and print Netw...

Страница 10: ...used in this documentation What is Avaya Network Management Server A description of the Avaya Network Management Server and its functions What is Avaya Network Management Console A description of Avay...

Страница 11: ...Log which reports network events Network Management in Standalone Mode uses a client server architecture allowing multiple users to access the Avaya Network Management Server simultaneously Web based...

Страница 12: ...le provides a list of terms used in Network Management in Standalone Mode documentation with their descriptions Table 1 1 Network Management Terms Term Description Best Name The best name for a device...

Страница 13: ...nagement Server allows you to operate Avaya Network Management Console from a remote location This feature provides a method for managing your network from any computer connected to the Internet By po...

Страница 14: ...I or launch Avaya P330 Device Manager to configure and monitor the device via its management application and monitor the device using Avaya P330 SMON Manager In addition Avaya Network Management Conso...

Страница 15: ...n exporting the device information from the current Network Map refer to Exporting the Network Map on page 60 What is Discovery Network Management in Standalone Mode can discover the subnets and nodes...

Страница 16: ...vices in your network The Event Manager maintains a log of all traps received from the devices in the network These traps can be viewed in the Event Log Browser Figure 1 3 Event Handling Flow Traps ar...

Страница 17: ...have already seen Define the format of the description field Delete traps signifying that the problem causing the trap was resolved In addition the Event Manager allows you to define event actions Eve...

Страница 18: ...from a computer where Network Management is not installed When you point your browser to the Avaya Network Management Server s IP address a Java applet prepares your browser to communicate with Avaya...

Страница 19: ...nch applications In addition Avaya Network Management Server enables remote sessions of Avaya Network Management Console Ensure that Avaya Network Management Server is running on the host computer bef...

Страница 20: ...ist of services 4 Click Start If Avaya Network Management Server starts successfully a window opens with the message Avaya Network Management Server successfully started If Avaya Network Management Se...

Страница 21: ...Network Management Server Or From a command prompt type cvserver stop A confirmation dialog box opens 2 Click Yes Or 1 Open Windows Control Panel 2 Double click Services 3 Select Avaya Network Managem...

Страница 22: ...Console s options Using Avaya Network Management Console Tables An explanation of symbols used in Avaya Network Management Console tables Using Avaya Network Management Console Help An explanation of...

Страница 23: ...gin Mode is disabled Avaya Network Management Console opens For more information about Login Mode refer to the Avaya Network Manager User Administration User s Guide Avaya Network Management Console U...

Страница 24: ...rmation about the current Avaya Network Management Console session The figure below shows the user interface with its various parts labeled Figure 3 1 Avaya Network Management Console Interface To res...

Страница 25: ...cription Menu Item Opens the Modify dialog box for the selected object Edit Modify Deletes the selected object from the Network Map Edit Delete Cuts the selected object from a custom view to the clipb...

Страница 26: ...ubnets device types or devices under the selected branch of the tree For more information about the Network Table refer to Chapter 5 Avaya Network Management Console Network Table Dialog Area The area...

Страница 27: ...the following information about the device Name The Best Name of the device IP The IP address of the device Mask The device s IP subnet mask MAC The device s MAC address Type The device type Interfac...

Страница 28: ...on setting the Timeout value see Setting Read Write Defaults on page 28 All functionality is enabled for a console with read write permission This is true whether you are running Avaya Network Managem...

Страница 29: ...click Refuse Note If you don t click OK or Refuse before the Timeout value expires write permission is automatically released to the requesting console To release read write permission without a dire...

Страница 30: ...polling a device Avaya Network Management Server uses the device s SNMP access parameters The server first checks the Specific IP s list If the device is listed in the Specific IP s list the SNMP acc...

Страница 31: ...User pull down listbox The user name must have been defined in the User Administration Window For more information refer to the Network Management User Administration User s Guide 5 Enter a number in...

Страница 32: ...r tests the IP address of devices to poll against the list of devices in the IP Wildcards list If the IP address matches a range the server uses the range s SNMP access parameters when polling the dev...

Страница 33: ...ormation refer to the Network Management User Administration User s Guide 6 Enter timeout and retry values in their respective fields 7 Click Apply The new range is added to the IP Wildcards table To...

Страница 34: ...pe pull down listbox 3 Enter the device s IP address in the IP field 4 If you selected V1 in the Type field enter read and write community values in their respective fields 5 If you selected V3 in the...

Страница 35: ...of times that Avaya Network Management Server will unsuccessfully PING a node before declaring it to be unreachable To set default connectivity polling parameters 1 Click the Connectivity Polling tab...

Страница 36: ...The network is configured with the new connectivity polling parameters Selecting a Default Map The Default Map page of the Avaya Network Management Console Options dialog box enables you to select the...

Страница 37: ...Options dialog box The Read Write Defaults page appears Figure 3 8 Avaya Network Management Console Options Dialog Box Read Write Defaults Page 2 Check the Allow Read Write request checkbox to enable...

Страница 38: ...line help can be opened to the contents page or directly to a topic of interest For more information refer to Opening the Help to the Contents Page Opening the Help to a Topic of Interest Opening the...

Страница 39: ...e Introduction 2 Click on a point of interest in Avaya Network Management Console The help opens to a topic explaining the clicked feature Closing Avaya Network Management Console To close Avaya Netwo...

Страница 40: ...tion to the Network Tree When viewing the network you may want to view The structure of the network by subnet The information categorized by the different types of devices in the network The system vi...

Страница 41: ...views of the network The Subnet View shows a hierarchical representation of the subnets in the network The Device Type View shows a view of the network grouped by device type The System View shows a...

Страница 42: ...f the device When an icon representing a device is selected the device s interfaces appear in the Network Table The Device Type View The Device Type View tree shows the network grouped by device type...

Страница 43: ...network The root splits into two branches CM Servers Communication Manager Media Servers and Other Under the CM Servers branch the tree splits into locations For each location Communication Manager Me...

Страница 44: ...le for stations running Network Management Console remotely Note If the System View tab does not appear run Discovery or System View Discovery The tab appears with the discovered devices in the tree C...

Страница 45: ...escription field 4 Click Apply The view is added to Avaya Network Management Console with the top level My Network All devices in the network are added to a branch labeled Unassigned Modifying Custom...

Страница 46: ...ches with devices or nested branches To add branches to a custom view of the network 1 Select the icon in the Network Tree to which you want to add a branch 2 Select File New Branch The Add Branch dia...

Страница 47: ...h you want to modify in the Network Tree Note The Unassigned branch cannot be modified 2 Select Edit Modify The Modify Branch dialog box opens Figure 4 5 Modify Branch Dialog Box 3 Change the name of...

Страница 48: ...ear in the Unassigned list Printing the Network Tree To print the current view of the Network Map select File Print The current view of the Network Map is printed To view a preview of the printed Netw...

Страница 49: ...dit Find The Find dialog box opens Figure 4 7 Find Dialog Box 2 Select one of the Find Options option buttons 3 Enter the device s name or part of it IP address or MAC address in the Find What field 4...

Страница 50: ...how to add devices to the Network Map Modifying Devices Instructions on how to modify device parameters Device Parameters A detailed description of device parameters Deleting Devices Instructions on h...

Страница 51: ...ected in the Network Tree Table 5 1 Network Table Subnets Field Description Name IP address of the subnet Status The status of the subnet No of Devices The number of registered devices in the subnet T...

Страница 52: ...terfaces Field Description IP Address The IP address of the interface Interface Status The status of the interface MAC Address The MAC address of the device Subnet Mask The subnet mask of the device s...

Страница 53: ...all of the objects may put stress on your network resources You may also want to keep devices that do not need management such as workstations in the Network Map When an object in the Network Map is u...

Страница 54: ...ally Adding Devices You can manually add devices to the Network Map To manually add a device to the current Network Map 1 Select File New Device The Add Device dialog box opens Figure 5 2 Add Device D...

Страница 55: ...Box 3 Modify the parameters in the dialog box 4 To edit the device s SNMP parameters click the SNMP Access tab 5 Enter the SNMP parameters 6 Click Apply The parameters are modified For information on...

Страница 56: ...The device is managed by Network Management Un manage The device is not managed by Network Management SNMP The SNMP protocol Possible SNMP protocols are Snmp V1 Snmp V3 Read Community The device s re...

Страница 57: ...ble Deleting Devices To delete selected devices from the current Network Map 1 Select a device To select more than one device press CTRL while selecting additional devices 2 Select Edit Delete A confi...

Страница 58: ...ent Console Launching Network wide Applications Instructions on launching network wide applications from Avaya Network Management Console For information specific to an application refer to the applic...

Страница 59: ...et can be used to access the Command Line Interface CLI of a network device This allows you to change the device s setup If you are running Avaya Network Management remotely you can use Telnet to mana...

Страница 60: ...Ping The results of the PING appear in the Command window Avaya Site Administrator Avaya Site Administrator ASA is a system management tool designed for user administration and maintenance of IP enabl...

Страница 61: ...device 2 Select Tools Avaya Site Administration Or Double click an appropriate managed telephony device If you selected a Communication Manager Media Server ASA connects to the device and opens the a...

Страница 62: ...ect Tools Avaya MultiSite Administration Avaya MultiSite Administration opens on the selected device Avaya Fault and Performance Manager Avaya Fault and Performance Manager is a system management tool...

Страница 63: ...d The main Avaya VAL Manager window opens To launch Avaya VAL Manager on an appropriate VAL board 1 Select an appropriate VAL board 2 Select Tools Avaya VAL Manager Or Double click an appropriate mana...

Страница 64: ...ens Note Avaya SMON Manager is only available with the purchase of an SMON license For more information on SMON licenses refer to Appendix B Setting up the SMON License in the Avaya SMON Manager User...

Страница 65: ...rk Map is the set of devices that can be viewed in Avaya Network Management Console The Network File provides a method of storing information about the devices in a Network Map You can create a number...

Страница 66: ...name for the file in the New map name field 3 Click OK A new Network Map is created 4 Add subnets and devices to the Network Map using one of the following methods Discovery For more information refer...

Страница 67: ...2 Open Map Dialog Box 2 Select a Network Map from the list 3 Click Open The selected Network Map opens Saving a Network Map to a Different Name To save a Network Map to a different Name 1 Select File...

Страница 68: ...6 4 11 149 49 32 251 149 49 43 210 255 255 0 0 00 C0 1F 01 C2 11 Lazy23 Lazy23 20 3 149 49 48 204 255 255 255 0 00 A7 F2 11 BA 34 Oddball Harpo Harpo 60 7 Note The information fields of the CSV file w...

Страница 69: ...twork Map is exported to the specified CSV file CSV File Structure The structure of the information in the CSV file is described in the following table Table 7 1 CSV Network File Syntax Field Descript...

Страница 70: ...r of times an application will poll the device without receiving a response before timing out Timeouts The number of milliseconds an application will poll the device without receiving a response befor...

Страница 71: ...o open the Discovery window The Discovery User Interface A description of the Discovery window Closing the Discovery Window Instructions on how to close the Discovery window Opening the Discovery Wind...

Страница 72: ...n Discovery menus refer to Appendix A Network Management Menus Discovery Toolbar Toolbar buttons for accessing Discovery functions Subnets Table A table of subnets listed in the Network View and disco...

Страница 73: ...Starts a Discovery based on the default routers of the management station and the contents and settings of the Subnet Table Actions Discover Stops a Discovery process Actions Stop Network Discovery Ad...

Страница 74: ...lick the column header again Table 8 2 Subnets Table Fields Field Name Description Subnet The IP address of the subnet Mask The subnet mask Router The IP address of the subnet s router Status The stat...

Страница 75: ...Area disappears and the Subnets Table expands to take its place Discovery Status Bar The Discovery Status Bar provides information about the current Discovery including Current Discovery Phase The pha...

Страница 76: ...and delete log entries Manually Discovering System View Instructions on how to discover the VoIP devices in your network Using the System View Log Instructions on how to open the System View Log Note...

Страница 77: ...covery Options dialog box opens Configuring Discovery Method and Range To configure the method and range of Discovery 1 Click the IP Discovery tab at the top of the Discovery Options dialog box The IP...

Страница 78: ...applied to the subnet address to determine the number of IP addresses in the subnet Possible values are Disable Ping Ping is not used to discover devices 255 255 255 252 2 hosts 255 255 255 248 6 host...

Страница 79: ...overy uses for selecting names for discovered nodes 1 Click the Names Discovery tab at the top of the Discovery Options dialog box The Names Discovery page of the Discovery Options dialog box appears...

Страница 80: ...very Options Field Name Description Update names for existing entries This determines whether Discovery updates the names for nodes already listed in the Network Map Possible states are Update Discove...

Страница 81: ...s an SNMP system name Discovery will use it as the node s name Otherwise Discovery will use the node s IP address Name Service SNMP sysName IP If there is a Name Service defined name Discovery will us...

Страница 82: ...Discovered Types Options are configured The Discovered Types page of the Discovery Options dialog box has two listboxes Only devices in the Discovered Types listbox will be found by Discovery Devices...

Страница 83: ...end dates To schedule network discovery 1 Select Actions Schedule Network Discovery in the Discovery menu bar The Discovery Scheduler dialog box opens Figure 9 4 Discovery Scheduler Dialog Box 2 Confi...

Страница 84: ...d Name Description Enable Scheduler When checked the Discovery Scheduler is enabled Recurrence Pattern The frequency to run Network Discovery Possible values are Hour Select the hourly interval betwee...

Страница 85: ...dit Delete All in the Discovery menu bar A confirmation dialog box opens 2 Click OK All subnets in the Subnets Table are deleted 3 Click in the Discovery toolbar Or Select Actions Discover in the Disc...

Страница 86: ...le select the subnets upon which you want to discover nodes To select more than one subnet Press SHIFT and select the last subnet in a contiguous selection Press CTRL and select additional subnets for...

Страница 87: ...bnets whose Discover checkbox is checked and the Discovery Progress window opens Figure 9 6 Discovery Progress Window To stop the Discovery click Stop A confirmation dialog box opens Click Yes Discove...

Страница 88: ...dialog box refer to Subnet Parameters on page 81 3 Click Apply The subnet is added to the current Network Map 4 Click in the Discovery toolbar Or Select File Update Map in the Discovery menu bar The N...

Страница 89: ...dialog box For information on the fields in the Add Subnet dialog box refer to Subnet Parameters on page 81 4 Click Apply The subnet is modified in the current Network View 5 Click in the Discovery t...

Страница 90: ...net Mask A subnet mask is used for the subnet You must enter a valid subnet mask in the IP Subnet Mask field The Router field is ignored Router The subnet s router is used for the subnet You must ente...

Страница 91: ...re deleted from the Subnets Table Using the Discovery Log The progress of the Discovery process is reported in the Discovery Log If the Discovery Log contains entries an L appears in the Status Bar of...

Страница 92: ...on Dialog Box The dialog box contains the router access error message and the current router access configuration parameters The following table provides a list of the parameters in the Router Access...

Страница 93: ...ame and browse to the directory in which to save the file 3 Click Save The Discovery Log is saved to the specified file Deleting Log Entries To delete an entry from the Discovery Log 1 Select an entry...

Страница 94: ...iscovering System View To manually discover the System View Select Actions System View Discovery in the Console menu bar System View Discovery is performed and the Network Map is updated Using the Sys...

Страница 95: ...can be viewed using Avaya Network Management Console The Event Log Browser window of the Event Manager provides a list of traps in a table Each row contains information about a single trap Note To re...

Страница 96: ...og Browser and Event Configuration windows The Action List window can only be reached from the Event Configuration window The Event Log Browser User Interface The Event Log Browser user interface cons...

Страница 97: ...olbar button for one second a label appears with the name of the button Table 10 1 Event Log Browser Toolbar Button Description Menu Item Deletes the selected traps Edit Delete Marks the selected trap...

Страница 98: ...Note The Trap Table can hold up to 10 000 traps The following table provides a list of the fields in the Trap Table and an explanation of each field Table 10 2 Trap Table Fields Field Description Seve...

Страница 99: ...ation user interface consists of the following elements Event Manager Tabs Tabs for switching between the Event Log Browser and the Event Configuration window Menu Bar Menus for accessing Event Config...

Страница 100: ...collapsible tree Each event category can be expanded or collapsed by clicking the handle next to the category The following table provides a list of the fields in the Event Table and an explanation o...

Страница 101: ...c identifier for the event Event Forward The state of event forwarding for the trap If the checkbox is checked the event is configured for forwarding If the checkbox is not checked the event has not b...

Страница 102: ...of the source from which the trap is sent Table 10 5 Assign Action Form Fields Continued Field Description Table 10 6 Event Configuration Form Fields Field Description Category The type of event Log...

Страница 103: ...nt will be displayed in the description field of the Event Log Browser The following parameters are available for configuring the format e trap enterprise number retrieves the specified parameter from...

Страница 104: ...or on a toolbar button for one second a label appears with the name of the button Table 10 7 Action List Toolbar Button Description Menu Item Applies the changes to the Action List Edit Apply Undoes a...

Страница 105: ...Area is where the Add Action and Modify Action dialog boxes open For information on the fields in the Add Action and Modify Action dialog boxes refer to Action Fields on page 108 Closing the Event Man...

Страница 106: ...s on managing traps and includes the following sections Trap Log Options Instructions on the options available for cleaning up the Trap Table Filtering Traps Instructions on how to filter the traps di...

Страница 107: ...ox opens Figure 11 1 Trap Log Options Dialog Box 2 Enter a number between 1 and 9999 in the Events to remove from the Trap Log field This is the number of events to be deleted when there are 10 000 ev...

Страница 108: ...displayed in the Trap Table However you can filter traps by severity level source device type or acknowledgment status When you filter the Trap Table traps that do not meet the filtering criteria are...

Страница 109: ...Trap Table Filtering By IP Address To view only traps from a specific IP address 1 Click The cursor changes to a hand 2 Click on the From column of a trap from the desired device Only traps from the...

Страница 110: ...ilter dialog box opens Figure 11 4 Device Type Filter Dialog Box 2 Select device types from the listbox 3 Click Apply Only traps from devices of the selected types are displayed in the Trap Table Filt...

Страница 111: ...ging Traps It is useful to acknowledge traps of which you are aware even if you do not want to delete them This can help focus your interest on traps that you have not yet seen To acknowledge a trap 1...

Страница 112: ...Select a trap To select multiple traps press CTRL while clicking on additional traps To select all traps select Edit Select All 2 Click Or Select Edit Delete A confirmation dialog box opens 3 Click Ye...

Страница 113: ...can be saved to a file The file can be in one of the following formats Comma Separated Values CSV As a text file with the columns in each row separated by commas XML As an XML file To save the Trap T...

Страница 114: ...ctions on how to apply Action List changes to the network Action Options Instructions on how to configure Avaya Network Management Console to use your SMTP server For information on the Action Table w...

Страница 115: ...ion The Add Action dialog box opens Figure 11 7 Add Action Dialog Box 2 Define the action using the Add Action dialog box fields For information on the fields in the Add Action dialog box refer to Act...

Страница 116: ...t Edit Modify Action The Modify Action dialog box opens Figure 11 8 Modify Action Dialog Box 3 Edit the action using the Add Action dialog box For information on the fields in the Modify Action dialog...

Страница 117: ...kbox determines whether the action includes running a script The textbox contains the name of the script file You can assign a script file by clicking Browse and using a standard file browser to find...

Страница 118: ...eld Or 1 Click Options The Script Parameters dialog box opens Figure 11 9 Script Parameters Dialog Box 2 Check the checkboxes next to the parameters you want to add to the command 3 Click Apply The Sc...

Страница 119: ...y audio file recognized by your computer for inclusion in an action The file will be played by its associated application If the file format is unrecognized by your operating system an error will occu...

Страница 120: ...ecify an e mail address as the sender of the e mail To define e mail settings 1 Select Tools Options The Action List Options dialog box opens Figure 11 10 Action List Options Dialog Box 2 Enter your S...

Страница 121: ...this section Assigning Actions to Events Configuring Event Forwarding To configure events and event forwarding click the Event Configuration tab The Event Configuration window appears For information...

Страница 122: ...dual devices to the Members list a Select a device in the Unassigned list To select a contiguous group of devices press the SHIFT key and select the last device in the group To select a non contiguous...

Страница 123: ...area 12 Click Apply The selected action is assigned to the selected event from the selected source Note Only one action can be assigned to a particular event To close the Action Definition dialog box...

Страница 124: ...e User Guide To open the Event Forwarding Options dialog box Click Or Select Tools Event Forward The Event Forwarding Options dialog box opens Figure 11 12 Event Forwarding Options Dialog Box To close...

Страница 125: ...SNMPv1 trap Syslog 4 Click Apply Event forwarding sources are configured Configuring Forwarding Recipients You can configure up to ten devices to receive forwarded network events To add devices to th...

Страница 126: ...he user must enter a username and password Once these are authenticated Avaya Network Management Console opens Remote Access and Security Network Management s files are secured by Windows NT s NTFS fi...

Страница 127: ...here IP_Address is the IP address of the Avaya Network Management Server The Avaya Network Management Console Remote Entry Page opens Figure 12 1 Network Management 2 Click Open Avaya Network Manageme...

Страница 128: ...Network Management Console These menus include Avaya Network Management Console File Menu Avaya Network Management Console Edit Menu Avaya Network Management Console Actions Menu Avaya Network Manage...

Страница 129: ...a Network Management Console Edit Menu Item Description Modify Opens the Modify dialog box for the selected object Delete Deletes the selected object from the Network Map Modify View Opens the Modify...

Страница 130: ...pens the System View log Tooltip Toggles the display of device tooltips Table A 4 Avaya Network Management Console Actions Menu Item Description System View Discovery Performs System View Discovery Ev...

Страница 131: ...Administration Avaya Fault and Performance Manager Launches Avaya Fault and Performance Manager Avaya VAL Manager Launches Avaya VAL Manager Avaya Software Update Manager Launches Avaya Software Upda...

Страница 132: ...etwork Management Console Help Menu Item Description Contents Opens the on line help to the contents page Help On Activates context sensitive help About Avaya Network Management Console Opens the Abou...

Страница 133: ...eld for the selected subnets Delete Deletes the selected subnet from the Subnets Table Delete All Deletes all subnets from the Subnets Table Table A 9 Discovery View Menu Item Description Discovery Lo...

Страница 134: ...p Menu Item Description Table A 12 Event Log Browser File Menu Item Description Options Opens the Trap Log Options dialog box Export Saves the Event Log to a file Exit Closes the Event Log Table A 13...

Страница 135: ...dify Event Opens the Modify Event dialog box Table A 14 Event Log Browser View Menu Item Description Filter Severity Filter Opens the Severity Filter dialog box Filter IP Address Filter Opens the IP A...

Страница 136: ...ation File Menu Event Configuration Edit Menu Event Configuration Tools Menu Table A 16 Event Configuration File Menu Item Description Exit Closes the Event Log Table A 17 Event Configuration Edit Men...

Страница 137: ...File Menu Action List Edit Menu Table A 19 Event Configuration Help Menu Item Description Contents Opens the on line help to the first topic Help On Activates context sensitive help Table A 20 Action...

Страница 138: ...ols Menu Action List Help Menu Table A 22 Action List Tools Menu Item Description Options Opens the Action List Options dialog box Table A 23 Action List Help Menu Item Description Contents Opens the...

Страница 139: ...elp 29 Help menu 123 menus 119 overview 4 13 starting 13 starting a remote session 118 status bar 17 Tools menu 122 user interface 14 View menu 121 what is 4 Avaya Network Management server 10 introdu...

Страница 140: ...Event log browser Edit menu 125 File menu 125 Help menu 126 menus 125 status line 90 toolbar 88 user interface 87 View menu 126 Event manager 86 closing 96 overview 86 user interface 87 viewing 87 Eve...

Страница 141: ...et discovery options 67 set IP SNMP access parameters 25 set SNMP access parameters 21 set SNMP access parameters for IP ranges 23 set SNMP default access parameters 21 start a remote session of Avaya...

Страница 142: ...s of events to forward 116 Specifying a subnet to discover 77 Starting a remote session of Avaya Network Man agement console 118 Avaya Network Management console 13 Avaya Network Management server 10...

Страница 143: ...82 the network view area 41 V View device type 33 34 subnet 33 Viewing the event manager 87 traps 102 W Web session 55 What is Avaya Network Management console 4 Avaya Network Management server 4 disc...

Отзывы: