26
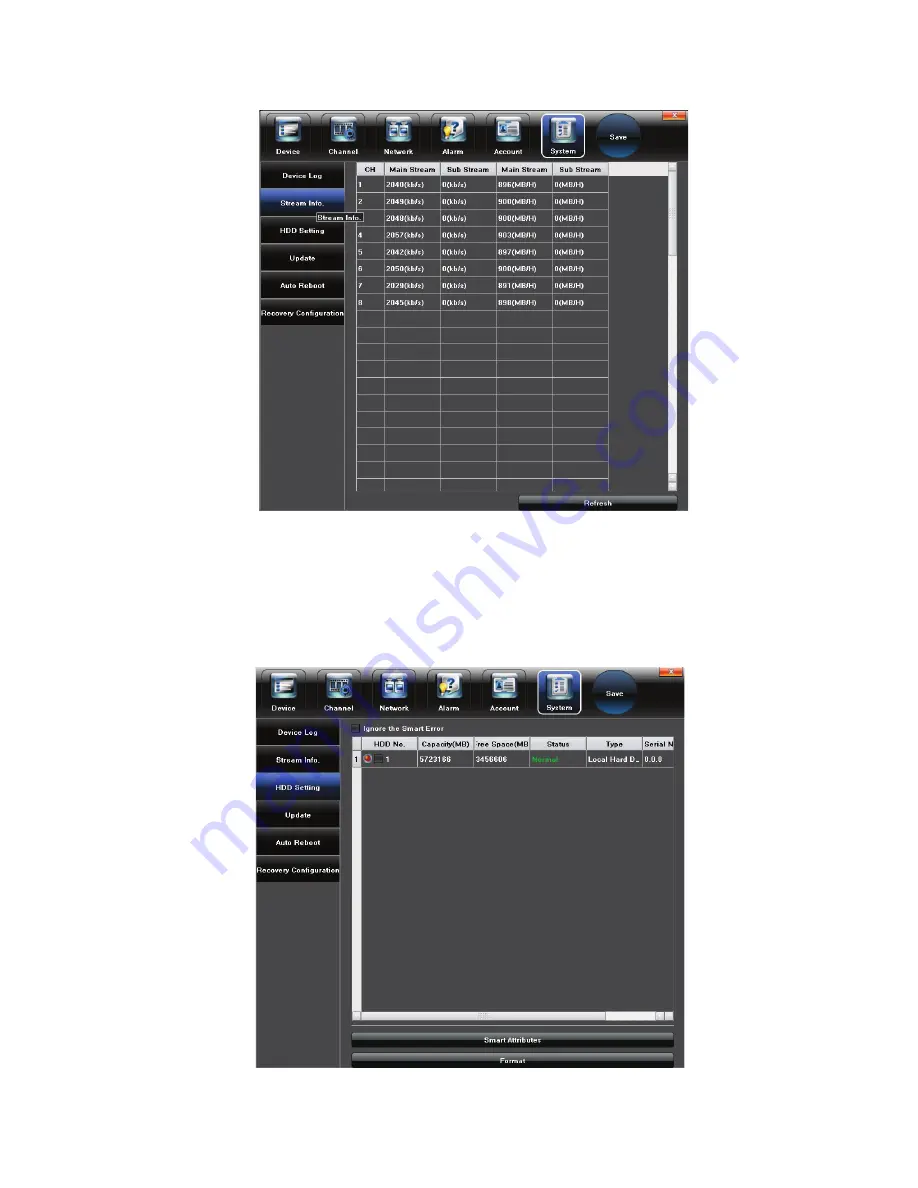
4.6.3 HDD Setting
Click
HDD Setting
, check HDD capacity / free space, and do format by
clicking √ in front of HDD No., then click
Format
, as shown in the below
picture:
Страница 1: ...DVR USER MANUAL AHD DVR Version 3 0...
Страница 2: ...3 1 Network Setting 15 4 3 2 DNNS Setting 17 4 3 3 NTP Setting 18 4 3 4 Email Setting 18 4 3 5 Management Platform 19 4 4 Alarm 20 4 4 1 Alarm Input 20 4 4 2 Alarm output 21 4 4 3 Exception 22 4 5 Acc...
Страница 3: ...11 Alarm setting 32 12 File Manage 32 13 Image Setting 33 14 Screen Aspect Ratio Segmentation 34...
Страница 4: ...Guide Click right mouse button in the local preview screen as shown in the below picture 2 Start Shutdown System click Start on the main menu 2 1 Local Menu Start setting Power Off Reboot Login and Lo...
Страница 5: ...cludes four steps respectively as below picture Language choose usage language the default language for simplified Chinese or click the right key to choose other languages then click Next to save and...
Страница 6: ...cture In addition the settings can be modified in the start menu by clicking User guide directly to enter 4 Power off Click Power off the device will automatically shutdown 5 Reboot Click Reboot the d...
Страница 7: ...4 3 Preview The main preview interface will appear as shown in the below picture after starting up and successfully login Note We take 8 ch for example in this paper...
Страница 8: ...on Mode Modify Click the drop down list of Mode there are 8 different video output modes optional respectively for 8x 1920 1080 8 1920 1080 IP4 1920 1080 all used in AHD video output 2 System Version...
Страница 9: ...ify the parameters on the Display Setting interface as shown in the below picture 1 Channel Modify the specified channel name for the input devices 2 Local Camera Name Modify channel name for specifie...
Страница 10: ...Channel Select the channel number 2 Encoding Type Main stream Sub stream for selection 3 Stream Type Video Audio Video optional 4 Resolution Camera supports several kinds of resolution 5 Bitrate Type...
Страница 11: ...ise Backup Double click to set precise video backup the check box in front of All Day Recording can not mark and then double click the small check the following interface will pop up as shown in the b...
Страница 12: ...d Set relevant advanced recording parameters for each channel on the Advanced interface as shown in the below picture 4 2 4 Motion Detection Note Fore end IP Camera must support motion detection Modif...
Страница 13: ...10 1 Click in front of Enable Motion Detection 2 Set motion areas as shown in the below picture 3 Adjust sensitivity volume 4 Set arm schedule 5 Select linkage as shown in the below picture...
Страница 14: ...11 Upload to Center Alarm information upload to platform 4 2 5 Video lost Modify each video channel parameters on the Video Lost interface as shown in the below picture...
Страница 15: ...2 Set arm schedule 3 Select linkage as shown in the below picture 4 2 6 Tampering Alarm Note Fore end IP Camera must support tampering alarm Modify each video channel parameters on the Tampering Alarm...
Страница 16: ...13 1 Click in front of Enable Video Tampering 2 Set tempering alarm areas as shown in the below picture 3 Set alarm schedule 4 Select linkage as shown in the below picture...
Страница 17: ...2 7 Video Mask Setting Modify each video channel parameters on the Video Mask interface as shown in the below picture 1 Click in front of Enable Video Mask 2 Set mask areas as shown in the below pict...
Страница 18: ...twork Set the relevant parameters on the Network interface as shown in the below picture 4 3 1 Network Setting Modify the basic network parameters on the Network Setting interface as shown in the belo...
Страница 19: ...ess 9 Default Route Select diverse NIC router optional only NIC1 for default which can connect IP devices with different network segments 10 Remote Port Input relevant remote port number 5050 default...
Страница 20: ...servers automatically 2 Enable PPPOE function to achieve DVR dialing 3 Click in front of Enable UPnP after set HTTP port and TCP port it can match successfully notice the port number can not conflict...
Страница 21: ...tandby domain name 4 3 3 NTP Setting 1 Server Address Input the IP of the NTP server asia pool ntp org for default 2 NTP Port This SNTP only supports TCP transmission 123 for default 3 Update Frequenc...
Страница 22: ...om Password Outbox email password Receiver address Test yahoo com SMTP server smtp 163 com SMTP port 25 4 3 5 Management Platform User can open or close device protocol optional on the Management Plat...
Страница 23: ...he need on the Alarm interface as shown in the below picture 4 4 1 Alarm Input Set alarm input parameters on the Alarm Input interface as shown in the below picture 1 Enable alarm handle 2 Set alarm s...
Страница 24: ...21 4 4 2 Alarm output Set alarm output parameters on the Alarm Output interface as shown in the below picture 1 Set alarm output delay 2 Set alarm schedule...
Страница 25: ...22 4 4 3 Exception Set abnormality on the Exception interface as shown in the below picture 4 5 Account Set account setting and user online on the Account interface as shown in the below picture...
Страница 26: ...the user or distribute user permission on the Account Setting interface as shown in the below picture Click User Privilege as shown on the below picture 4 5 2 User Online Checking Check the current u...
Страница 27: ...24 shown on the below picture 4 6 System administration Set the relevant parameters on the System interface as shown in the below picture...
Страница 28: ...Alarm Exception Operation for selection 2 Sub Type According to the different main types there have corresponding sub type for selection 3 From Select a start time for log query 4 To Select a end tim...
Страница 29: ...26 4 6 3 HDD Setting Click HDD Setting check HDD capacity free space and do format by clicking in front of HDD No then click Format as shown in the below picture...
Страница 30: ...5 Auto Reboot There are Disable Every Day Every week Once options for selection the device will restart according to the maintenance mode 4 6 6 Recovery Configuration Click Export Configuration Impor...
Страница 31: ...down list and click button the following interface will pop up On the Cruise interface set preset preset name residence time cruise speed and click Add to add new cruise preset support multiple prese...
Страница 32: ...pshot click Capture on the main menu Select Capture on the main menu click in the lower right corner of the screen to do snapshot on the preview channel and check the image picture in the file manager...
Страница 33: ...p the playback process 2 4 8 16 times optional 5 Snapshot Click to snapshot any playback channel video image 6 Frame play Click to play single frame 7 Backup Click to make video backup for any channel...
Страница 34: ...rightness contrast saturation hue transparency etc of the video screen display 5 Displayer Resolution Select different resolution in need 6 Enable SEQ Click in front of Enable SEQ to make video image...
Страница 35: ...ce click Start it will backup video file automatically and show the backup process meanwhile you also can click Stop and Unmount USB 11 Alarm setting click Alarm on the main menu Select Alarm in the m...
Страница 36: ...w an external storage device backup files and local snapshot image as shown in the below picture 13 Image Setting click Image Setting on the main menu Adjust the video image brightness contrast satura...
Страница 37: ...34 14 Screen Aspect Ratio Segmentation According to the DVR version on the main menu as shown in the below picture...