


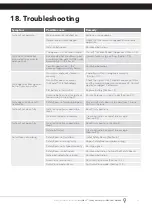

Owner Installation Instructions
NeoSlider
TM
- Sliding Gate Opener NES-500 / NES-800
5
Console Exit button
Console Down/Close button
Console SET button
Antenna connector
Console display
PG3 programmer / network connector
Motor connector
24VAC input connector
10 AMP slow blow fuse
Standby battery charger/solar
connector
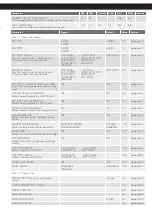
3. Set Up Requirements
Fig 3.1
3.1 Kit Contents
3.2 Choosing your Set up
The NeoSlider™ can be set up in various ways and therefore
may require additional items. Common Set ups are as
follows;
ITEM
DESCRIPTION
QTY
1
DRIVE UNIT NES-500 / NES-800
1
2
TRIO-CODE 4B PTX-5V2 TRANSMITTER
2
3
METAL BASE PLATE
1
4
NUTS, BOLTS AND WASHERS
4
5
ACTUATOR W/ 2 SCREWS
2
6
ANTENNA
1
1
2
3
Set Up
Items Required
Automated Set Up
Drive Unit and transmitter
Automated Set Up
with Safety Beams
Drive Unit, transmitter and
safety beams (optional)
CAUTION: Cables which have a green/yellow
coloured insulation are for earthing purposes
only.
Never use these cables for any other purpose.
IMPORTANT WARNING!
A qualified electrician must perform the installation
where 240V AC power is used.
4
5
6
3.3 Initial Checking
Before commencing installation of the NeoSlider™, check
the following:
a. The gate moves freely and easily by hand for the full
opening and closing travel.
b. The mounting point must be solidy constructed,
e.g concrete, brick or steel, and must be capable of
withstanding the full force applied to the gate.
c. Select a suitable location for mounting the drive unit.
This position is usually established by fully opening
the gate and mounting the drive unit within a suitable
distance of the gate edge.
d. A weather-proof 240v 10 amp power outlet must
be located within one (1) metre of the NeoSlider™
mounting point.
e. If Safety Beams are to be installed, provision for
underground cabling should be made from one side of
the gateway to the other.
Fig 3.2


