background image


Installation Instructions 

Axess

®

 Pro 1505

27

Appendix 

D - Diagnostic Tools

The controller provides several diagnostic tools from within the Diagnostics 

Menu (Menu 8). This section details the function of each tool and its use. 

Navigating To Diagnostics Menu 

a. Press PREV to navigate to Menu 8 (

Fig. D.1

). 

b. Press SET to display the menu of available functions. 

c. Press PREV or NEXT to cycle through diagnostic tools. 

d. Press SET to select. 

Menu 8.1 Test Inputs 

This tool is used to view the state of the control inputs. When selected, 

a screen is displayed (

Fig. D.2

) which indicates the state of each input. If 

the name of the input is in upper case or number in the bracket, then the 

input is active. Conversely if the input is in lower case and [---] dash in the 

bracket, then the input is inactive. For normal operation, all inputs should 

be inactive. When finished, press STOP. 

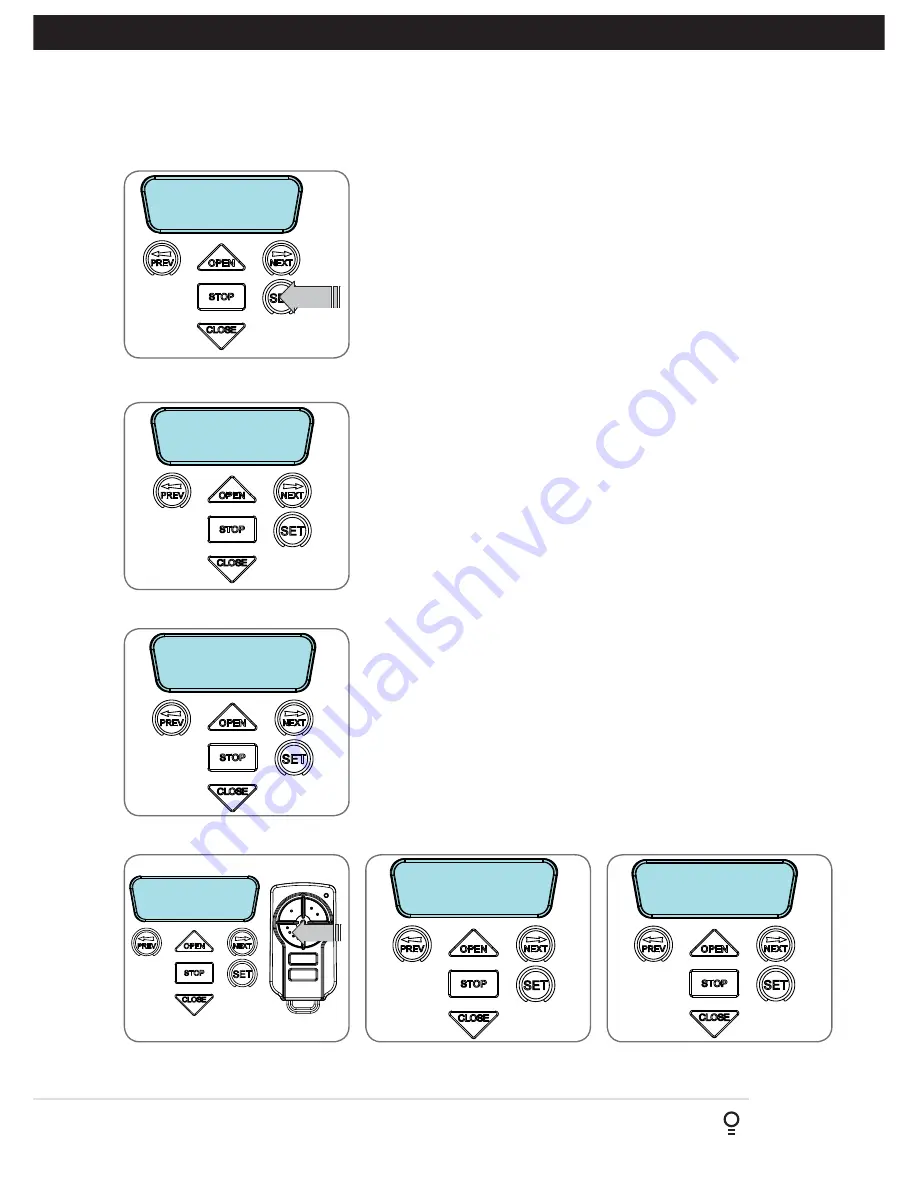
Menu 8.2 Test Transmitters (Tx’ers) 

This tool is used to test receiver/transmitter functionality. When selected, 

a screen is displayed which prompts for a transmitter button to be pressed 

(

Fig. D.3

) and whether ID or serial numbers are to be displayed. 

The opener will then beep each time a transmission is received. 

If the transmitter button is stored in the controller memory and 

has a function assigned to it, a second screen will be displayed 

that shows the transmitter details along with the button pressed 

(

Fig. D.4

). The example shows the case where transmitter number 

14 is activated by button 4. Note ID is selected for display. 

Menu 8.3 Display History 

The opener keeps a record of the last 64 events that have taken 

place. The events include the type of drive cycles executed, 

obstruction detection, various faults, power failures etc. When this 

tool is selected, the screen displays the last event that occurred 


(

Fig. D.5

). Press NEXT or PREV to view each event. The “EVENT#” field 

shows the sequence of the events, with (1) being the first and (64) being 

the last. The example shows that the last event was a close cycle which 

succeeded in closing the door. When finished viewing the events, press 

STOP to exit. 

Menu 8.4 Memory Usage 

This tool displays the number of transmitter store locations used and the 

number free (

Fig. D.6

). 

MENU 8
Diagnostics

PRESS

I/P: pe fir osc
opn stp cls swp

Used =       1
Free =       510

Close Complete
    EVENT # 64

14 

ID

 BB SMITH

OSC PED LGT>VAC

PRESS

PRESS TX’ER

<-/-> Shows ID/SN

Fig D.1

Fig D.2

Fig D.3

Fig D.4

Fig D.5

Fig D.6

Содержание Axess Pro 1505

Страница 1: ...Doc 160052_01 Part 13436 Released 25 06 15 Axess Pro 1505 Industrial Overhead Door Opener ...

Страница 2: ...0 Coding Transmitter 13 10 1 Coding Transmitter Button 13 10 2 Selecting Function Of The Button 13 10 3 Returning To Main Screen 13 11 Remotely Coding Transmitters 14 11 1 Selecting The Function To Be Coded 14 11 2 Activate Remote Code Set Mode 14 12 Setting Pedestrian Position 14 12 1 Setting Pedestrian Position 14 12 2 Checking Pedestrian Position 14 12 3 Error Displays 14 13 Auto Close Mode for...

Страница 3: ... is vital for the safety of persons to follow all instructions Failure to comply with the installation instructions and the safety warnings may result in serious personal injury and or property and remote control opener damage Please save these instructions for future reference NOTE For full automatic operation a Safety Beam Photo Electric Beam Sensor must be fitted to the logic console with this ...

Страница 4: ... instructions may result in death serious personal injury or property damage 1 Important Safety Instructions CAUTION Emergency access If your facility has no pedestrian entrance door an emergency access device should be installed Entrapment under operating door DO NOT operate the opener unless the Door is in full view and free from objects such as cars and children people Make sure that the Door h...

Страница 5: ...ious and sing ving logy be h as g or afety eeds wear the pair their mpt prior r and 2 Controller Input And Outputs Motor identification harness connector Serial interface connector Position sensor connector 10 Amps slow blow mains fuse 02 03 01 04 01 02 03 04 Fig 2 1 ...

Страница 6: ...ms 0V Common Terminal For Control Inputs FIRE N O N C Input Terminal GPI N O Input Terminal OPN N O N C Input Terminal STP N O N C Input Terminal CLS N O Input Terminal Programmer PG 3 Input Console Previous Button Liquid Crystal Display Console Next Button Console Open Button Console Stop Button Console Set Button Console Close Button RJ45 Connector 05 06 07 08 09 10 11 12 13 3 Operating Controls...

Страница 7: ... 5 BENT ARM 1 62800 6 STRAIGHT ARM 1 62790 ACCESSORY PACK 7 NILOCK NUT M8 1 10860 8 WALL BRACKET 1 62525 9 HEX HEAD SCREW M8 X 70 1 10088 10 SLEEVE 081246 1 64385 11 DOOR BRACKET LOCATOR 1 62515 12 DOOR BRACKET 1 62511 13 PIN SNAP SSP 8 ZNU 31080 2 10720 14 HEX HEAD SCREW M8 X 25 2 10110 15 CLEVIS PIN 0829 2 62551 16 HEX SERRATION FLANGE NUT M8 2 10148 17 SPACE HEAD CAP SCREW M5 X 45 2 10008 18 SP...

Страница 8: ...he drive unit d Safety Beams have been installed The Safety Beams should be positioned as close to the door as practicable 5 2 Drive Unit Pre assembly The drive unit 1 and track are supplied as two separate packages The drive sprocket is part of drive unit a To connect rail 22 to the drive unit open the cover by removing screws b Cut the cable tie that holds the chain index together on the track c...

Страница 9: ...orting structure where the bracket is mounted must be capable of supporting 2kN push pull force f Measure 4080mm 150mm across the ceiling from the wallcentrepoint Fig 6 2 Installperforatedangleorsimilar not supplied g Turnover the drive unit 1 and pull the ring located at Y to release the vent Fig 6 4 h Raise the opener into position using suitable equipment for the height of the door NOTE The dri...

Страница 10: ...d over the door bracket 12 and uses 4 mounting holes for extra strength Mount the door bracket to the centre line of the door Fig 6 5 using M6 or equivalent screws not supplied NOTE If in doubt about the strength of the door reinforcement may need to be added to the frame or panel where necessary Damage to the door panel may occur if the bracket is installed incorrectly on a panel with insufficien...

Страница 11: ...ition of the Door is reached ii If the Door overshoots press the OPEN button to move the Door in the open direction c When the Door is at the desired close position press the SET button to record the close limit position The display will change and the green open LED will start to flash Fig 8 2 d Press and hold the OPEN button to open the Door When the Door is at the desired open position release ...

Страница 12: ...ory The open green LED will starts to flash Press Button 1 to open the Door i If the Door is opened too far press Button 4 to inch the Door closed WARNING The Door will automatically close and open once the next step is performed Ensure that no persons or objects are in the path of the Door c When you are happy with the open limit position press Button 2 on the transmitter to store into memory The...

Страница 13: ...0 2 c Press the same transmitter button again as prompted by the display 10 2 Selecting Function Of The Button The logic console will now show the transmitter s record with a cursor on the field for the button being coded Fig 10 3 Use OPEN CLOSE to select the function for the button Available functions OSC Open Stop Close PED Pedestrian access SWP Swipe CLS Close OPN Open STP Stop LGT Courtesy Lig...

Страница 14: ...ed Mode s active status is indicated on the display Fig 12 2 If a Ped Mode button is pressed while the door is moving the door will stop If a Ped Mode button is pressed when the door is in the Ped position then the door will close 12 3 Error Displays During the above procedure many error checks are performed If an error is detected a message will be displayed indicating the error MENU 10 3 Set Ped...

Страница 15: ...e Mode for Console Either Beam i Safety Beam 1 or Safety Beam 2 ii Safety Beam 1 or Safety Beam 3 iii Safety Beam 2 or Safety Beam 3 iv Safety Beam 1 or Safety Beam 2 or Safety Beam 3 Combination i Safety Beam 1 and Safety Beam 2 ii Safety Beam 1 and Safety Beam 3 iii Safety Beam 2 and Safety Beam 3 iv Safety Beam 1 Safety Beam 2 and Safety Beam 3 NOTE The swipe input can be used to clear the Safe...

Страница 16: ...ly press UP or DOWN to display the cursor and then move to the field to be changed using the NEXT PREV buttons Then press OPEN CLOSE to change the setting and then the SET or STOP buttons to save Menu 7 2 View Programs Select this menu to display or edit the Time Clock programs Fig 14 3 When selected program number 1 is displayed and the cursor is shown on the program number field The other fields...

Страница 17: ...CR2032 ONLY Fig 15 1 Fig 15 2 Use a pen to push the battery down through the side opening to release battery When batteries reach the end of their usual life in accordance with Australian Battery Recycling Initiative please follow the next simple steps for protecting the environment Refer to the Automatic Technology website for information on where to recycle batteries in Australia DO NOT throw th...

Страница 18: ... 3 Volts Real Time Clock Battery CR 1220 1 5 Volts NOTE a If the Safety Beams are not installed then the controller will automatically go into Safety Close mode A limited number of features are available in this mode please refer to menu 6 1 in Section 13 1 18 Specifications 17 Accessories Installation 17 1 Fitting Courtesy Lights A light relay module optional can be connected to the aux out on th...

Страница 19: ...eration in the time clock menu Section 14 5 The opener is in Vacation Mode Turn off Vacation Mode Appendix C Menu 6 16 Flat battery in transmitter Replace battery Section 15 Door does not close with transmitter Safety Close Mode is on Turn the Safety Close Mode off Section 13 1 Transmitter does not contain TrioCodeTM 128 Technology Check that the transmitter has grey buttons and the model number o...

Страница 20: ...ervice and Repair If correct maintenance and servicing are not carried out warranty may be void To keep your door running well it is recommendedthatyourdoorbeservicedbyanexperienced technician every 12 months or earlier if required Check the manual operation of the door by using the hand chain Fasterners Check all screws nuts and bolts to ensure they are secure 20 Maintenance 20 4 Opener Maintenan...

Страница 21: ...0 0 0 0 1 0 Sec 3 6 13 4 AUTO CLOSE AFTER CLOSE OBSTRUCTION Enables Auto Close feature after close obstructions requires Safety Beams Off On Off 3 7 13 5 AUTO CLOSE AFTER OPEN OBSTRUCTION Enables Auto Close feature after open obstructions Off On Off 3 8 13 5 AUTO CLOSE AFTER POWER UP Enables Auto Close feature power up Off On Off 3 9 13 5 Menu 4 Light Lock Times ON AFTER CYCLE LIGHT TIME Time ligh...

Страница 22: ...input Off On N O 6 11 Appendix C FIRE INPUT MODE configure the fire input Options are OPN CLS and PED OPN CLS PED OPN 6 12 Appendix C REMOTE CODE ENABLED Selects remote transmitter coding function Off On On 6 13 Appendix C ACTIVITY REPORTS Select report to be output Off 255 Off 1 6 14 Appendix C ACTIVITY REPORT ID Selects ID for controller sent with activity report 0 65535 0 1 6 15 Appendix C VACA...

Страница 23: ... HISTORY 8 3 Appendix D MEMORY USAGE 8 4 Appendix D SERVICE COUNTER 60 000 8 5 Appendix D EVENT COUNTER 8 6 Appendix D INSTALL DATA 8 7 Appendix D PARAMETERS 8 8 Appendix D VERSION INFO Firmware 8 9 Appendix D Menu 9 Memory Tools CLR CONTROL 9 1 Appendix E CLR TRANSMITTERS TX ERS 9 2 Appendix E Menu 10 Setup Travel SETUP LIMITS 10 1 8 1 or 9 4 REPROFILE TRAVEL 10 2 9 5 SET PEDESTRIAN 10 3 12 1 App...

Страница 24: ...ue to change rapidly f The longer the button is held the faster the value changes g Press SET to SAVE the setting Reload Default Setting a Press NEXT PREV buttons to display the LOAD DEFAULT screen b Press SET to load the default value Return To Menu If the parameter s value is not to be changed press STOP to return to the sub menu Press STOP again to return to the MAIN SCREEN 2 100 O L Time sec 1...

Страница 25: ...Safety Beam SB3 Response Mode Same as above menu 6 3 Menu 6 6 Safety Beam Obstruction Reverse Time Mode Normally after a Safety Beam obstruction the door will fully open to its open position After a Safety Beam Close obstruction the doors open cycle can be reduced from 5 sec to its full open position Menu 6 7 GPI Input GPI input can be configured as OSC PED or DST setup The GPI input terminal is a...

Страница 26: ...ture enables all parameters and configuration settings to be protected unless a password is entered When this feature is turned on the user is requested to enter the desired password to be used The password protection feature has a time out that expires after 60 seconds of inactivity Alternatively the user may log out manually by pressing exit when the main screen is displayed 6 18 Transmitter Gro...

Страница 27: ... to be displayed The opener will then beep each time a transmission is received If the transmitter button is stored in the controller memory and has a function assigned to it a second screen will be displayed that shows the transmitter details along with the button pressed Fig D 4 The example shows the case where transmitter number 14 is activated by button 4 Note ID is selected for display Menu 8...

Страница 28: ...of number of times a particular event occurs The list of event counters kept is shown below When this tool is selected the first event counter is shown Fig D 8 Press NEXT or PREV to step through the list The example shows the OPEN CYCLE event counter with a value of 500 When finished viewing press STOP 1 Open Cycles 2 Close Cycles 3 PED Cycles 4 Setup Limits 5 Warranty Cycles 6 Open O LS 7 Close O...

Страница 29: ... F 2 The available functions are shown below Selecting OFF will prevent the opener responding to that button Available functions OSC Open Stop Close PED Pedestrian access SWP Swipe CLS Close OPN Open STP Stop LGT Courtesy Light VAC Vacation Mode AUX Auxiliary OFF No action NOTE OSC will change to OS and CLS Close function is not available in the case where PE Beams are not installed c Press SET to...

Страница 30: ...e d Press NEXT PREV to move the cursor over the ID field e Press NEXT to reveal the Serial Number Fig F 5 The serial number display is provided for additional means of identification The transmitter in this example has serial number 12345 Editing A Character Field a Press NEXT or PREV to move the cursor Fig F 6 b Press UP or DOWN to scroll through and select a new character c Press NEXT or PREV to...

Страница 31: ...ayed Navigating The List a Press the OPEN or CLOSE buttons to navigate through the list Fig G 4 NOTE Holding a button down will step through the list faster b Press SET to display the menu of available functions Selecting An Operation a Press NEXT or PREV to cycle through the four menu options Fig G 5 b Press STOP to return to the list Press SET to execute the menu s operation Fig G 1 Fig G 2 Fig ...

Страница 32: ...present the relevant sales docket and this Warranty document to the retailer to confirm the date of purchase 9 Except for this Warranty ATA gives no warranties of any kind whatsoever whether express or implied in relation to the product and subject to paragraph 1 above all warranties of whatsoever kind relating to the product are hereby excluded 10 This Warranty excludes damage resulting from a no...

Отзывы: