background image


AUO AC Unison


 [AUO AC Unison Installation Guide] 

[Page 3 of 44] 

[February 2012    Rev. 1.0] 


Plug & Play Installation 


  Single Manufacture Warranty 

  Standard NEC AC installation practice –similar to appliance installation 

  No need to calculate string sizes, a simple limit of 17 modules per 20A branch circuit 

  Scalability    –easily add modules as time and budget allow 

Greater Energy Harvest 

 Reduced shading losses 

 3% reduction module mismatch 

 Increased system availability -single failure does not impact entire system 

Safety 

 No exposure to high voltage DC electricity during installation 

 No DC arc faults 

 Ability to turn off power at the module 


Cloud Based Monitoring & Communication


 Each microinverter communicates with a site gateway and then onto cloud-based application 

 Provide both the system owner and the installer with a detailed data and information PV system and 

individual module performance data 

Design and Delivery   

•  Lower installation costs 

  No inverter to install, eliminates DC components/field wiring 

  Less specialized installers needed –labor reduction 

  More flexible installation 

•  Higher availability (no single point of failure) 

•  Reduced design costs -no string design consideration nor limitations 

•  Scalable – can add modules over time 

The AC Module Advantage


Содержание AC UNISON

Страница 1: ...SON SOLAR POWER SYSTEM INSTALLATION GUIDE Please carefully read these installation instructions This document is available on our web site http solar auo com sn 784 lang en US c 238 Thank you for choosing AUO ...

Страница 2: ...Management 15 3 3 Accessory Plan and Part Number 16 AUO AC Unison Module Map 17 3 4 Data Logger Installation and Setup 18 4 AUO Solar Web Portal Account Creation 22 4 1 Creating your Installer or Company Account 22 4 2 Create A New Customer Account 22 4 3 Creating your New Customer Account 23 5 Notice and Safety Instructions 25 6 Additional Information on AC Module Planning Preparation 31 7 PV Sys...

Страница 3: ...odule circuits not to exceed 17 modules per circuits and Data Logger circuit not to exceed 20A Utility Meter Main 1 Phase Gateway or Wireless Router internet connection existing or provided by others http solar auo com sn 905 lang en US AUO Solar Web Portal high resolution module and array performance monitoring Step1 one time installer registration see your sales representative for your Distribut...

Страница 4: ...gh voltage DC electricity during installation No DC arc faults Ability to turn off power at the module Cloud Based Monitoring Communication Each microinverter communicates with a site gateway and then onto cloud based application Provide both the system owner and the installer with a detailed data and information PV system and individual module performance data Design and Delivery Lower installati...

Страница 5: ...ratings 240 Volt AC Single Phase split phase L1 to L2 211 to 264 VAC L1 L2 to Neutral 106 to 132 VAC 2 0 AC Module Planning and Preparation 1 AUO AC Module 1 1 DC to AC micro inverter 1 2 Module Junction Box 1 3 Mid Cable Receptacle Female 1 4 AC Cable Plug Male 2 MCR Bracket field installed 3 M3 Screw 4 M5 Screw 5 End Cap 6 Transition Cable 7 Cable Clip ...

Страница 6: ...AUO AC Unison AUO AC Unison Installation Guide Page 5 of 44 February 2012 Rev 1 0 2 1 ACPV System Design and Layout Please see below several of our common module layout examples and best practice ...

Страница 7: ...AUO AC Unison AUO AC Unison Installation Guide Page 6 of 44 February 2012 Rev 1 0 ...

Страница 8: ...ment grounding for the AC Unison module only It is the installer s responsibility to ensure that any metallic parts in contact with the module i e mounting systems are provided with a means of equipment grounding according to the manufacturer s instructions and local code Failure to provide proper grounding can void equipment warranty in the case of lightning strike In areas subject to lightning i...

Страница 9: ...ould require different male female preparations For the first module plug the transition cable into the AC cable plug or mid cable receptacle For the last module cover the AC cable plug or mid cable receptacle with female or male end cap depending on the system layout Installer must ensure that the cable does not touch the roof Examples are shown below ...

Страница 10: ...AUO AC Unison AUO AC Unison Installation Guide Page 9 of 44 February 2012 Rev 1 0 ...

Страница 11: ...AUO AC Unison AUO AC Unison Installation Guide Page 10 of 44 February 2012 Rev 1 0 ...

Страница 12: ...AUO AC Unison AUO AC Unison Installation Guide Page 11 of 44 February 2012 Rev 1 0 ...

Страница 13: ...d moisture Available in boxes of 250 Transition Cable Male Interconnecting cable plug on one end and 100 mm of stripped wires on the other 20A exterior rated 4 wire L1 L2 N and Ground cable Available in 5 and 10 lengths Each cable is shipped with one disconnect tool Transition Cable Female Interconnecting cable receptacle on one end and 100 mm of stripped wires on the other 20A exterior rated 4 wi...

Страница 14: ... Cable Female Female Interconnecting cable receptacle on both ends 20A exterior rated 4 wire L1 L2 N and Ground cable Available in 5 and 10 lengths Disconnect Tool Center disconnect pin is inserted into interconnecting plugs receptacles and mid cable receptacles to safely disconnect components ...

Страница 15: ... the AC Mid Cable Receptacle harness to the SS MCR bracket with two M3 screws provided Torque to 20 inch pound It is best to complete steps 1 and Step 2 on the ground prior to installing the AC Unison modules Step 2 First and last module considerations For the last module in the circuit insert the End Cap into the Mid Cable Receptacle For the first module in the circuit connect the AC cable plug t...

Страница 16: ...ace Continue to connect subsequent modules to the end of the string 3 2 AC Cable Management The following diagram shows a system of three AC Unison modules The AC cables are secured to the module frames with stainless steel Cable Clips at the recommended locations below Limit module spacing to 1 inch maximum Please ensure that all AC wiring is well secured and not in contact with the roof surface ...

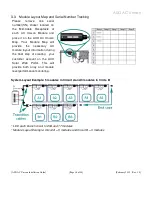
Страница 17: ...the AUO AC Unison Map Your Module Map will provide the necessary AC module layout information during the final step of creating your customer account on the AUO Solar Web Portal This will provide both array and module level performance monitoring System Layout Example 5 modules in Circuit A and 3 modules in Circle B Limit each branch circuit to 20A and 17 modules Module Layout Example Circuit A 5 ...

Страница 18: ..._______ Project Name _________________________ No of Modules _________________ Project Location State____ Zip Code __________ PV System Size _________________ Date of Installation _________________________ Data Logger SN _________________ NEC branch circuit limit to 20A and 17 AC modules per circuit Cir_A Cir_B Cir_C Cir_D Cir_E 1 2 3 4 5 6 7 8 9 10 11 12 13 14 15 16 17 ...

Страница 19: ...ction data at 5 minute intervals and then forwards the aggregated data to the AUO Solar Web portal at 15 minute intervals Our data logger is NEMA 3R rate and suitable for outdoor applications The AUO Solar Web Portal is a cloud based data management system that enables customers to register create and monitor their photovoltaic PV systems http solar auo com sn 905 lang en US Step 1 Data Logger Com...

Страница 20: ...al to the Hot black wire of split phase system and the N terminal to the neutral white wire Do not exceed NEC 20A and 17 module branch circuit protection limit Ethernet Termination RJ45 Use T568B to terminate the CATV ethernet patch cable to connect the network socket to a 10 100Base T router or broadband gateway Before terminating your RJ45 please note the following standard T568B pin out and col...

Страница 21: ... the front cover and secure the screws as shown in Step 4 torque screws to 20 in lbs Step 6 Data Logger Start up The Data Logger will automatically boot up when it detects utility power The Data Logger will display the PLEASE WAIT message during its initialization process Please allow about 20 minutes for the Data Logger to fully start up Do not interrupt the AC power supply during the boot up seq...

Страница 22: ...m the Data Logger to the existing broadband gateway or network router A NOCOMM reading indicates an unreliable or failed network handshake between the Data Logger and the network gateway Refresh IP through the Data Logger Communication menu Exit the Communication menu returning to the Home Screen COMM should now be displayed on the Home Screen indicating a reliable network connection Module Count ...

Страница 23: ...ributor or Dealer will provide your installer or company account registration code After signing up installers should receive an email with your default login password for the registered account Please carefully read the Terms of Use AUO Solar Web Portal URL http solar auo com sn 905 lang en US 4 2 Create A New Customer Account Login to your newly created installer account http solar auo com sn 90...

Страница 24: ...m installation Be certain to Save each step in the process before you proceed to next step in this 3 step process Step 2 AC Unison Configuration drag and drop AC modules as needed to create an array layout Place the modules by serial number azimuth and tilt angle in accordance with your project site Module Map the panels as they are physically installed Please Save and proceed to the next step as ...

Страница 25: ...d name of the PV system owner A system generated password will be sent to the account holders email address The system registration process has been completed and the registered system is now listed under the All Systems tab This system will remain Locked until the system owner logs in to the AUO Solar Web Portal and activates their new account ...

Страница 26: ...SI NFPA 70 for US installations or the Canadian Electrical Code Part I CSA C22 1 for Canada This unit or system is provided with fixed trip limits and shall not be aggregated above 30 kW on a single Point of Common Connection Voltage and frequency limits for utility interaction C Simulated utility source Condition Voltage V Frequency Hz Maximum time sec cycles at 60 Hz a before cessation of curren...

Страница 27: ...ystem provides an internal EGC for grounding the AC Unison modules only Other metal structures such as mounting systems must be grounded per code If a module is removed from within the string it is recommended that you bridge the gap in the string using an AC extension cable Inserting an extension cable maintains ground continuity to subsequent modules in the string Other auxiliary grounding metho...

Страница 28: ...resistant roof Avoid uneven shade on the AC Unison module surface Shaded cells may become hot hot spot phenomenon which may result in permanent damage to the module e g solder joints may peel off Do not clean the glass surface with chemicals or high pressure water spray Do not cover the water drain holes of the frame There is a risk of frost damage when the frame is filled with water AC Unison mod...

Страница 29: ...rter makes a bolted termination to the micro inverter chassis and is environmentally sealed The micro inverter chassis is bonded at the factory to the module frame with stainless steel hardware to provide ground continuity to the AC Unison module frame The AC cable grounding path has been tested by a NRTL Before an AC Unison module assembly can be labeled with the NRTL certification mark and shipp...

Страница 30: ...paration between the equipment and receiver Connect the equipment into an output on a circuit different from that to which the receiver is connected Consult the dealer or an experienced radio TV technician for help Changes or modifications not expressly approved by the party responsible for compliance could void the user s authority to operate the equipment Safety Certification of Data Logger ETL ...

Страница 31: ...ed plug must be used It is important to ensure that neutral is connected to the correct terminal of the plug and to the Neutral location on the Data Logger s terminal block The following labels are used on the Data Logger housing This label warns of hazardous voltages behind the AC terminal cover that can cause serious injury or death if the cover is removed This area is to be accessed only by qua...

Страница 32: ...ect to the plug at the end of the AC cable Therefore a female transition cable is required The final module in the string will require a protective cap be plugged into the mid cable receptacle With the junction or transition box to the right of the array a male transition cable is needed which will plug into the mid cable receptacle and the final module will require additional cable management to ...

Страница 33: ...ting strips by at least four points The following figures illustrate the installation and the mounting area and the position of the mounting hole Under no circumstances may the short frame edges be used for anchoring the module The assembly on the support structure using the pertinent holes and specific nuts and bolts The screws should be tightened up to 5 5 Nm 4 1 lb ft The module s frame must no...

Страница 34: ...ide Page 33 of 44 February 2012 Rev 1 0 Module Type L mm W mm D1 mm D2 mm D3 mm D5 mm PM250M00 0_XXX 1651 992 425 800 942 300 PM250M00 0_XXX 1651 992 175 1300 942 300 Note XXX 240 245 250 255 260 The mechanical loading claimed value is 50 lb ft2 ...

Страница 35: ...t current AC and duration 11 9 Apeak 0 52 Arms total duration 13 8 ms Maximum output overcurrent protection 20 A d a See Utility Interaction b Single phase requiring two of the phases L1 and L2 for power production and a neutral for voltage sensing only per IEEE 1547 c Maximum overload current at peak module performance combined with low grid voltage is 1 17A d This is the maximum number of micro ...

Страница 36: ... the current menu SELECT button Displays additional submenus or information Removable access cover Provides access to the field accessible components of the Data Logger Location for security lock AC terminal block cover Remove this cover to attach the wires that will connect the Data Logger to the site s electric service panel Warning This area is to be accessed only by qualified trained personnel...

Страница 37: ...ddress 192 168 100 1 Verify Required Supplies Depending on the mounting surface use appropriate fasteners and anchors capable of supporting 15 lbs of weight For Wood use screws with 3 4 thread length For outdoors use galvanized or stainless steel For outdoor wiring use wet rated wire e g THWN outdoor rated 1 2 conduit metallic non metallic or flexible and appropriate conduit for Type 3R enclosures...

Страница 38: ...d by the installer to configure the site after modules have been installed or by a service provider performing maintenance at the site Use the two buttons below the LCD interface to navigate through a set of topic menus that provide access to information or setup controls Press the arrow button to move through the menus Press the checkmark button to select a topic and begin viewing information Pre...

Страница 39: ...AUO AC Unison AUO AC Unison Installation Guide Page 38 of 44 February 2012 Rev 1 0 ...

Страница 40: ...zed Number of discovered modules Total amount of power generated by all modules at the time of the last data reading COMM Connected to AUO Solar Monitoring System NOCOMM Not connected to AUO Solar Monitoring System Information about the Data Logger Device Information Menu Information about each module that is monitored by this Data Logger Module Information Menu Current performance statistics for ...

Страница 41: ...the menus Menu Description Displays the serial number of the Data Logger Displays the version number of the installed firmware Displays the amount of memory still available on the SD card Scrolls through the menus Exits the information screens and returns to Device Information Module Information Menu This menu provides information about each module in the installation Menu Description Press to scr...

Страница 42: ... Displays the date and time the module last reported data to the Data Logger Exits the information screens for the selected module and returns to Module Serial No Site Information Menu This menu provides information about the overall performance of the site Menu Description Displays the amount of energy produced today Displays the total energy produced over the lifetime of the array Displays the f...

Страница 43: ...ast communicated with the monitoring system Menu Description Displays the IP address of the Data Logger Press to acquire a new IP address or to renew the current IP address An interim screen displays the progress of the refresh and returns the Device IP Address Screen Displays the MAC address of the Data Logger Displays the date and time that data from the modules was last transmitted to the monit...

Страница 44: ...o move to the EXIT screen Scrolls through the menus Exits the information screens and returns to Setup Shutdown Menu This menu shuts down the Data Logger device To restart the device cycle the power supply by unplugging the Data Logger and then plugging it back in or by flipping the circuit breaker Menu Description Press to begin the shutdown process Press to choose the correct response to the con...

Отзывы: