USER’S MANUAL
19
USER INSTRUCTIONS
2-HANDS, 3-HANDS QUARTZ OR AUTOMATIC MODELS
(Fig. 2 – Fig. 7)
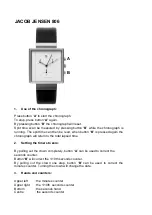
SETTING THE TIME
(watches without date Fig. 2, Fig. 4 and Fig. 5)
Pull the crown out to position
II
and turn it clockwise or counter-clockwise to
set the desired time. Short hand
❶
for actual hour and long hand
❷
for actual
minute. Push the crown in, to position
I
, to put the watch in normal use mode.
SETTING THE TIME AND DATE
(watches with date Fig. 3, Fig. 6 or Fig. 7)
Pull the crown out to position
III
(the second hand
❸
will stop running) and
turn the crown counter-clockwise. Move the hour hand
❶
forward over
12 o’clock until the date changes. Now you know the watch has its midnight
position (moment while the date will be changed automatically by the move-
ment). Move the hands forward to the actual time you want to set. Be aware,
if you move some hours, the watch will show morning time and if you move
once again over 12 o’clock, the watch shows afternoon time. When time is
set, push the crown in position
I
and the time will start to work. You can see
the second hand
❸
moving again.
To set the date
❹
, push or pull the crown to the position
II
. Turn the crown
clockwise until you find the date to set. For watches with day indication: To
set the day, turn the crown counter-clockwise until you find the actual day.
With some watches you can choose between the day in English language or
Russian language.
After setting the date (and the day for watches with day indication), push the
crown back into position
I
to put the watch in normal use mode.
Take care to not change the date while the hour hand is between 8.00 p.m.
and 4.00 a.m. The movement might be in the process of changing the date
and by changing the date with the crown in that moment, you might damage
the movement.
On some models with a second hand
❸
, you can synchronize it with an official
time signal (radio/TV/Internet). When the crown is pulled out in position
III
,
the second hand
❸
is stopped. As soon as the time setting has been synchro-
nized, push the crown back down into position
I
(and tighten it back down on
models with a screwed crown).
Содержание Tramelan Series
Страница 1: ...ENGLISH USER S MANUAL WARRANTY ...
Страница 2: ...I II 8 I II III I II I II 60 8 I II III I II III 8 MON Fig 6 Fig 7 Fig 5 Fig 4 Fig 3 Fig 2 ...
Страница 6: ......