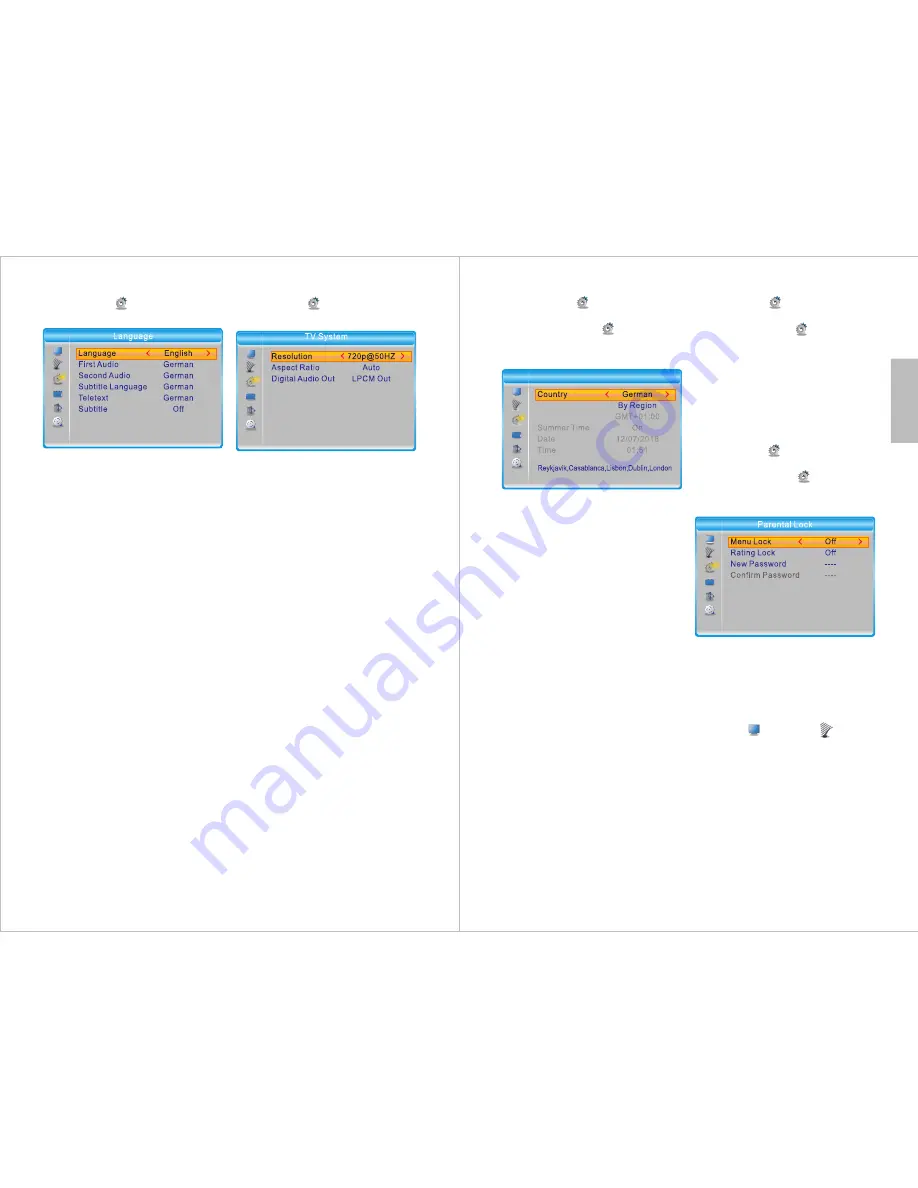
background image

-18-

English

7.3.1 Language
Path

: MENU >        System Setup > 

Language

 / 

: Navigate through the submenu.

◄ / ►: Change the selected setting.

- Language

Select your preferred system 
language from among 

English, 

French, German, Italian 

and

 Spanish.

- First Audio

Select the default audio language for 
TV from among 

English, French, 

German, Italian 

and

 Spanish.

- Second Audio

Select the second audio language for 
TV from among 

English, French, 

German, Italian 

and

 Spanish.

- Subtitle Language

Select the subtitle language from 
among 

 English, French, German, 

Italian 

and

 Spanish.

- Teletext

Select the teletext language from 
among 

English, French, German, 

Italian 

and

 Spanish.

- Subtitle

Set Subtitle to 

Normal

 or 

Hard of 

Hearing

 to enable subtitles. Set it to 

Off

 to disable subtitles. 

Note

: Subtitles are not provided by all 

programs.

7.3.2 TV System
Path

: MENU >       System Setup > TV 

System

 / 

: Navigate through the list of 

options and submenus. 

OK

: Enter a submenu or confirm 

changes.

- Resolution

Select the desired resolution from 
among the following options: 

By Source, By Native TV, 480i, 480p, 
576i, 576p, 720p@50Hz, 
720p@60Hz, 1080i@50Hz, 
1080i@60Hz, 1080p@50Hz 

or 

1080p@60Hz.

In the pop-up window, select 

Yes

 to 

confirm the new resolution or 

No

 to 

revert to the previous setting.

- Aspect Ratio

Select the desired aspect ratio from 
among 

Auto, 4:3PS, 4:3LB 

or

 16:9 

and confirm.

- Digital Audio Out

Choose either LPCM Out or BS Out 
and confirm.

Note

: BS stands for Bitstream. LPCM 

stands for Linear Pulse-code 
modulation.

Tip

: We strongly recommend using 

LPCM Out.

-19-

7.3.3 Date/Time Settings
Path: 

MENU >        System Setup > 

Date/Time Settings
Press 

MENU

, select      

System Setup


and press 

OK

. Then, select 

Date/Time Settings

 and press 

OK

.

- Country

Select 

Country

, press 

OK

 then 

choose one of 

United Kingdom, 

France, Spain, Germany 

or 

Italy.


Press 

OK

 to confirm.

- Time Zone

Select 

Time Zone

, press 

OK

 and 

choose one of 

By Region, User 

Defined 

or 

Off

. Press 

OK

 to confirm. 

By Country

: When Time Zone is set 

to 

By Country

, all clock settings will 

be set automatically according to the 
country selected. 

Tip

: We strongly recommend setting 

Time Zone to 

By Country

User Defined:

 Setting Time Zone to 

User Defined

 allows you to set the 

Time Offset

 and 

Summer Time


options manually.

Off: 

Setting Time Zone to 

Off

 allows 

you to set the 

Date

 and 

Time


manually. 

To input the time and date manually, 
select 

Off

, go to 

Date

 or 

Time, 

then 

use ◄ and ► to select the number to 
change and use the number keys to 
enter the new number.

7.3.4 Timer Settings
Path:

 MENU >        System Setup > 

Timer Settings
Press 

MENU

, select        

System 

Setup

 and press 

OK

. Then, select 

Timer Settings

 and press 

OK

Select a timer, then press 

OK

 to enter.

Please refer to section 6.2.7 for more  
detailed information.
Up to 8 timers can be added.

7.3.5 Parental Lock
Path

: MENU >        System Setup > 

Parental Lock
Press 

MENU

, select        

System 

Setup

 and press 

OK

. Then, select 

Parental Lock

 and press 

OK

Input the password to enter the 

Parental Lock

 menu. The default 

password is 0000.

- Menu Lock:


If the 

Menu Lock

 is 

On

, you will be 

required to enter the password to 
access the      

Channel

 or       

Channel 

Search

 menus. 

- Rating Lock: 

Press 

OK

 to adjust the 

Rating Lock.


Select 

Off

 or an age rating between 

AGE 4 and AGE 18.

- New password

To set a new password, use the 
keypad numbers to enter the new 
password, then enter the new 
password again to confirm. Select


Yes

 to return.

Time Zone

Time Offset

Date/Time Settings

Содержание DVB425

Страница 1: ... com DVB T2 HEVC TV Receiver and Multimedia Player Ricevitore TV DVB T2 HEVC e Lettore Multimediale Sintonizador TDT HD DVB T2 HEVC y Reproductor Multimedia Récepteur TNT HD DVB T2 HEVC avec Multimédia Player DVB T2 HEVC TV Receiver und Multimedia Player DVB425 EN FR DE IT ES ...

Страница 2: ...uct to ensure your safety and the safety of others Please ensure the product and its accessories are disposed in compliance with WEEE Waste Electrical and Electronic Equipment Directive and any other applicable regulations Please check with your local authority for current disposal regulations If you need help please contact our customer service Telephone 44 0 845 250 0586 Email service augustint ...

Страница 3: ... Photo Movie or PVR and press to view the file list Then select a file and press to Play 8 Please note that the signal strength in some areas may not be sufficient to support TV reception using a portable aerial The distance from the closest transmitter and other factors such as surrounding buildings the walls of your house weather and electromagnetic interference caused by power and telecommunica...

Страница 4: ... 23 7 6 2 PVR Settings 23 8 Specifications 24 9 Troubleshooting 25 10 Warranty 27 1 1 Safety Instructions Storage and Use DVB425 DVB425 DVB425 DVB425 DVB425 DVB425 DVB425 DVB425 Maintenance Please unplug all external wires before cleaning the machine Alcohol Do not expose the device to hot or cold conditions The working temperature of the device is 0゚C 50゚C The storage temperature is 10゚C 60゚C Kee...

Страница 5: ...cord Function Time Shift EPG Electronic Programme Guide Max Resolution 1080p Video Output HDMI SCART Audio Output HDMI SCART Coaxial 3 Box Contents DVB425 Remote Control HDMI Cable 2 x AAA Batteries User Manual SU B T AU DI O D VB 42 5 US B TIM ER MP DV B T 2 HE VC TV Re ce ive r an d Mu ltim ed ia Pla ye r Ric ev ito re TV DV B T 2 HE VC e Le tto re Mu ltim ed ial e Sin ton iza do r TD T HD DV B ...

Страница 6: ... control 2 Use the remote control no further than 8 meters away from the sensor 3 The receiving angle range should be 30 Replacing the Batteries If the remote control does not function or if the operating range becomes reduced replace the old battery with a new one Pull out the battery holder and remove the old battery Replace the battery holder Insert the new battery into the battery holder with ...

Страница 7: ...ution then press OK to confirm 4 Select Yes from the pop up window to save the settings or No to cancel 5 Select the desired Aspect Ratio 6 Select OK then press OK to start the Auto Channel Search After the search has finished you can start watching any channels which have been found Press TV RADIO to switch between Freeview TV and Radio channels If no channels are found the device will return to ...

Страница 8: ...ting 1 Select the desired Timer Mode Off Once Daily Weekly or Monthly 2 For Action select Record Note When selecting Record ensure that a USB storage device with sufficient free space is inserted in the USB port Tips When creating a timer from the EPG the program time date and duration will be set automatically according to information transmitted by the broadcaster Should you wish to change these...

Страница 9: ...g information 3 Whilst the detailed recording information is displayed press REC to set the duration Use or to navigate and use the keypad numbers to input the time 4 To stop a live recording press then select Yes to finish or No to return 11 Multi view mode allows you to view multiple channels at once Use the arrow keys to select and preview a channel Press OK or EXIT to return to the live broadc...

Страница 10: ...us next page Enter folder or play the selected file Go Back Enter Edit mode 1 13 In edit mode Press to rename a folder or file Press to copy the selected folder or file then choose the directory to copy it to and press Press to mark one or more files or folders for deletion When you exit Edit mode the marked files will be deleted Press to add a new folder Press EXIT to go back to the previous fold...

Страница 11: ...mode or start a slideshow 2 3 15 7 1 Channel Path MENU Channel Channel Manager Press MENU select Channel and press OK Then select TV Channel Manager and press OK 7 1 1 TV Channel Manager Select a channel EXIT Return to the Channel submenu When you press EXIT if any changes have been made select Yes to confirm or select No to cancel Favourites Press FAV to enable disable the favourites function Sel...

Страница 12: ...ency of that channel Navigate to Channel No and use and to change the channel Selecting By Frequency allows you to enter a specific frequency to search Navigate to Frequency and use the number keys to enter the desired frequency Network Search Enable the Network Search option to allow the DVB425 to search all channels with ONID Original Network ID on the selected frequency Note Prior to scanning a...

Страница 13: ...Press MENU select System Setup and press OK Then select Date Time Settings and press OK Country Select Country press OK then choose one of United Kingdom France Spain Germany or Italy Press OK to confirm Time Zone Select Time Zone press OK and choose one of By Region User Defined or Off Press OK to confirm By Country When Time Zone is set to By Country all clock settings will be set automatically ...

Страница 14: ...cel 21 7 3 9 Auto Standby Path MENU System Setup Auto Standby Press MENU select System Setup and press OK Then select Auto Standby and press OK The Auto Standby function causes the DVB425 to go into standby mode automatically if no action is taken within the selected time Choose between Off 30 Min 1 Hour 2 Hours and 3 Hours 7 4 Tools Path MENU Tools Press MENU select Tools and press OK 7 4 1 Infor...

Страница 15: ...ess to play Weather Channel 1 Press OK to enter 2 Select a country 3 Select a city to see its weather Press Pg Dn and Pg Up for faster navigation Network Setting Network Application Network Network 23 7 6 Media Player Path MENU Media Player Press MENU select Media Player and press OK For instructions concerning the PVR Video Music and Photo functions please refer to section 6 4 7 6 1 USB Device In...

Страница 16: ...the aerial may be improperly connected If you are using a rooftop aerial ensure that the DVB425 s Antenna Power option is set to Off Please refer to section 7 2 3 If you are using an indoor aerial try moving it around or changing its position Try using another connection cable Picture Freezing Sound Distorting If the signal is too weak please try using a rooftop aerial or an amplified aerial You a...

Страница 17: ...nditions The warranty is only valid within the country where the product was purchased The product must be correctly installed and operated in accordance with the instructions given in this user manual The product must be used solely for domestic purposes The warranty only covers the main units and does not cover the accessories The warranty does not cover damage caused by misuse negligence accide...

Отзывы: