17
CLASSIC Line
Deutsch
| English
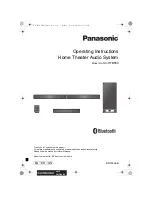
Unpacking and Assembly – The CLASSIC Compact | CLASSIC Center
1.
Lay the box down on the floor with the
product labels facing forward
. Carefully open the packaging on
the long side where it has been taped up, preferably using a pocket knife or kitchen knife.
2.
Remove the “Welcome to the Family“ package and the accessories.
3.
Carefully remove the loudspeakers, together with their protective foam pads, from the
box. Make sure that
you
do not touch the drivers
when removing and handling the loudspeakers as this may cause irreparable
damage to the drivers.
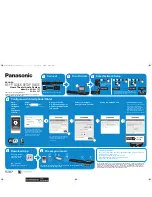
4.
Now remove the foam covers and carefully slide down the protective foil.
5.
Position the loudspeaker(s) in your listening room. The loudspeaker(s) should stand level and upright. The
enclosed spirit level will help you to finely adjust your loudspeakers (which are level when the bubble
remains in the inner circle).
6.
Our CLASSIC Compact and CLASSIC Center models are fitted with a solid front panel without fabric when
delivered from our factory. If you wish, you can exchange this panel for the panel covered in fabric that is
also enclosed with your loudspeaker to suit your tastes. To do so, simply use your fingers to carefully lift off
the fitted panel.
Please ensure that you do not touch the drivers when doing so.
Once you have
removed the panel, place the fabric-covered panel in its position and softly push it in into place until it is
flush with the loudspeaker cabinet. You do not need to worry about any limitations or loss of sound details
when using either of the panels.
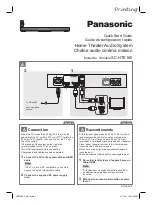
Connecting the Loudspeakers
Your new loudspeakers are fitted with particularly high-quality connectors
from the “nextgen” range made by the specialist manufacturer WBT (see
the image on the right). These connectors feature a unique mechanism
(the torque indicator)
that helps you to connect cables with spades as
explained under point 2. The connectors of the CLASSIC LINE accept both
spades and banana plugs. Loose cable strands oxidise easily and are not
suitable for a permanently high-quality listening experience.
1.
Please switch off all equipment in your Hifi system before
you begin
to connect your loudspeakers.
2.
If you are using a loudspeaker cable with spade connectors, turn the
screw clamps to the left until you can easily slide the spades into
the openings at the side. Push the spades into these openings and
turn the screw clamps to the right until you hear a clicking noise
-
this is the torque indicator. Now turn the clamps until they are
hand-tight, which will normally be the case after a few more
‘clicks‘. After this point, you can indeed tighten
the clamps even more, but this will not improve the results. In the worst case scenario, further tightening
the clamps may lead to damage to the surface structure of the spade connectors.
3.
Make sure you have the right polarity. As a rule, loudspeaker cables are accordingly labelled, either by a
permanent marking on one of the two conductors of the cable or by plus “+“ and minus “-“ markings on
the cable ends.
4.
Now connect the cable to your amplifier and make sure that you have
the right polarity here.