background image


8

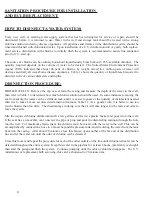
SANITATION PROCEDURE FOR INSTALLATION  

AND BULB REPLACEMENT:

HOW TO DISINFECT A WATER SYSTEM:

Every new well, or existing water supply system that has been disrupted for service or repair, should be  

disinfected before it is returned to use. Water in the well and storage tank should be treated with a strong  

chlorine solution to destroy disease organisms.  All pipelines and fixtures in the distribution system should be 

rinsed and flushed with chlorinated water.  Upon installation of a U.V. disinfection unit or yearly bulb replace-

ment service, disinfection with chlorine to initially flush the system is recommended to assure line sanitation 

prior to U.V. start up.

The source of chlorine can be ordinary household liquid laundry bleach (about 5.25% available chlorine).  The 

quantity required depends on the volume of water to be treated.  The United States Environment Protection 

Agency (EPA) indicated that about 100 parts of chlorine, by weight, mixed in a million parts of water will 

destroy essentially all water-borne disease organisms.  Table 1 shows the quantity of liquid bleach required to 

disinfect wells of various diameters and depths.  

DISINFECTION PROCEDURE:

DRILLED WELLS:  Remove the cap or seal form the casing and measure the depth of the water in the well, 

then refer to Table 1 to determine how much chlorine solution should be used.  In some instances removing the 

seal to measure the water can be a difficult task, and it is easier to guess at the quantity of disinfectant needed 

than it is to make a more accurate determination (footnote, Table 1).  As a general rule, it is better to use too 

much chlorine than too little.  The disadvantage in doing so is that it will take longer for the taste and odor to 

leave the system.  

Mix the required chlorine disinfectant with a few gallons of water in a plastic bucket and pour it into the well.  

If the seal has a removable vent, unscrew the pipe or plug and pour the disinfecting solution through the hole 

into the well.  For maximum effectiveness, the chlorine must be mixed with the water in the well. This can be 

accomplished by connection a hose to a faucet beyond the pressure tank, and circulating the water from the tank 

back into the casing.  After about 20 minutes, close this faucet, open another at the far end of the distribution 

line and let the water run until the odor of chlorine can be detected.

Close this faucet and repeat the procedure for each of the other outlets on the line until chlorinated water can be 

detected throughout the entire system.  Keep this water in the pipeline for at least 6 hours, (preferably overnight) 

then start the pump and flush the system.  Continue pumping until the odor of chlorine disappears.  For U.V. 

installations or replacement bulb servicing, this can be shortened to 20 minute time.

Содержание Safe Lite SL-2V

Страница 1: ...Models SL 2V 8V It is important that those responsible for the installation of this equipment as well as the owner operator read this manual and carefully follow the instructions and guidelines Revis...

Страница 2: ...r sold by the manufacturer distributor may cause an unsafe condition 7 Intended for indoor use Do not install this disinfection system where it will be exposed to the weather Do not store this disinfe...

Страница 3: ...Flow rate must not exceed rated capacity of the unit DESCRIPTION OF EQUIPMENT The Safe Lite series are of unique design with an ultraviolet germicidal lamp housed within a single quartz sleeve surroun...

Страница 4: ...personnel look at a U V lamp in operation EXCEPT through an external Site Port lens located on the outside of the unit 3 U V disinfection units must always be properly grounded INSTALLATION The Safe L...

Страница 5: ...selected Simply hand press or slightly tap in the flow control until it sits on the inside ledge of the machined port 3 Using the mounting box provided secure unit to wall or other surface Make sure t...

Страница 6: ...eposit onto the quartz sleeve After sufficient film has formed on the quartz sleeve the ability of the ultraviolet germicidal rays to pass though the quartz sleeve and into the water may be impaired T...

Страница 7: ...shortwave U V to effectively kill bacteria Failure to replace the U V lamps every 9 000 hours may cause bacteriological breakthrough Should the use of the disinfection unit be intermittent in no case...

Страница 8: ...o determine how much chlorine solution should be used In some instances removing the seal to measure the water can be a difficult task and it is easier to guess at the quantity of disinfectant needed...

Страница 9: ...w to protect wells and springs and keep them from becoming contaminated call or visit your local Cooperative Extension office or your nearest certified water treatment specialist TABLE 1 Quantity of s...

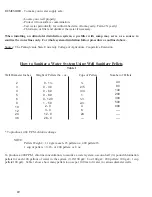
Страница 10: ...ater System Using Well Sanitizer Pellets Table 1 Well Diameter Inches Weight of Pellets lbs oz Cups of Pellets Number of Pellets To produce a 400 P P M chlorine dosage NOTE Pellets Weight 1 14 gram ea...

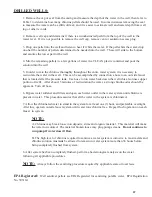
Страница 11: ...n water back down the well this also rinses upper portion of well After about 15 minutes of recirculation the water a strong chlorine odor should be apparent Turn off hose 6 Bypass water softener and...

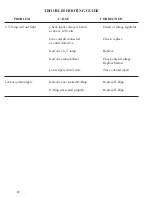
Страница 12: ...gulator or above 120 volts Line cord disconnected Check replace or outlet defective Defective U V lamp Replace Defective lamp ballast Check output voltage Replace ballast Loose open circuit wire Trace...

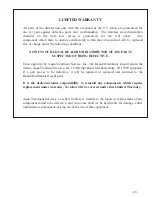
Страница 13: ...proval by Aqua Treatment Service Inc the Dealer Distributor should return the item to Aqua Treatment Service Inc 194 Hempt Road Mechanicsburg PA 17050 prepaid If a part proves to be defective it will...

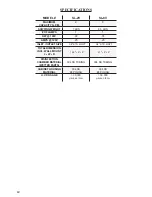
Страница 14: ...120V 03 03 AMPS 120V 25 25 INLET OUTLET SIZE 3 8 STD MNPT 3 4 STD MNPT TOTAL DIMENSION INCL WALL MOUNT L X W X D 15 5 X 5 X 5 21 X 5 X 5 DISINFECTION CHAMBER MATERIAL WETTED PARTS 304 SS TUBING 304 SS...

Страница 15: ...bottle or sterile container being used Holding the cap in a down position the operator should then hold his breath while taking the sample so as to avoid oral contamination of the sample The operator...

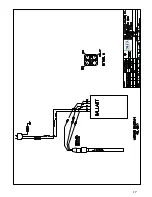
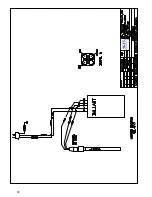
Страница 16: ...16 WIRING DIAGRAM...

Страница 17: ...17...

Страница 18: ...18...

Страница 19: ...19 DRAWING AND PART NUMBERS...

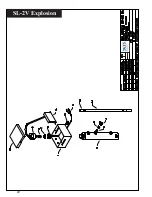
Страница 20: ...20 SL 2V Explosion...

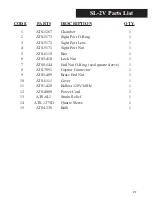
Страница 21: ...1 4 ATS 5171 Sight Port Nut 1 5 ATS 6110 Box 1 6 ATS5 410 Lock Nut 1 7 ATS8 544 End Nut O Ring seal quartz sleeve 1 8 ATS 7091 Gaynor Connector 1 9 ATS5 409 Brass End Nut 1 10 ATS 6111 Cover 1 11 ATS1...

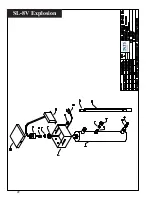
Страница 22: ...22 SL 8V Explosion...

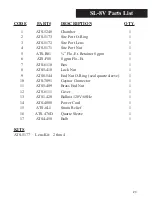
Страница 23: ...Retainer 8 gpm 1 6 ATS F08 8 gpm Flo Et 1 7 ATS 6110 Box 1 8 ATS5 410 Lock Nut 1 9 ATS8 544 End Nut O Ring seal quartz sleeve 1 10 ATS 7091 Gaynor Connector 1 11 ATS5 409 Brass End Nut 1 12 ATS 6111 C...

Отзывы: