


Any revisions must first be approved by the product designer. Version: 201911
Revision By: JST
14.
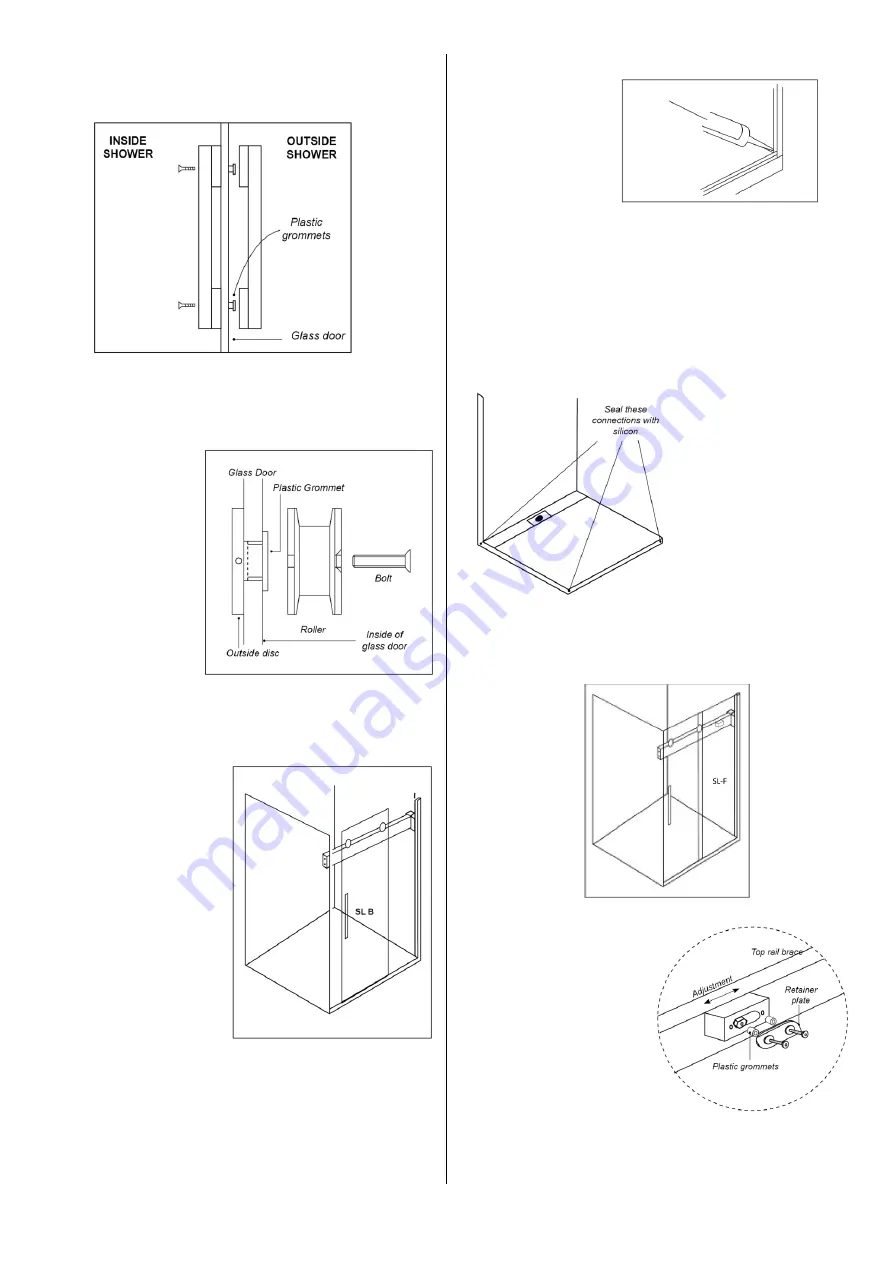
HANDLE INSTALLATION
Assemble the handles as shown. Use 3mm Hex
Key supplied with the handle set.
15.
ROLLER SET ASSEMBLY TO GLASS DOOR
Ensure the direction of the door is correct. Fit
the plastic
grommet
through the
glass first
(Note:
Direction of
grommet).
Tighten with
the 4mm hex
key supplied.
16.
DOOR INSTALLATION
Protect the outside face of the top rail brace
with the blue tape supplied. Standing outside
the shower, lift
the door,
SL B,
and place the
rollers onto the
top rail brace.
Adjust the door
height and
alignment by
loosening the
roller bolts and
rotating the
outside disc.
Ensure the
bottom of the
door clears the floor tiles.
17.
CRITICAL SEAL
Remove dust
and dirt first.
Seal the
connection
between the
glass receiver
channel and the base glazing channel with clear
silicon, prior to the installation of the fixed
panel,
SL-F.
Ensure corner junction between wall
channel and base channel is full of silicon before
final glass placement.
It is vital that all junctions are sealed sufficiently.
Prior to installation of
glass panels and infill all
connections
of channels, must be
sealed with clear silicon
supplied
18.
INSTALLATION OF FIXED PANEL
Locate the glass panel
SL-F
into the glazing
channel. Add or remove plastic packers (bag11)
in the base glazing channel as necessary.
19.
ADJUSTING
BLOCK
Apply the plastic
grommets into the
holes in the glass
panel
SL-F.
Assemble retainer
plate as shown
(bag104 & 117).