


Manual & Parts Lists Technical
13
Fig. 5
Fig. 6
Loading and Adjusting the Folder
Feed the gusset through the top portion of
the folder with the flange to the right and under the
right flange guide. Adjust the left guide to make a
snug fit to the gusset width. Adjust the folder left or
right as necessary to set the desired stitch margin.
Normally, with the folder positioned to its right
most position in its slots, a 6" wide gusset will be
centered on the needle. The folder spacers should
be sized as required to fit the thickness of the
gusset. Extra spacers can be ordered to fit any
thickness gusset from 1/8" to 9/16". Adjust the
lower portion of the folder in the same manner.
Adjusting the Edge Guide
The edge guide located on the front of the
table should be set so its left edge aligns with the
right edge of the gusset. This is the guide for the
right edge of the panel.
Loading the Panel
Heal back the treadle or step on the foot lift pedal to raise the presser foot. Swing
in the stripper blade and the folder/ruffler assembly. Be sure the sensor at the back of the
swing-out bracket is lit indicating that the bracket is all the way in to the detent. Activate
the “Wipe” switch to raise the folder for easier loading. Pull the gusset through the folder,
under the presser foot and under the puller. Activate the “Wipe” switch again to lower the
folder. Load the panel under the gusset with the center of the short side even with the
needle and the edge of the panel against the edge guide. Lower the presser foot. Be sure
the Auto/Manual switch is in its Auto position (up). Be sure the folder is “Down”. The
automatic cycle will not function while the folder is up.
Sewing the Panel with Rounded Corners
Set thumbwheel #5 to any ruffle setting between 1 and 6 as desired.
Sew the panel to the corner being sure not to get your hands in the way of the
electric eye mounted under the table which must "see" the edge of the panel as it nears
the presser foot. The machine will stop automatically at the corner. Go to neutral treadle
as you position your hands for turning. Place your right hand on the panel near the
presser foot and your left hand about 1 foot to the left on the panel. Treadle forward and
allow the machine to make the first ruffle sewing straight. Begin to rotate the panel as the
rest of the ruffles are formed. Try to turn an equal amount with each ruffle so that when
the ruffles are complete the panel has turned 90 degrees and the right edge of the panel
is resting against the left edge of the edge guide. The ruffles can be made one at a time
by going to neutral treadle between each ruffle. Complete all four corners.
Содержание 1335MF
Страница 2: ......
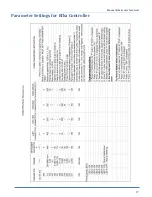
Страница 23: ...Manual Parts Lists Technical 17 Parameter Settings for Efka Controller ...
Страница 24: ...Technical Manual Parts Lists 18 1335M Folder Spacer Reference Chart ...
Страница 34: ...Technical Manual Parts Lists 28 ...
Страница 36: ...Technical Manual Parts Lists 30 ...
Страница 44: ...Technical Manual Parts Lists 38 ...
Страница 48: ...Technical Manual Parts Lists 42 ...
Страница 50: ...Technical Manual Parts Lists 44 ...
Страница 52: ...Technical Manual Parts Lists 46 ...
Страница 54: ...Technical Manual Parts Lists 48 ...
Страница 56: ...Technical Manual Parts Lists 50 ...
Страница 60: ...Technical Manual Parts Lists 54 ...
Страница 68: ...Technical Manual Parts Lists 62 ...
Страница 70: ...Technical Manual Parts Lists 64 ...
Страница 72: ...Technical Manual Parts Lists 66 ...
Страница 78: ...Technical Manual Parts Lists 72 1335MF PD Pneumatic Diagram 125860A ...
Страница 79: ...Manual Parts Lists Technical 73 1959 PD Pneumatic Diagram 125492C ...
Страница 80: ...Technical Manual Parts Lists 74 1334S 01WD Wiring Diagram 125627C ...
Страница 81: ...Manual Parts Lists Technical 75 1334S 02WD Wiring Diagram 125690C ...
Страница 82: ...Technical Manual Parts Lists 76 1335MF WD Wiring Diagram 125665C ...
Страница 83: ...Manual Parts Lists Technical 77 1335MFC 34WD2 Wiring Diagram 125712C ...


