background image

34  ATI VPU Recover Tab

ATI VPU Recover Tab

Hardware crashes may occur when a hardware device and the 
corresponding software device driver are no longer able to communicate 
with each other. VPU Recover enables the ATI display driver to detect 
when the graphics card is no longer able to respond to display driver 
commands. When this situation arises, the display driver will reset the 
graphics card. Depending on the current state of the system when VPU 
Recover is activated, applications that are running may be able to fully 
recover from this reset. In other cases, running applications may be closed, 
and the user will be returned to the Windows® desktop.

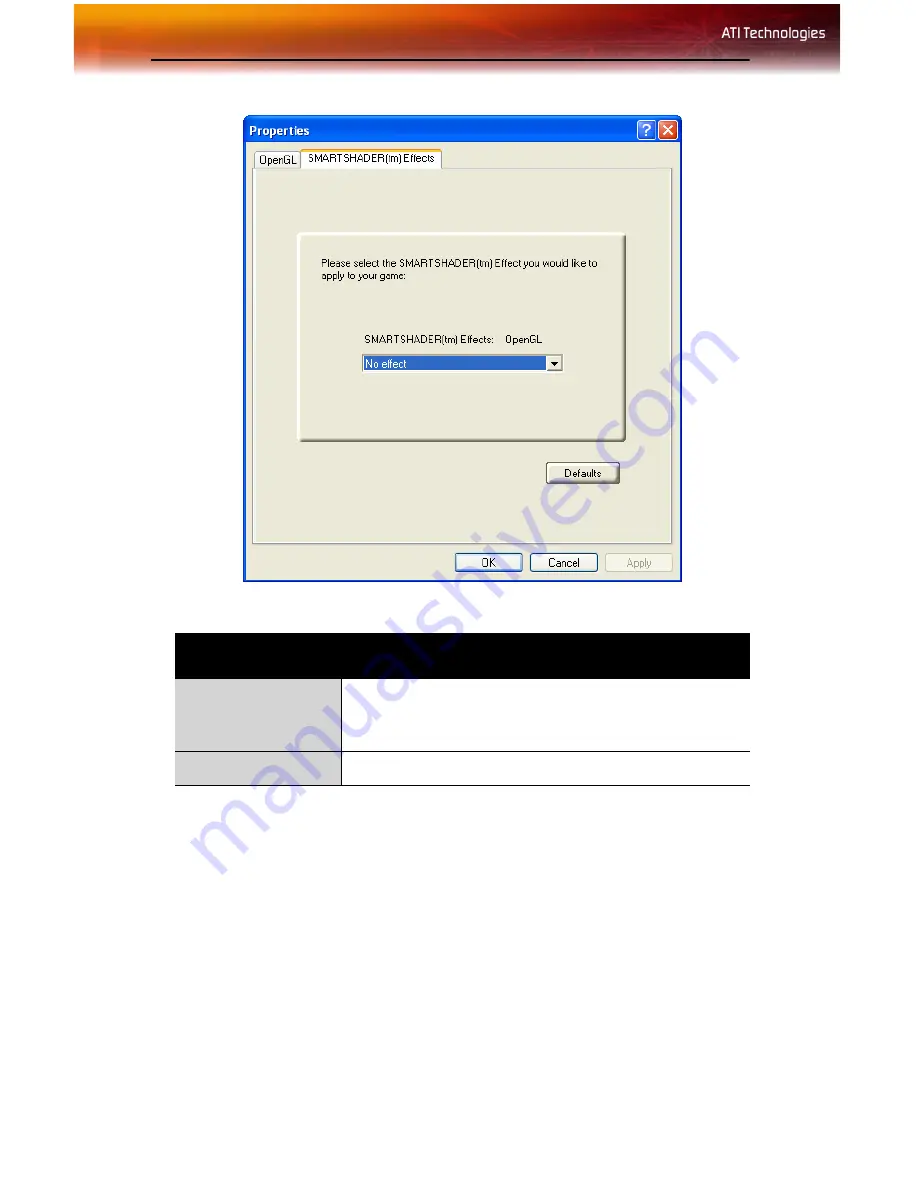
 Custom Properties Dialog: SMARTSHADER™ Effects

SMARTSHADER™ 
Effects drop-down 
list

SMARTSHADER™ applies preset pixel effects on 
OpenGL® or Direct 3D® applications. Choose the 
desired effect and click 

OK

.

Defaults button

Restores the default settings.

Содержание 100-505141 - Firemv 2200 128 MB PCIE Graphics Card

Страница 1: ...P N 137 50051 10 FireMV 2200 User s Guide ...

Страница 2: ... respect to the operation or use of ATI hardware software or other products and documentation described herein for any act or omission of ATI concerning such products or this documentation for any interruption of service loss or interruption of business loss of anticipatory profits or for punitive incidental or consequential damages in connection with the furnishing performance or use of the ATI h...

Страница 3: ... is a safety feature If you are unable to insert the plug into the outlet contact your electrician to replace the obsolete outlet Do not defeat the safety purpose of the grounding type plug Secure Attachment All card securement pins shall be completely tightened as to provide continuous bonding between the option card and the PC chassis Lightning For added protection for this product during a ligh...

Страница 4: ...iv ...

Страница 5: ...11 HYDRAVISION Multi monitor Management 11 Installing Drivers and Software in Windows 12 Software Installation Prerequisites 12 Monitor Configuration 13 Reinstalling Drivers 14 Display Properties 15 Accessing the CATALYST Software Suite 15 ATI Displays Tab 16 Dynamic Display Reassignment 18 ATI Color Tab 18 Hotkeys 21 ATI Options Tab 23 ATI Rotation Tab 24 ATI Overlay Tab 26 Theater Mode Options 2...

Страница 6: ...g Additional Accessories 41 Compliance Information 41 FCC Compliance Information 42 Industry Canada Compliance Statement 42 CE Compliance Information 42 Informations de conformité de la CE 43 Electrical Safety 43 VCCI Class B ITE Compliance Information 43 MIC Certification Information 43 BSMI Certification Information 44 ...

Страница 7: ...s on systems FireMV graphics cards deliver uninterrupted performance Look to the FireMV series to realize these core benefits Reliability Stability Flexibility User friendly software Direct user support Lower power consumption Space efficient low profile design Product longevity Features of your FireMV 2200 card include Dual display Industry standard DMS59 connector for easy access to after market...

Страница 8: ...mber printed on the graphics card are required for registration They are located on a sticker on the back of the card Hardware Intel Pentium 4 Xeon AMD Athlon 64 K7 XP or compatible 128 MB of system memory 256 MB or more for best performance Motherboard with available X16 lane PCI Express slot and correct chipset driver or available PCI slot as appropriate CD ROM drive required for installation so...

Страница 9: ... With your current graphics card still in your computer 1 Close all applications that are currently running 2 Navigate to the Control Panel and select Add Remove Programs 3 Select your current graphics card drivers and select Add Remove The wizard will help you remove your current display drivers Note If the previously installed graphics card has any additional software installed it should also be...

Страница 10: ...4 Before You Begin ...

Страница 11: ...rboard containing an on board graphics solution and do not intend to use it as part of a multiple monitor display disable it 2 Shut down and disconnect your computer system 3 Remove any previously installed card 4 Install your new FireMV 2200 card 5 Reassemble and connect your computer system 6 Install the FireMV 2200 drivers and configuration software from the ATI Installation CD ROM by doing one...

Страница 12: ...ion FireMV 2200 Installation Diagram X PCIe Interface Connector Y PCIe Card Z PCIe Interface Connection Insertion Point for PCIe Card PCI Interface Connector PCI Card PCI Interface Connection _ Insertion Point for PCI Card ...

Страница 13: ...s card with the slot and press it in firmly until the card is fully seated 7 Screw in or fasten the graphics card securely and replace the computer cover 8 Reconnect any cables you have disconnected and plug in the computer s power cord 9 Turn on the monitor and then your computer Connecting Your Monitors Your FireMV 2200 card is designed for use with a DMS 59 cable connector which provides suppor...

Страница 14: ...re using a single display make sure you connect it to the primary connection A single display will not function properly if it is connected to the secondary connection X Male DMS 59 connector Y Female DMS 59 connection on the backplate of your FireMV 2200 graphics card Z Dual Female DVI I connections ...

Страница 15: ... use the Display Properties control panel to adjust the video settings and configure multiple monitors Display Configuration Connector s Used Comments Single CRT display VGA connector with DVI I to VGA adapter CRT cathode ray tube analog display The DVI I connection can support a CRT display using the DVI I to VGA adapter Single DFP display DVI I connector DFP digital flat panel display DFP displa...

Страница 16: ...10 Detailed Installation ...

Страница 17: ...N Multi monitor Management The HYDRAVISION multi monitor and desktop management software will install automatically with the Express driver installation of the ATISETUP utility If you do not want to install HYDRAVISION select the Custom driver installation and clear the HYDRAVISION check box For more information concerning HYDRAVISION consult the user s guide included on the ATI Installation CD RO...

Страница 18: ...tor cable is properly attached before you begin Note The installation dialog will display in English if your operating system s language is not supported To install ATI drivers and software 1 Start your system When the Found New Hardware Wizard comes up click Cancel When the System Settings Change window asks you to restart your computer click No 2 Run the ATISETUP utility The ATISETUP utility wil...

Страница 19: ...Yes or Continue to complete the driver installation Monitor Configuration Once the drivers and software have been installed you can configure your monitor To configure your primary display 1 Navigate to the Control Panel and choose Display or right click on the desktop and choose Properties 2 Choose the Settings tab and select a screen resolution and color depth that best suit your requirements an...

Страница 20: ... will always be Primary Any additional monitors will be designated as Secondary Reinstalling Drivers You can reinstall the drivers at any time using the ATISETUP utility on the ATI Installation CD ROM The ATISETUP utility will start automatically if you insert the ATI Installation CD ROM into your CD ROM drive after the operating system has started If your CD ROM auto run is not enabled or the ATI...

Страница 21: ...ATALYST Software Suite The CATALYST Software Suite installs the ATI display tabs into the Windows Display Properties dialog They are accessed through the Advanced button located on the Settings tab To access the Display Properties dialog right click on the desktop or navigate through Windows Control Panel which is located in the Start menu Windows Display Properties Settings Tab ...

Страница 22: ... and Secondary displays The Displays Tab ATI Displays Tab Scheme Displays the drop down list of available display device configurations that have previously been created New configurations can be entered here and then saved using the Save button Hotkey Associates a hotkey with a scheme To input the hotkey highlight the field and press the appropriate key combination on your keyboard ...

Страница 23: ... to have active 2 Type a name into the Scheme drop down list field 3 Click Save to save the scheme Display Configuration button These are the buttons that contain the name of the devices that can be connected to your graphics card such as Monitor Panel FPD TV or YPrBr Clicking on any of these buttons opens further options to refine your display on that device Only the type of devices supported by ...

Страница 24: ...roperty dialog under Settings For more information consult your Windows documentation To assign your Primary monitor 1 Click the buttons to assign the Primary monitor Clicking the button will reassign the Primary and Secondary monitors Clicking the button creates a clone or mirror image of the Primary display onto the Secondary display 2 Click OK or Apply to save the changes ATI Color Tab The ATI ...

Страница 25: ...e profiles in the drop down list are for your Desktop or a full screen 3D environment Profiles drop down list Lists all of the Desktop or Full Screen 3D profiles that you have saved Selecting a profile from the list loads those custom color settings for the relevant environment To create a new profile simply type in a name and click Save Save button Saves your current color settings to a Desktop o...

Страница 26: ...rightness of your Desktop or full screen 3D application Changing the brightness adjusts the vertical position of the color curve Contrast slide Increases or decreases the color contrast of your Desktop or full screen 3D application Changing the contrast adjusts the slope of the color curve Reset buttons Restores an individual slider setting to its default value Click Apply or OK to save Color prev...

Страница 27: ... box 3 Click Apply or OK To apply the settings for a Full Screen 3D profile 1 Choose the Full Screen 3D radio button 2 Select the profile name from the drop down list box 3 Click Apply or OK 4 Start your 3D application in full screen mode Hotkeys Some 3D applications automatically load their own color settings rather than those set through the ATI Color tab To use custom settings you can preconfig...

Страница 28: ...file and save it assign hotkeys for the Load Current Profile action through the Hotkeys dialog make sure that the profile you prefer is selected from the drop down list box and click OK Once inside the 3D application use the hotkeys to trigger the profile Some 3D applications allow you to switch easily between full screen mode and windowed mode and do not load their own color settings In windowed ...

Страница 29: ... The Options Tab ATI Options Tab Version Information Shows the driver build version Details button Gives access to the Details tab which lists the card s hardware details and driver information WMV Acceleration When enabled improves the performance of WMV format video files Reactivate all warning messages Reactivates any disabled graphics warning messages ...

Страница 30: ...e ATI icon from the system tray without disabling the ATI icon applications Disable quick resolution feature The quick resolution feature is accessible by left clicking the ATI icon in the system tray Checking this option disables this feature Reduce DVI frequency on high resolution Resolves display corruption or no image at high resolutions for example 1280x1024 75Hz using a digital DVI display T...

Страница 31: ...ate a hotkey The options are Standard Landscape 0 Rotate 90 Right Rotate 180 Rotate 90 Left Toggle between 0 and 90 Right Toggle between 0 and 180 Toggle between 0 and 90 Left Hotkey field Associates a hotkey with a rotation To input the hotkey click on the field and press the appropriate key combination on your keyboard Save button Saves a hotkey setting Defaults Restores the default hotkey setti...

Страница 32: ...he appropriate button 5 Click OK or Apply ATI Overlay Tab The ATI Overlay tab allows you to configure the brightness contrast saturation hue and gamma properties of your video overlay Video overlay allows for the viewing of video on your PC This feature is available only through the Primary video display The video overlay controls are automatically activated during playback of any video file type ...

Страница 33: ...l color and produces a black and white picture Hue Adjusts the pureness or tint of the red green and blue components of the color Gamma Adjusts the overall intensity of the video image Theater mode options Accesses Theater Mode overlay settings These settings only apply to video content when viewed in dual controller Clone mode For more information see the Theatre Mode Settings section Defaults bu...

Страница 34: ...rd VGA connector and a digital flat panel connector such as the DVI I connector or to a TV using the TV Out connector In either of these cases you can access Theater Mode Options if more than one display is connected Note These settings apply to video content viewed when you are in dual controller Clone mode and not single display or extended desktop configurations Theater Mode Options Dialog Thea...

Страница 35: ... Settings These settings are available when Theater Mode is selected Same as source video The aspect ratio of the source video is maintained for full screen display Note that this option may result in black bars on either the horizontal or vertical sides of the video display Full Screen Video The source video is scaled so that your display is showing full screen Note if the source video contains h...

Страница 36: ...ill maximize application performance while moving the slider to the right will maximize image quality Use Custom Settings checkbox When Use Custom Settings is checked the Performance Quality slider is disabled and the Custom button is enabled Using custom settings is recommended for advanced users only Custom button Opens the Custom Properties dialog Using custom settings is recommended for advanc...

Страница 37: ...me in Current Profile and click the Save button Saved profiles are selected from the Current Profile drop down window To delete a profile select it from the Current Profile drop down window and press the Delete button Compatibility Settings button Accesses advanced settings that may solve compatibility issues for a few specific Direct 3D or OpenGL applications whichever is selected For more inform...

Страница 38: ...ulting in smoother more natural looking objects Anti Aliasing can be applied using different sample patterns and sample points such as 2X or 4X Moving this slider to the right increases sampling to provide the most realistic 3D image Select the Application Preference checkbox for high quality images with a negligible reduction in the application s performance Deselect the Application Preference ch...

Страница 39: ...o the right delivers the highest quality experience Moving the slider to the left emphasizes a high performance solution while still providing good visuals Mipmap Detail Level slider Choose the texture quality of the mipmaps the application will use Mipmaps are a collection of different sized textures of the same image As the user moves closer to a 3D object the image quality should increase requi...

Страница 40: ...es the display driver will reset the graphics card Depending on the current state of the system when VPU Recover is activated applications that are running may be able to fully recover from this reset In other cases running applications may be closed and the user will be returned to the Windows desktop Custom Properties Dialog SMARTSHADER Effects SMARTSHADER Effects drop down list SMARTSHADER appl...

Страница 41: ...epare an Error Report checkbox When VPU Recover is activated a dialog will prompt you to submit an automatically generated error report to ATI This error report will help ATI to determine the cause of the problem and help create more stable drivers To disable this feature deselect the Prepare an Error Report checkbox ...

Страница 42: ...36 ATI VPU Recover Tab ...

Страница 43: ...e problems during start up restart your computer in Safe Mode Check the system configuration utility of your operating system for the interrupt assignments Contact Dell Technical Support if the problem persists No Display Check that the card is seated properly in its expansion slot Ensure that the monitor cable is securely fastened to the card Make sure that the monitor and computer are plugged in...

Страница 44: ...color balance controls of your monitor Try adjusting the centering and positioning controls of your monitor to position the picture on the screen Note The Screen Position settings in Display Properties Advanced Displays Adjustments tune the position of the picture on the screen via the video signal Set the monitor s RGB inputs and sync switches if this option is available to 75 Ohms with the sync ...

Страница 45: ...Spanish and Portuguese Telephone Brazil 0800 891 9068 9 00AM 5 30PM EST Monday to Friday Toll free Support available in English Spanish and Portuguese Telephone Mexico 001800 514 3276 9 00AM 5 30PM EST Monday to Friday Toll free Support available in English Spanish and Portuguese Telephone Other Latin American Countries 1 905 882 3277 9 00AM 5 30PM EST Monday to Friday Complimentary International ...

Страница 46: ... in good working condition according to its specifications at the time of shipment for a period of three years from the date of original purchase Should the product in ATI s opinion malfunction within the warranty period ATI will at its discretion repair or replace the product upon receipt with an equivalent Any replaced parts become the property of ATI This warranty does not apply to the software...

Страница 47: ...cement only ATI makes no other representations or warranties as to fitness for a particular purpose merchantability or otherwise in respect of the product No other representations warranties or conditions shall be implied by statute or otherwise In no event shall ATI be responsible or liable for any damages including but not limited to the loss of revenue or profit arising From the use of the prod...

Страница 48: ...cian for help Industry Canada Compliance Statement ICES 003 This Class B digital apparatus complies with Canadian ICES 003 Cet appareil numérique de la Classe B est conforme à la norme NMB 003 du Canada For further compliance information ATI Research Inc 4 Mount Royal Ave Marlborough MA 01752 1976 USA 508 303 3900 CE Compliance Information EMC Directive 89 336 EEC and amendments 91 263 EEC 92 31 E...

Страница 49: ...PR 24 1997 A1 2001 A2 2003 Norme sur l immunité de matériel des technologies de l information et comprenant EN 61000 4 2 EN 61000 4 3 EN 61000 4 4 EN 61000 4 5 EN 61000 4 6 Electrical Safety 73 23 EEC The Low Voltage Directive IEC 60950 1 2001 IEC 60950 1999 3rd Edition Safety of Information Technology Equipment BS EN60950 1 2002 BS EN60950 2000 3rd Edition UL 60950 1 2003 UL 60950 2000 3rd Editio...

Страница 50: ...44 Compliance Information BSMI Certification Information ...

Страница 51: ... 26 ATI taskbar applications disabling 24 enabling 24 B brightness 20 21 color settings 18 video overlay 26 C card specification information 23 Clone Mode settings 28 clone mode primary display 28 secondary displays 28 color hotkeys 20 color preview color settings 20 color settings brightness 18 color preview 20 contrast 18 20 desktop 19 gamma 18 Hotkeys 21 profiles 19 Color Tab 18 ...

Страница 52: ...key 16 primary 16 scheme 16 17 secondary 16 Displays Tab 16 driver information 23 drivers installing 12 uninstalling 3 DVI operational mode 24 F full screen 3D 18 G gamma 20 21 color settings 18 video overlay 26 gamma correction 20 graphics card resetting through VPU Recover 34 H Hotkeys color settings 21 hue video overlay 26 HYDRAVISION 11 13 M multiple displays rotate 26 O Options Tab 23 overlay...

Страница 53: ...ltiple displays 26 single display 26 S safety instructions iii saturation video overlay 26 secondary display 16 secondary displays clone mode 28 serial number 2 settings Clone Mode 28 single display rotate 26 system requirements 2 T tab Overlay 26 troubleshooting general problems 37 V VGA 28 video overlay 26 brightness 26 contrast 26 gamma 26 hue 26 saturation 26 VPU Recover 34 ...

Отзывы: