background image

Chapter 2. Hardware Setup

11

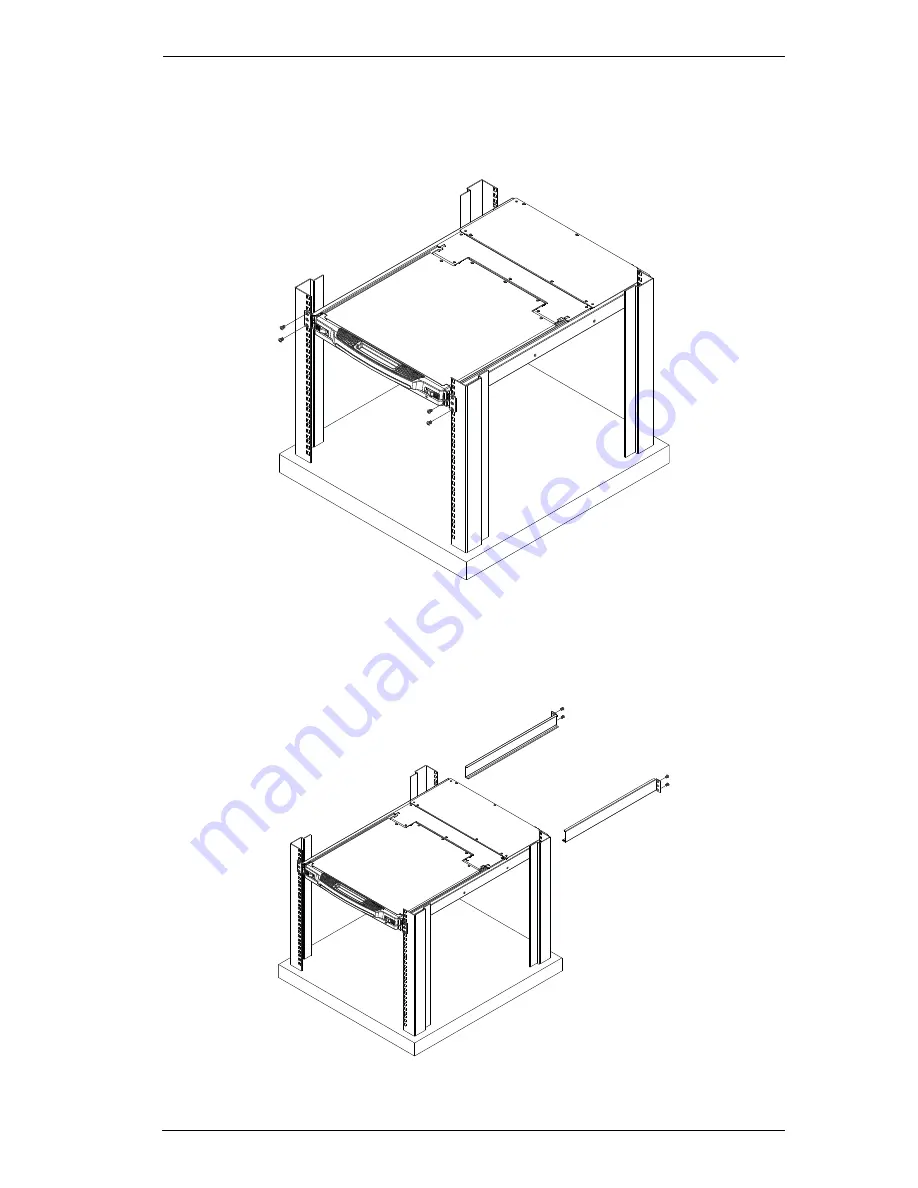
To rack mount the CL1308 / CL1316, do the following:

1. While one person positions the switch in the rack and holds it in place, the 

second person loosely screws the front brackets to the rack.

2. While the first person still holds the switch in place, the second person 

slides the L brackets into the switch's side mounting brackets, from the 
rear until the bracket flanges contact the rack, then screws the L brackets 
to the rack.

3. After the L brackets have been secured, tighten the front bracket screws.

Содержание CL1308

Страница 1: ...LCD KVM Switch CL1308 CL1316 User Manual www aten com...

Страница 2: ...nt in a residential area is likely to cause harmful interference in which case the user will be required to correct the interference at his own expense The device complies with Part 15 of the FCC Rule...

Страница 3: ...CL1308 CL1316 User Manual iii SJ T 11364 2006 The following contains information that relates to China...

Страница 4: ...ective following their purchase the buyer and not the manufacturer its distributor or its dealer assumes the entire cost of all necessary servicing repair and any incidental or consequential damages r...

Страница 5: ...hly and follow the installation and operation procedures carefully to prevent any damage to the unit and or any of the devices connected to it Features may have been added to the CL1308 CL1316 since t...

Страница 6: ...verview 1 Features 2 Requirements 3 Computers 3 Cables 3 Operating Systems 4 Components 5 Front View 5 Rear View 7 Chapter 2 Hardware Setup Overview 9 Before you Begin 9 Standard Rack Mounting 10 Grou...

Страница 7: ...n 27 OSD Functions 27 F1 GOTO 28 F2 LIST 28 F3 SET 29 F4 ADM 31 F5 SKP 34 F6 BRC 34 F7 SCAN 35 F8 LOUT 36 Chapter 5 Keyboard Port Operation Hotkey Port Control 37 Invoke Hotkey Mode 37 Number Lock and...

Страница 8: ...neral 53 Rack Mounting 55 Consignes de s curit 56 G n ral 56 Montage sur b ti 58 Technical Support 60 International 60 North America 60 Specifications 61 Connection Tables 62 CL1308 to Compatible 8 Po...

Страница 9: ...te 17 switch two level operation are provided Chapter 3 Basic Operation explains the fundamental concepts involved in operating the CL1308 CL1316 Chapter 4 OSD Operation provides a complete descriptio...

Страница 10: ...Indicates keys you should press For example Enter means to press the Enter key If keys need to be chorded they appear together in the same bracket with a plus sign between them Ctrl Alt 1 Numbered li...

Страница 11: ...S 2 connections for the console and computers The CL1308 CL1316 intercepts keyboard input directly thus eliminating the need for any software configuration Switching between computers can be easily ac...

Страница 12: ...when the console focus is elsewhere Keyboard languages supported English US English UK French German German Swiss Greek Hungarian Italian Japanese Korean Russian Spanish Swedish and Traditional Chine...

Страница 13: ...or at least one USB port Cables Substandard cables might damage the connected devices or degrade overall performance For optimum signal integrity and to simplify the layout use the high quality custom...

Страница 14: ...ems are shown in the table below OS Version Windows 2000 and higher Linux RedHat 7 1 and higher SuSE 8 2 and higher Mandriva Mandrake 9 0 and higher UNIX AIX 4 3 and higher FreeBSD 4 2 and higher Sun...

Страница 15: ...1 Introduction 5 Components Front View Note While it is the CL1316 that is pictured above the CL1308 is identical with the exception of only having 8 KVM ports 11 12 13 14 10 3 4 5 6 7 9 8 2 1 2 EXIT...

Страница 16: ...5 key keyboard 7 Touchpad Standard mouse touchpad 8 Port Switches Press the port pushbuttons to bring the KVM focus to the computer attached to the corresponding port 9 Power LED Lights to indicate th...

Страница 17: ...witch This standard rocker switch powers the unit on and off 3 KVM Port Section The cables that link to the computers plug in here Note The shape of these SPHD connectors have been specifically modifi...

Страница 18: ...CL1308 CL1316 User Manual 8 This Page Intentionally Left Blank...

Страница 19: ...Custom cables of various lengths are listed on page 3 Consult your dealer to find out which custom KVM cables best fit your needs Before you Begin 1 Important safety information regarding the placemen...

Страница 20: ...two people to mount the switch one to hold it in place the other to screw it in 2 The standard rack mounting kit does not include screws or cage nuts If you need additional screws or cage nuts contact...

Страница 21: ...person loosely screws the front brackets to the rack 2 While the first person still holds the switch in place the second person slides the L brackets into the switch s side mounting brackets from the...

Страница 22: ...amage to your installation it is important that all devices are properly grounded Use a grounding wire to ground the CL1308 CL1316 by connecting one end of the wire to the grounding terminal and the o...

Страница 23: ...l be connecting 2 Use KVM cable sets as described in the Cables section on page 3 to connect any available KVM port to the keyboard video and mouse ports of the computer you are installing Refer to th...

Страница 24: ...CL1308 CL1316 User Manual 14 Cable Connection Diagrams KVM Cable Installation Diagrams USB KVM Cable Connection PS 2 KVM Cable Connection...

Страница 25: ...sing a KVM cable connect any available KVM Port on the first level switch to the Console port on the second level unit 3 Use KVM cable sets described in the Cables section page 3 to connect any availa...

Страница 26: ...CL1308 CL1316 User Manual 16 Two Level Installation Diagram CL1316 CS1316...

Страница 27: ...and raise the cover Note As a safety precaution to keep the console from accidentally sliding out the console is locked into the In position Before you can pull the console module out you must release...

Страница 28: ...module all the way out until it automatically locks in place 3 Open the cover Closing the Console To slide the console module back in do the following 1 Close the cover 2 Push the module all the way...

Страница 29: ...on the keyboard module as you work Wrong DO NOT lean your body weight on the keyboard module DO NOT place heavy objects on the keyboard module The maximum load bearing capacity of the keyboard module...

Страница 30: ...f any computers that have the Keyboard Power On function Otherwise the CL1308 CL1316 will still receive power from the computers 2 Unplug the CL1308 CL1316 from its power source 3 Wait 10 seconds then...

Страница 31: ...hrough the menus this button moves you Right or Up When making an adjustment it increases the value When navigating through the menus this button moves you Left or Down When making an adjustment it de...

Страница 32: ...is visible on the display your LCD may have the wrong clock setting Adjust the clock setting to eliminate vertical banding H Position Positions the display area on the LCD panel horizontally moves th...

Страница 33: ...ually reconfigure the OSD to reflect the new port information See the F3 SET page 29 and F4 ADM page 31 functions for details Note If the computer s operating system does not support hot plugging this...

Страница 34: ...37 A computer attached to a master unit has a two digit Port ID from 01 08 for the CL1308 from 01 16 for the CL1316 that corresponds to the KVM port number that it is connected to A computer attached...

Страница 35: ...The OSD main screen displays in administrator mode In this mode you have administrator privileges with access to all administrator and user functions and can set up operations including password auth...

Страница 36: ...port list is collapsed click on a switch number or move the highlight bar to it then press the right arrow key to expand the list Similarly to collapse a switch s port list click on the switch number...

Страница 37: ...hat can appear on the main screen the screen will scroll To activate a port double click it or move the highlight bar to it then press Enter After executing any action you automatically go back to the...

Страница 38: ...ut making a choice press Esc F2 LIST This function lets you broaden or narrow the scope of which ports the OSD displays on the main screen The submenu choices and their meanings are given in the table...

Страница 39: ...ll Lock combination PORT ID DISPLAY POSITION Allows each user to customize the position where the port ID appears on the screen The default is the upper left corner but users can choose to have it app...

Страница 40: ...k view ports and are powered on The default is ALL Note The quick view choices only show up on the administrator s screen since only he has Quick View setting rights see SET QUICK VIEW PORTS page 33 f...

Страница 41: ...name and password appears Usernames and passwords can be from 1 to 16 characters long and can consist of any combination of letters and numbers A Z 0 9 and some additional keys space 3 For each indivi...

Страница 42: ...a port name 1 Click the port or use the navigation keys to move the highlight bar to it then press Enter 2 Key in the new port name or modify delete the old one The maximum number of characters allowe...

Страница 43: ...t the port operating system 1 From the list select the port for which you wish to set the com puter s operating system 2 Set the operating system by pressing Spacebar to cycle through WIN MAC SUN or O...

Страница 44: ...before its port ID display While skip mode is in effect the console will not function normally You must exit skip mode in order to regain control of the console To exit skip mode press Spacebar or Es...

Страница 45: ...bar to stop scanning If the scanning stops on an empty port or one where the computer is attached but is powered Off the monitor screen will be blank and the mouse and keyboard will have no effect Aft...

Страница 46: ...egain access to the OSD whereas with Esc all you have to do to reenter the OSD is tap the OSD hotkey Note 1 When you reenter the OSD after logging out the screen stays blank except for the OSD main sc...

Страница 47: ...mode Setting the Beeper Setting the Quick Hotkey Setting the OSD Hotkey Setting the Port Operating System Restoring the OSD Default Values Invoke Hotkey Mode All hotkey operations begin by invoking Ho...

Страница 48: ...mbering page 24 You can directly access any computer on the installation with a hotkey combination that specifies the port ID of the KVM port that a computer is connected to To access a computer using...

Страница 49: ...sing P or with a left click of the mouse During the time that auto scanning is paused the command line displays Auto Scan Paused Pausing when you want to keep the focus on a particular computer is mor...

Страница 50: ...w keys After you press an arrow you automatically exit hotkey mode and enter Skip mode where you can switch ports as follows Once you are in Skip mode you can keep on skipping by pressing the arrow ke...

Страница 51: ...you press F5 you automatically exit Hotkey mode and regain keyboard and mouse control on the computer connected to the KVM port If you fail to regain keyboard mouse control on the computer after press...

Страница 52: ...ANGED for one second then the message disappears and you automatically exit Hotkey mode OSD Hotkey Control The OSD Hotkey see OSD HOTKEY page 29 can be toggled between Scroll Lock Scroll Lock and Ctrl...

Страница 53: ...unction key you automatically exit Hotkey mode Restore Default Values This administrator only hotkey restores the CL1308 CL1316 default values See RESTORE DEFAULT VALUES page 32 To restore the default...

Страница 54: ...to Mac F3 Set Operating System to Sun F5 Performs a keyboard mouse reset on the target computer H Toggles the Quick Hotkey invocation keys between Ctrl F12 and Num Lock R Enter This administrator only...

Страница 55: ...e available new firmware upgrade packages are posted on our website Check the website regularly to find the latest information and packages Downloading the Firmware Upgrade Package To download the fir...

Страница 56: ...to connect a COM port on your computer to the Firmware Upgrade Port of your switch 2 Shut down all the computers on the KVM installation 3 From your KVM switch console login to the OSD as the administ...

Страница 57: ...are Upgrade Utility welcome screen appears Note The screens shown in this section are for reference only The wording and layout of the actual screens put up by the Firmware Upgrade Utility may vary sl...

Страница 58: ...n is higher than the upgrade version it brings up a dialog box informing you of the situation and gives you the option to continue or cancel If you didn t enable Check Firmware Version the Utility ins...

Страница 59: ...een appears to inform you that the procedure was successful Click Finish to close the Firmware Upgrade Utility Upgrade Failed If the Upgrade Succeeded screen doesn t appear it means that the upgrade f...

Страница 60: ...do the following 1 Power off the switch 2 Connect the Firmware Upgrade Cable to its Firmware Upgrade Port 3 Slide the Firmware Upgrade Recovery Switch to the Recover position 4 Power the switch back o...

Страница 61: ...he emulation mappings are listed in the table below Note When using key combinations press and release the first key Ctrl then press and release the activation key PC Keyboard Mac Keyboard Shift Shift...

Страница 62: ...her keys The corresponding functions are shown in the table below Note When using key combinations press and release the first key Ctrl then press and release the activation key PC Keyboard Sun Keyboa...

Страница 63: ...ntilation has been provided Never spill liquid of any kind on the device Unplug the device from the wall outlet before cleaning Do not use liquid or aerosol cleaners Use a damp cloth for cleaning The...

Страница 64: ...of fire or electrical shock Do not attempt to service the device yourself Refer all servicing to qualified service personnel If the following conditions occur unplug the device from the wall outlet an...

Страница 65: ...nd stable before extending a device from the rack Do not overload the AC supply branch circuit that provides power to the rack The total rack load should not exceed 80 percent of the branch circuit ra...

Страница 66: ...es de ventilation se trouveraient bloqu es De m me l unit ne doit pas tre plac e dans un meuble ferm moins qu une ventilation adapt e ne soit assur e Ne renversez jamais de liquides de quelque sorte q...

Страница 67: ...syst me et les c bles d alimentation avec pr caution veillez ce que rien ne repose sur aucun des c bles Lors du branchement ou du d branchement des blocs d alimentation permettant la connexion chaud v...

Страница 68: ...rs avant et lat raux sur un m me b ti ou bien les stabilisateurs avant si plusieurs b tis sont r unis avant de travailler sur le b ti Chargez toujours le b ti de bas en haut et chargez l l ment le plu...

Страница 69: ...rature ambiante de fonctionnement de l environnement du b ti ne d passe pas la temp rature ambiante maximale sp cifi e pour l quipement par le fabricant Ne marchez sur aucun appareil lors de la maint...

Страница 70: ...beforehand Product model number serial number and date of purchase Your computer configuration including operating system revision level expansion cards and software Any error messages displayed at th...

Страница 71: ...grade 1 x Slide Switch LCD Control 4 x Pushbutton LCD On Off 1 x Pushbutton Port Selection 8 x Pushbutton 16 x Pushbutton LEDs On Line 8 Orange 16 Orange Selected 8 Green 16 Green Power KVM 1 Dark Gre...

Страница 72: ...itches Switches Computers Switches Computers Switches Computers 1 8 4 29 7 50 2 15 5 36 8 57 3 22 6 43 9 64 Switches Computers Switches Computers Switches Computers 1 8 4 53 7 98 2 23 5 68 8 113 3 38...

Страница 73: ...at are compatible with the CL1308 CL1316 and the type of expansion that they use KVM switches listed below are sold separately Contact your dealer for details Expansion Type Brand Model Name Cascade A...

Страница 74: ...Hotkey Scroll Lock Scroll Lock Port ID Display Position Upper Left Corner Port ID Display Duration 3 Seconds Port ID Display Mode Port Number plus Port Name Scan Duration 5 Seconds Scan Skip Mode All...

Страница 75: ...it for 68 0 105 0 cm racks Standard Long To install the long bracket standard rack mount kit simply replace the short L brackets on the standard rack mount kit with the long ones and mount the switch...

Страница 76: ...the switch will be to the inside a Screw the front flanges to the rack first b Slide the bars with the rear flanges toward the rack until the flanges make contact with the rack then screw the rear fl...

Страница 77: ...e switch to the front of the rack only tighten the screws part way 4 Slide the rear attachment sliding brackets along the slide bars until they contact the rear of the switch then use the screws suppl...

Страница 78: ...ing that the switch is properly lined up and operating correctly finish up by fully tightening down the partially tightened front attachment screws inserted in step 3 About SPHD Connectors This produc...

Страница 79: ...he power adapter that was supplied with the unit is plugged in and functioning properly Limited Warranty IN NO EVENT SHALL THE DIRECT VENDOR S LIABILITY EXCEED THE PRICE PAID FOR THE PRODUCT FROM DIRE...

Страница 80: ...CL1308 CL1316 User Manual 70 This Page Intentionally Left Blank...

Страница 81: ...sktop mounting 10 E Easy installation rack mounting 65 Edit Port Names 32 F F1 GOTO 28 F2 LIST 28 F3 SET 29 F4 ADM 31 F5 SKP 34 F6 BRC 34 F7 SCAN 35 F8 LOUT 36 factory default settings 64 Firmware upg...

Страница 82: ...Display Position 29 Numbering 24 Port Names 32 Port Selection 23 Manual 23 ports quick view 33 set operating system 33 Powering Off 20 Q quick view ports 33 R Rack mounting Easy installation 65 Option...

Страница 83: ...Chapter 73 Telephone support iv Timeout 32 Troubleshooting 69 two level installation 15 U User Notice iv...

Отзывы: