


4-8
Chapter 4: Motherboard information
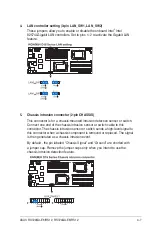
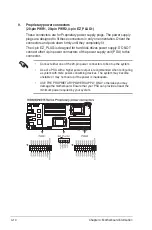
6. Force BIOS recovery setting (3-pin RECOVERY1)
This jumper allows you to quickly update or recover the BIOS settings when it
becomes corrupted.
To update the BIOS:
1. Prepare a USB flash disk that contains the original or latest BIOS for the
motherboard.
2. Set the jumper to pins 2–3.
3. Insert the USB flash and turn on the system to update the BIOS.
4. Shut down the system.
5. Set the jumper back to pins 1–2.
6. Turn on the system.
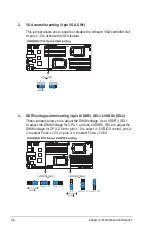
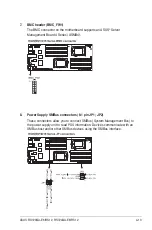
7. IPMI setting (3-pin IPMI_SEL1)
This jumper allows you to use the IPMI feature through the dedicated LAN
or share LAN. Place the jumper caps on pins 1–2 if you want to use IPMI
through the dedicated LAN (default). Or you can place the jumper caps on
pins 2–3 to use IPMI through the shared LAN.
Содержание RS720QA-E6/RS12
Страница 1: ...2U Rackmount Server RS720QA E6 RS12 RS724QA E6 RS12 User Guide ...
Страница 20: ...Chapter 1 Product introduction 1 10 ...
Страница 44: ...Chapter 2 Hardware setup 2 24 ...
Страница 50: ...4 2 Chapter 4 Motherboard information 4 1 Motherboard layouts KGNH D16 For RS720QA E6 RS12 ...
Страница 51: ...ASUS RS720QA E6 RS12 RS724QA E6 RS12 4 3 KGMH D16 QDR For RS724QA E6 RS12 ...
Страница 118: ...6 14 Chapter 6 RAID configuration ...
Страница 142: ...7 24 Chapter 7 Driver installation 9 Click your preferred options and click Finish to exit the wizard ...
Страница 148: ...7 30 Chapter 7 Driver installation ...


