


6-2
Chapter 6: RAID configuration
6.1
Setting up RAID
6.1.1
RAID definitions
RAID 0
(Data striping)
optimizes two identical hard disk drives to read and write
data in parallel, interleaved stacks. Two hard disks perform the same work as a
single drive but at a sustained data transfer rate, double that of a single disk alone,
thus improving data access and storage. Use of two new identical hard disk drives
is required for this setup.
RAID 1
(Data mirroring) copies and maintains an identical image of data from one
drive to a second drive. If one drive fails, the disk array management software
directs all applications to the surviving drive as it contains a complete copy of
the data in the other drive. This RAID configuration provides data protection and
increases fault tolerance to the entire system. Use two new drives or use an
existing drive and a new drive for this setup. The new drive must be of the same
size or larger than the existing drive.
RAID 5
stripes both data and parity information across three or more hard disk
drives. Among the advantages of RAID 5 configuration include better HDD
performance, fault tolerance, and higher storage capacity. The RAID 5 configuration
is best suited for transaction processing, relational database applications,
enterprise resource planning, and other business systems. Use a minimum of three
identical hard disk drives for this setup.
6.1.2
Installing hard disk drives
The motherboard supports SATA hard disk drives for RAID set configuration. For
optimal performance, install identical drives of the same model and capacity when
creating a disk array.
See section
2.4 Hard disk drives
for SATA hard disk drive installation.
6.1.3
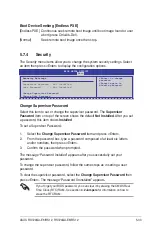
Setting the RAID item in BIOS
You must set the RAID item in the BIOS Setup before you can create a RAID set
from SATA hard disk drives attached to the SATA connectors supported by
AMD SP5100 chipset
. To do this:
1. Enter the BIOS Setup during POST.
2. Go to the
Main Menu
>
Storage Configuration
, then press <Enter>.
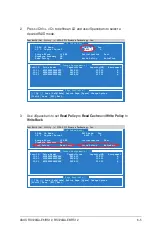
3. Set
SATA Port1-4
to [RAID] and
SATA Port5-6
will be set to [RAID] too.
4. Press <F10> to save your changes and exit the BIOS Setup.
Refer to Chapter 5 for details on entering and navigating through the BIOS
Setup.
Содержание RS720QA-E6/RS12
Страница 1: ...2U Rackmount Server RS720QA E6 RS12 RS724QA E6 RS12 User Guide ...
Страница 20: ...Chapter 1 Product introduction 1 10 ...
Страница 44: ...Chapter 2 Hardware setup 2 24 ...
Страница 50: ...4 2 Chapter 4 Motherboard information 4 1 Motherboard layouts KGNH D16 For RS720QA E6 RS12 ...
Страница 51: ...ASUS RS720QA E6 RS12 RS724QA E6 RS12 4 3 KGMH D16 QDR For RS724QA E6 RS12 ...
Страница 118: ...6 14 Chapter 6 RAID configuration ...
Страница 142: ...7 24 Chapter 7 Driver installation 9 Click your preferred options and click Finish to exit the wizard ...
Страница 148: ...7 30 Chapter 7 Driver installation ...


