


Chapter 2: Hardware setup
2-6
Apply some Thermal Interface Material to the exposed area of the CPU that the
heatsink will be in contact with, ensuring that it is spread in an even thin layer.
Some heatsinks come with pre-applied Thermal Interface Material. If so, skip
this step.
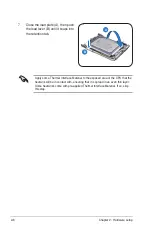
7. Close the load plate (A), then push
the load lever (B) until it snaps into
the retention tab.
A
B
Содержание RS720QA-E6/RS12
Страница 1: ...2U Rackmount Server RS720QA E6 RS12 RS724QA E6 RS12 User Guide ...
Страница 20: ...Chapter 1 Product introduction 1 10 ...
Страница 44: ...Chapter 2 Hardware setup 2 24 ...
Страница 50: ...4 2 Chapter 4 Motherboard information 4 1 Motherboard layouts KGNH D16 For RS720QA E6 RS12 ...
Страница 51: ...ASUS RS720QA E6 RS12 RS724QA E6 RS12 4 3 KGMH D16 QDR For RS724QA E6 RS12 ...
Страница 118: ...6 14 Chapter 6 RAID configuration ...
Страница 142: ...7 24 Chapter 7 Driver installation 9 Click your preferred options and click Finish to exit the wizard ...
Страница 148: ...7 30 Chapter 7 Driver installation ...


