


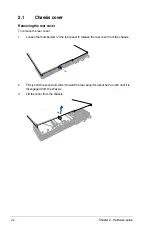


Chapter 2: Hardware setup
2-6
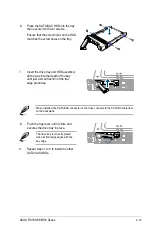
11. Gently push the load plate just enough
to let it sit on top of the CPU.
Do not force to close the load plate
as it may damage the CPU.
6.
Push the left load lever to slightly lift the
load plate (G).
Do not insert the load lever into the
retention tab.
The CPU fits in only one correct
orientation. DO NOT force the CPU
into the socket to prevent bending the
CPU pins on the socket.
8.
Get the CPU.
9. Align and position the CPU over the
socket ensuring that the triangle mark on
the CPU matches the triangle mark on
the socket box.
Triangle mark
7.
Hold the edge then gently lift the load
plate (H).
10. Install the CPU into the slot.
Load plate
edge of the Load plate
Содержание RS700-E8-RS8 Series
Страница 1: ...1U Rackmount Server RS700 E8 RS8 Series User Guide ...
Страница 10: ...x ...
Страница 27: ...2 9 ASUS RS700 E8 RS8 Series 18 Replace the air duct CPU1 CPU2 ...
Страница 52: ...Chapter 4 Motherboard information 4 2 4 1 Motherboard layout ...
Страница 76: ...Chapter 4 Motherboard information 4 26 ...
Страница 164: ...6 38 Chapter 6 RAID configuration ...
Страница 192: ...A 2 Appendix A Reference information Z10PP D24 block diagram ...
Страница 198: ...A 8 Appendix A Reference information ...