background image

2 - 2

2 - 2

2 - 2

2 - 2

2 - 2

C h a p t e r   2 :   B a s i c   i n s t a l l a t i o n

C h a p t e r   2 :   B a s i c   i n s t a l l a t i o n

C h a p t e r   2 :   B a s i c   i n s t a l l a t i o n

C h a p t e r   2 :   B a s i c   i n s t a l l a t i o n

C h a p t e r   2 :   B a s i c   i n s t a l l a t i o n

2.1

Preparation

Before you proceed, make sure that you have all the components you plan
to install in the system.

Basic components to install

Basic components to install

Basic components to install

Basic components to install

Basic components to install

1.

Central processing unit (CPU)

2.

DDR Dual Inline Memory Module (DIMM)

3.

Expansion card(s)

4.

Hard disk drive

5.

Optical drive

2.2

Before you proceed

Take note of the following precautions before you install components into
the system.

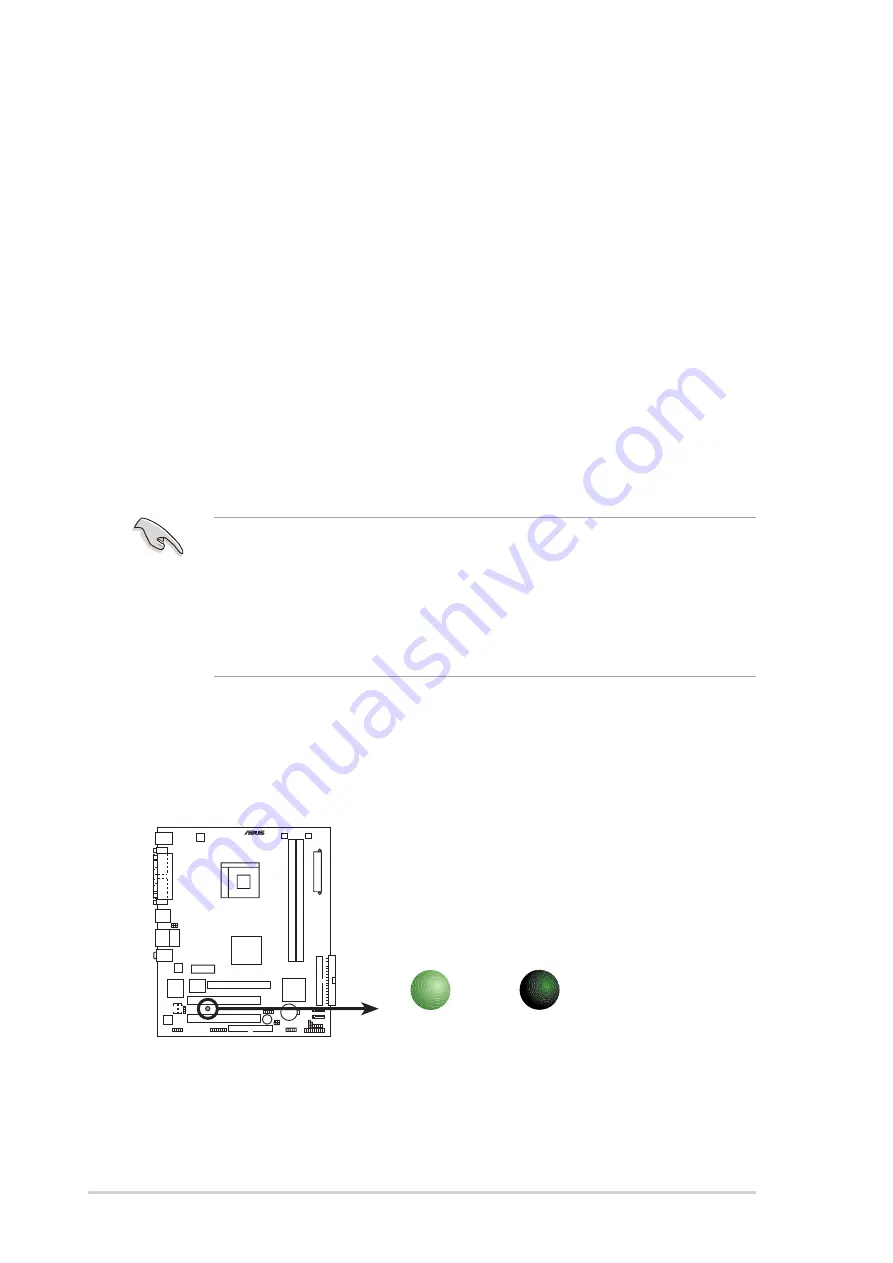
The system motherboard comes with an onboard standby power LED. This
LED lights up to indicate that the system is ON, in sleep mode or in soft-off
mode, and not powered OFF. Unplug the power cable from the power outlet
and make sure that the standby power LED is OFF before installing any
system component.

Use a grounded wrist strap or touch a safely grounded object or a
metal object, such as the power supply case, before handling
components to avoid damaging them due to static electricity.

Hold components by the edges to avoid touching the ICs on them.

Whenever you uninstall any component, place it on a grounded
antistatic pad or in the bag that came with the component.

®

Onboard LED

SB_PWR

ON

Standby

Power

OFF

Powered

Off

Содержание PUNDIT-AE3

Страница 1: ...Pundit AE3 Barebone System ...

Страница 2: ...F MERCHANTABILITY OR FITNESS FOR A PARTICULAR PURPOSE IN NO EVENT SHALL ASUS ITS DIRECTORS OFFICERS EMPLOYEES OR AGENTS BE LIABLE FOR ANY INDIRECT SPECIAL INCIDENTAL OR CONSEQUENTIAL DAMAGES INCLUDING DAMAGES FOR LOSS OF PROFITS LOSS OF BUSINESS LOSS OF USE OR DATA INTERRUPTION OF BUSINESS AND THE LIKE EVEN IF ASUS HAS BEEN ADVISED OF THE POSSIBILITY OF SUCH DAMAGES ARISING FROM ANY DEFECT OR ERRO...

Страница 3: ... 2 2 2 2 Before you proceed 2 2 2 3 Removing the covers 2 3 2 3 1 Removing the system cover 2 3 2 3 2 Removing the front panel assembly 2 4 2 4 Installing the CPU 2 5 2 4 1 Overview 2 5 2 4 2 CPU installation 2 5 2 4 3 CPU fan and heatsink assembly installation 2 6 2 5 Installing a DIMM 2 8 2 5 1 Memory configurations 2 8 2 5 2 Installing a DIMM 2 10 2 5 3 Removing a DIMM 2 10 2 6 Installing an ex...

Страница 4: ...D 3 2 3 2 2 Drivers menu 3 3 3 2 3 Utilities menu 3 4 3 2 4 ASUS contact information 3 5 3 2 5 Other information 3 5 3 3 Software information 3 8 3 3 1 SoundMAX 4 XL software 3 8 3 3 2 ASUS PC Probe II 3 13 3 3 3 Cool n Quiet Technology 3 20 Chapter 4 Motherboard info Chapter 4 Motherboard info Chapter 4 Motherboard info Chapter 4 Motherboard info Chapter 4 Motherboard info 4 1 Motherboard overvie...

Страница 5: ...mary Secondary Third and Fourth IDE Master Slave 5 11 5 3 5 OnBoard PCI SATA Controller 5 12 5 3 6 System Information 5 12 5 4 Advanced menu 5 13 5 4 1 CPU Configuration 5 13 5 4 2 Chipset 5 14 5 4 3 Onboard Devices Configuration 5 17 5 4 4 PCI PnP 5 20 5 5 Power menu 5 22 5 5 1 Suspend Mode 5 22 5 5 2 Repost Video on S3 Resume 5 22 5 5 3 ACPI 2 0 Support 5 22 5 5 4 ACPI APIC Support 5 22 5 5 5 AP...

Страница 6: ...ry to correct the interference by one or more of the following measures Reorient or relocate the receiving antenna Increase the separation between the equipment and receiver Connect the equipment to an outlet on a circuit different from that to which the receiver is connected Consult the dealer or an experienced radio TV technician for help Canadian Department of Communications Statement Canadian ...

Страница 7: ...ay from connectors slots sockets and circuitry Avoid dust humidity and temperature extremes Do not place the product in any area where it may become wet Place the product on a stable surface If you encounter technical problems with the product contact a qualified service technician or your retailer Lithium Ion Battery Warning Lithium Ion Battery Warning Lithium Ion Battery Warning Lithium Ion Batt...

Страница 8: ...ganized This guide contains the following parts 1 1 1 1 1 Chapter 1 System introduction Chapter 1 System introduction Chapter 1 System introduction Chapter 1 System introduction Chapter 1 System introduction This chapter gives a general description of the barebone system The chapter lists the system features including introduction on the front and rear panel and internal components 2 2 2 2 2 Chapt...

Страница 9: ...NOTE NOTE Tips and additional information to aid in completing a task Typography Typography Typography Typography Typography Bold text Bold text Bold text Bold text Bold text Indicates a menu or an item to select Italics Used to emphasize a word or a phrase Key Keys enclosed in the less than and greater than sign means that you must press the enclosed key Example Enter means that you must press th...

Страница 10: ...cessories Accessories Accessories Accessories Accessories Foot stand and screw 1 pair for vertical placement Rubber stand x 4 for horizontal placement Hard disk drive screw x 8 Optical drive screw x 2 Rubber washer x 8 3 3 3 3 3 Cables Cables Cables Cables Cables AC power cable IDE cable Serial ATA signal cable x 2 4 4 4 4 4 Support CD Support CD Support CD Support CD Support CD 5 5 5 5 5 User gui...

Страница 11: ...t AE3 ASUS Pundit AE3 ASUS Pundit AE3 Chapter 1 System introduction This chapter gives a general description of the barebone system The chapter lists the system features including introduction on the front and rear panel and internal components ...

Страница 12: ...es The system comes in a stylish mini tower casing and powered by the ASUS motherboard that supports the AMD Athlon 64 FX Athlon 64 Athlon Sempron processor in the 754 pin package with 800 MHz FSB and up to 2 GB system memory With audio capabilities extensive connectivity and Fast Ethernet LAN Pundit AE3 is designed for the sophisticated The system s ergonomic design allows vertical or horizontal ...

Страница 13: ...5 5 5 5 Headphone port Headphone port Headphone port Headphone port Headphone port This port lime is a combined headphone Line Out and S PDIF Out port The port functions as audio Line Out when you connect a headphone with a stereo mini plug The port functions as S PDIF Out when you connect an external audio output device that supports the S PDIF feature 6 6 6 6 6 Microphone port Microphone port Mi...

Страница 14: ... 8 8 8 Voltage selector Voltage selector Voltage selector Voltage selector Voltage selector Allows you to adjust the system input voltage according to the voltage supply in your area See the Voltage selector section on page 2 24 before adjusting this switch 9 9 9 9 9 Power connector Power connector Power connector Power connector Power connector Connects the power plug is for the power cable and p...

Страница 15: ...f the Line Out Line In and Microphone ports change when you select the 6 channel configuration Refer to the table below for audio ports function variation Low Frequency Enhanced P o r t P o r t P o r t P o r t P o r t Headphone 2 Channel Headphone 2 Channel Headphone 2 Channel Headphone 2 Channel Headphone 2 Channel 4 Channel 4 Channel 4 Channel 4 Channel 4 Channel 6 Channel 6 Channel 6 Channel 6 ...

Страница 16: ...t 10 ASUS motherboard 11 Metal bracket lock 12 Socket 754 13 CPU fan and heatsink assembly optional 14 DIMM sockets 1 4 Internal components The illustration below is the internal view of the system when you remove the top cover and the chassis support bracket The installed components are labeled for your reference Proceed to Chapter 2 for instructions on installing additional system components 9 9...

Страница 17: ...ASUS Pundit AE3 ASUS Pundit AE3 ASUS Pundit AE3 ASUS Pundit AE3 ASUS Pundit AE3 Chapter 2 Basic installation This chapter provides step by step instructions on how to install components in the system ...

Страница 18: ...owing precautions before you install components into the system The system motherboard comes with an onboard standby power LED This LED lights up to indicate that the system is ON in sleep mode or in soft off mode and not powered OFF Unplug the power cable from the power outlet and make sure that the standby power LED is OFF before installing any system component Use a grounded wrist strap or touc...

Страница 19: ... 3 1 2 3 1 2 3 1 2 3 1 Removing the system cover Removing the system cover Removing the system cover Removing the system cover Removing the system cover To remove the cover and metal chassis support 1 On the rear panel locate the two thumb screws that secure the cover to the chassis 4 Lift the system cover then set aside 5 Lift the expansion card lock to a 90º 100º angle 6 Lift the chassis support...

Страница 20: ... front panel assembly Removing the front panel assembly To remove the front panel assembly 4 Swing the left edge of the front panel assembly outward 1 Place the system vertically 2 Locate the front panel assembly hooks 3 Pull the hooks outward to release the front panel assembly 5 Unhook the hinge like tabs from the holes on the right side of the chassis to detach Do not use too much force when re...

Страница 21: ...tion Force ZIF socket designed for the AMD Athlon 64 FX Athlon 64 Sempron processor The 128 bit wide data paths of these processors can run applications faster than processors with only 32 bit or 64 bit wide data paths Take note of the marked corner with gold triangle on the CPU This mark should match a specific corner on the socket to ensure correct installation G o l d G o l d G o l d G o l d G ...

Страница 22: ... 3 CPU fan and heatsink assembly installation CPU fan and heatsink assembly installation CPU fan and heatsink assembly installation CPU fan and heatsink assembly installation CPU fan and heatsink assembly installation The system package includes an optional CPU fan and heatsink assembly To install the optional CPU fan and heatsink assembly 1 Position the CPU fan and heatsink assembly on top of the...

Страница 23: ...tention module hole 3 Insert one retention clip hook to the hole at the other side of the retention module 5 Install the second retention clip Make sure that the retention clip locking levers are on opposite corners Refer to the illustration on the right 6 Connect the CPU fan cable to the CPU fan connector on the motherboard Refer to Chapter 4 for the location of the CPU fan connector ...

Страница 24: ...gurations Memory configurations Memory configurations Memory configurations You may install up to 2 GB system memory using 256 MB 512 MB and 1 GB DDR DIMMs Install only identical identical identical identical identical the same type and size DDR DIMMs Always install DIMMs with the same CAS latency For optimum compatibility we recommend that you obtain memory modules from the same vendor Refer to t...

Страница 25: ...ICRON MT16VDDT6464AG 40BCB N A MICRON DS MT46V32M8TG 5BC 256 MB Infineon HYS64D32300HU 5 C 3 Infineon SS HYB25D256800CE 5C 512 MB Infineon HYS64D64320HU 5 C N A Infineon DS HYB25D256800CE 5C 256 MB Infineon HYS64D32301HU 5 C 3 Infineon SS HYB25D512160CE 5C 512 MB Infineon HYS64D64300HU 5 C 3 Infineon SS HYB25D512800CE 5C 1024 MB Infineon HYS64D128320HU 5 C 3 Infineon DS HYB25D512800CE 5B 256 MB CO...

Страница 26: ...e DIMM 4 Firmly insert the DIMM into the socket until the retaining clips snap back in place and the DIMM is properly seated 2 Remove the DIMM from the socket Unlocked Unlocked Unlocked Unlocked Unlocked retaining clip retaining clip retaining clip retaining clip retaining clip DDR DIMM notch DDR DIMM notch DDR DIMM notch DDR DIMM notch DDR DIMM notch L o c k e d L o c k e d L o c k e d L o c k e ...

Страница 27: ...t PCI Express x1 slot PCI Express x1 slot PCI Express x1 slot This motherboard supports PCI Express x1 network cards SCSI cards and other cards that comply with the PCI Express specifications AGP slot AGP slot AGP slot AGP slot AGP slot The Accelerated Graphics Port AGP slot supports AGP8X 4X cards When you buy an AGP card make sure that you ask for one with 1 5V specification Note the notches on ...

Страница 28: ... 5 If you have already installed a hard disk drive replace the chassis support bracket otherwise install other components before replacing the chassis support bracket 4 Align the card connector with the slot and press firmly until the card is completely seated on the slot 1 Lay the system on its side on a flat and stable surface 2 Lift the expansion card lock to a 90º 100º angle then remove the ch...

Страница 29: ...available for ISA or PCI devices These IRQs are usually available for ISA or PCI devices IRQ assignments for this motherboard IRQ assignments for this motherboard IRQ assignments for this motherboard IRQ assignments for this motherboard IRQ assignments for this motherboard When using PCI cards on shared slots ensure that the drivers support Share IRQ or that the cards do not need IRQ assignments o...

Страница 30: ...ug and plug Audio cable Audio cable Audio cable Audio cable Audio cable and plug and plug and plug and plug and plug 5 Connect the IDE cable to the IDE interface at the back of the drive Match the red stripe on the cable with Pin 1 on the IDE interface 6 Connect the optical drive audio cable to the 4 pin connector at the back of the optical drive To install an optical drive 1 Remove the front pane...

Страница 31: ... optical drive Uninstalling the optical drive In the future you may have to upgrade or replace a defective optical drive To uninstall the optical drive 1 Remove the front panel assembly following the instructions in section 2 3 2 Removing the front panel assembly 2 Locate the optical drive screw lock 4 Disconnect the IDE audio and power cables and plugs from the back of the drive 5 Pull out the dr...

Страница 32: ...hat trap the HDD screws and secure the drive in the place 2 8 2 2 8 2 2 8 2 2 8 2 2 8 2 SATA hard disk drive installation SATA hard disk drive installation SATA hard disk drive installation SATA hard disk drive installation SATA hard disk drive installation To install a SATA hard disk drive When installing one one one one one hard disk drive install it on the upper HDD bay 1 Insert the rubber wash...

Страница 33: ...of the SATA connectors 4 Connect the 15 pin SATA power plug from the power supply unit to the power connector at the back of the drive 5 Place the HDD on the tray Make sure that the HDD screws are aligned with the screw holes and rails 6 When the HDD screws align with the screw rails push the drive carefully until it is completely flushed on the bay The HDD screw lock clicks to indicate that the d...

Страница 34: ... back of the drive Match the red stripe on the cable with Pin 1 on the IDE interface 3 Connect a power cable from the power supply unit to the power connector at the back of the drive 4 Follow steps 5 to 6 of the previous section to complete installation 2 8 4 2 8 4 2 8 4 2 8 4 2 8 4 Uninstalling a hard disk drive Uninstalling a hard disk drive Uninstalling a hard disk drive Uninstalling a hard di...

Страница 35: ... assembly Replacing the front panel assembly Replacing the front panel assembly If you installed an optical drive you must remove the optical drive bay cover before you replace the front panel assembly To remove the optical drive bay cover The photo below shows the front panel assembly without the optical drive bay cover 2 Press one lock inward to disengage the optical drive bay cover from the fro...

Страница 36: ... the left edge of the front panel inward then attach the front panel assembly hooks to the chassis until they snap in place To replace the front panel assembly 1 Hook the hinge like tabs to the holes on the right side of the chassis Hinge like tabs Hinge like tabs Hinge like tabs Hinge like tabs Hinge like tabs Do not use too much force when replacing the front panel assembly ...

Страница 37: ... 2 2 9 2 Replacing the system cover Replacing the system cover Replacing the system cover Replacing the system cover Replacing the system cover To replace the metal chassis support 2 Match and insert the hooks of the cover to the elongated holes on the side of the chassis All eight hooks four hooks on both sides of the cover must properly fit the designated holes 1 Reinstall the metal chassis supp...

Страница 38: ...ot stands 1 Lay the system on its side on a flat stable and elevated surface then locate two screw holes on the left side of the system 2 Extend the left side of the system at least 3 cm from the edge of surface to facilitate installation 3 Position the foot stand on the chassis side until their screw holes align 4 Drive in a screw to secure the footstand to the chassis 5 Repeat steps 3 to 4 to in...

Страница 39: ...or Audio Device Headphone or Audio Device Camera Camera Camera Camera Camera 2 11 Selecting the voltage The system s power supply unit has a 115 V 230 V voltage selector switch located beside the power connector Use this switch to select the appropriate system input voltage according to the voltage supply in your area If the voltage supply in your area is 100 127 V set the switch to 115 V If the v...

Страница 40: ... 2 Mouse 2 Mouse Line Out Line Out Line Out Line Out Line Out Recorder Recorder Recorder Recorder Recorder M i c M i c M i c M i c M i c VGA monitor VGA monitor VGA monitor VGA monitor VGA monitor Card reader Card reader Card reader Card reader Card reader P P P P Power outlet ower outlet ower outlet ower outlet ower outlet Printer Printer Printer Printer Printer Serial mouse Serial mouse Serial m...

Страница 41: ...ASUS Pundit AE3 ASUS Pundit AE3 ASUS Pundit AE3 ASUS Pundit AE3 ASUS Pundit AE3 Chapter 3 Getting started This chapter helps you power up the system and install drivers and utilities from the support CD ...

Страница 42: ...em features 3 2 1 3 2 1 3 2 1 3 2 1 3 2 1 Running the support CD Running the support CD Running the support CD Running the support CD Running the support CD Place the support CD to the optical drive The CD automatically displays the Drivers Drivers Drivers Drivers Drivers menu if Autorun is enabled in your computer Motherboard settings and hardware options vary Use the setup procedures presented i...

Страница 43: ...he ADI1888 audio controller drivers and application SiS RAID Controller Driver SiS RAID Controller Driver SiS RAID Controller Driver SiS RAID Controller Driver SiS RAID Controller Driver Installs the SIS RAID controller driver Make SiS RAID Controller Driver Disk Make SiS RAID Controller Driver Disk Make SiS RAID Controller Driver Disk Make SiS RAID Controller Driver Disk Make SiS RAID Controller ...

Страница 44: ...puter in healthy operating condition See the online help for details ASUS Update ASUS Update ASUS Update ASUS Update ASUS Update The ASUS Update utility allows you to update the motherboard BIOS in a Windows environment This utility requires an Internet connection either through a network or an Internet Service Provider ISP See page 5 3 for details Microsoft DirectX 9 0c Microsoft DirectX 9 0c Mic...

Страница 45: ... on the inside front cover of this user guide The screen display and drivers option may not be the same for different operating system versions 3 2 5 3 2 5 3 2 5 3 2 5 3 2 5 Other information Other information Other information Other information Other information The icons on the top right corner of the screen give additional information on the motherboard and the contents of the support CD Click ...

Страница 46: ...Technical support form Technical support form Technical support form Technical support form Technical support form Displays the ASUS Technical Support Request Form that you have to fill out when requesting technical support Browse this CD Browse this CD Browse this CD Browse this CD Browse this CD Displays the support CD contents in graphical format ...

Страница 47: ... 3 7 ASUS Pundit AE3 ASUS Pundit AE3 ASUS Pundit AE3 ASUS Pundit AE3 ASUS Pundit AE3 Filelist Filelist Filelist Filelist Filelist Displays the contents of the support CD and a brief description of each in text format ...

Страница 48: ...dMAX SoundMAX SoundMAX SoundMAX Audio Driver and Application Audio Driver and Application Audio Driver and Application Audio Driver and Application Audio Driver and Application from the support CD that came with the system package to activate the 6 channel audio feature If the SoundMAX 4 XL software is correctly installed you will find the SoundMAX 4 XL icon on the taskbar SoundMAX 4 XL icon From ...

Страница 49: ...itial window appears You can also launch the wizard by clicking the Configuration Configuration Configuration Configuration Configuration button when AudioESP detects and verifies a newly connected peripheral 2 Click Next Next Next Next Next 3 Select the speaker configuration from the drop down list Select 5 1 5 1 5 1 5 1 5 1 Speakers Speakers Speakers Speakers Speakers if you have a 6 channel aud...

Страница 50: ...ettings Changing the audio settings Changing the audio settings Changing the audio settings Changing the audio settings You can change the general audio listening environment synthesizer and microphone settings using the Preferences window of the SoundMAX application To change the audio settings using the Preferences window 1 Click the Preferences icon from the SoundMAX control panel The Preferenc...

Страница 51: ...elect and adjust the playback and recording devices and the SoundMAX application preferences Listening Environment The Listening Environment Listening Environment Listening Environment Listening Environment Listening Environment tab allows you to select the speaker setup set the acoustic environment enable the Virtual Theater TM Surround feature and set the VirtualEar TM mode ...

Страница 52: ...Music Synthesizer The MIDI Music Synthesizer MIDI Music Synthesizer MIDI Music Synthesizer MIDI Music Synthesizer MIDI Music Synthesizer tab allows you to set the MIDI and synthesizer settings for your selected audio configuration Microphone The Microphone Microphone Microphone Microphone Microphone tab allows you to select the microphone setup and environment ...

Страница 53: ...in window allows you to view the current status of your system and change the utility configuration By default the main window displays the Preference Preference Preference Preference Preference section You can close or restore the Preference Preference Preference Preference Preference section by clicking on the triangle on the main window right handle Click to close the Click to close the Click t...

Страница 54: ...eference section in the main window Click the box before each preference to activate or deactivate Refer to the table below Preference Preference Preference Preference Preference When checked When checked When checked When checked When checked Always on top the utility main window always appear on top of all opened windows Enable Monitoring Panel the utility displays large hexagonal or small recta...

Страница 55: ...er position from the list box Click OK OK OK OK OK when finished Large display Large display Large display Large display Large display Small display Small display Small display Small display Small display Moving the monitor panels Moving the monitor panels Moving the monitor panels Moving the monitor panels Moving the monitor panels All monitor panels move together using a magnetic effect If you w...

Страница 56: ...y Large display Large display Large display Large display Small display Small display Small display Small display Small display WMI browser WMI browser WMI browser WMI browser WMI browser Click to display the WMI Windows Management Instrumentation browser This browser displays various Windows management information Click an item from the left panel to display on the right panel Click the plus sign...

Страница 57: ...k the plus sign before DMI Information DMI Information DMI Information DMI Information DMI Information to display the available information PCI browser PCI browser PCI browser PCI browser PCI browser Click to display the PCI Peripheral Component Interconnect browser This browser provides information on the PCI devices installed on your system Click the plus sign before the PCI Information PCI Info...

Страница 58: ... information on the CPU hard disk drive space and memory usage Click to display the Usage browser CPU usage CPU usage CPU usage CPU usage CPU usage The CPU CPU CPU CPU CPU tab displays real time CPU usage in line graph representation If the CPU has an enabled Hyper Threading two separate line graphs display the operation of the two logical processors On Intel On Intel On Intel On Intel On Intel CP...

Страница 59: ...nd the available physical memory Hard disk drive space usage Hard disk drive space usage Hard disk drive space usage Hard disk drive space usage Hard disk drive space usage The Hard Disk Hard Disk Hard Disk Hard Disk Hard Disk tab displays the used and available hard disk drive space The left panel of the tab lists all logical drives Click a hard disk drive to display the information on the right ...

Страница 60: ...er Power Power Power Power menu then set the ACPI 2 0 Support ACPI 2 0 Support ACPI 2 0 Support ACPI 2 0 Support ACPI 2 0 Support item to Y e s Y e s Y e s Y e s Y e s See section 5 5 Power Menu for details 4 Save your changes then exit the BIOS Setup 5 Set the Power Option Properties Power Option Properties Power Option Properties Power Option Properties Power Option Properties depending on the o...

Страница 61: ...e CPU frequency and core voltage To launch the Cool n Quiet application Windows XP OS 1 Click the Start Start Start Start Start button 2 Select All Programs ASUS Cool Quiet Cool All Programs ASUS Cool Quiet Cool All Programs ASUS Cool Quiet Cool All Programs ASUS Cool Quiet Cool All Programs ASUS Cool Quiet Cool Quiet Quiet Quiet Quiet Quiet The Cool n Quiet application window appears and displays...

Страница 62: ...3 22 3 22 3 22 3 22 3 22 Chapter 3 Getting started Chapter 3 Getting started Chapter 3 Getting started Chapter 3 Getting started Chapter 3 Getting started ...

Страница 63: ...S Pundit AE3 ASUS Pundit AE3 ASUS Pundit AE3 Motherboard info Chapter 4 This chapter gives information about the motherboard that comes with the system This chapter includes the motherboard layout jumper settings and connector locations ...

Страница 64: ...L 4M BIOS ATX12V SIS 760GX AUX CPU_FAN CD CHA_FAN 19 9cm 7 8in 24 4cm 9 6in Super I O GAME PCI1 AD1888 Below Mic In Center Line Out Top Line In CHASSIS PCI2 PCIEX1_1 PARALLEL PORT COM1 VGA PS 2KBMS T Mouse B Keyboard USB12 USB78 FP_AUDIO DDR DIMM2 64 bit 184 pin module DDR DIMM1 64 bit 184 pin module USBPW56 USBPW34 USBPW12 SB_PWR Top RJ 45 Bottom USB34 SPDIF_OUT CLRTC Accelerated Graphics Port AG...

Страница 65: ...te time and system setup parameters by erasing the CMOS RTC RAM data The onboard button cell battery powers the RAM data in CMOS which include system setup information such as system passwords To erase the RTC RAM 1 Turn OFF the computer and unplug the power cord 2 Remove the onboard battery 3 Move the jumper cap from pins 1 2 default to pins 2 3 Keep the cap on pins 2 3 for about 5 10 seconds the...

Страница 66: ...t these jumpers to 5V to wake up the computer from S1 sleep mode CPU stopped DRAM refreshed system running in low power mode using the connected USB devices Set to 5VSB to wake up from S3 and S4 sleep modes no power to CPU DRAM in slow refresh power supply in reduced power mode USB device wake up 3 2 2 1 5V Default 5VSB USBPW78 USBPW56 3 2 2 1 5V Default 5VSB USBPW34 USBPW12 The USB device wake up...

Страница 67: ...are for Ultra DMA 100 66 33 signal cables The Ultra DMA 100 66 33 signal cable has three connectors a blue connector for the primary IDE connector on the motherboard a black connector for an Ultra DMA 100 66 33 IDE slave device optical drive hard disk drive and a gray connector for an Ultra DMA 100 66 33 IDE master device hard disk drive If you install an optical drive and an IDE HDD you must conf...

Страница 68: ... 8 88 W max or a total of 1 A 2 22 A 26 64 W max at 12V Connect the fan cables to the fan connectors on the motherboard making sure that the black wire of each cable matches the ground pin of the connector Important notes on Serial ATA Important notes on Serial ATA Important notes on Serial ATA Important notes on Serial ATA Important notes on Serial ATA You must install Windows 2000 Service Pack 4...

Страница 69: ... 5 5 5 5 5 Internal audio connectors 4 pin CD AUX Internal audio connectors 4 pin CD AUX Internal audio connectors 4 pin CD AUX Internal audio connectors 4 pin CD AUX Internal audio connectors 4 pin CD AUX These connectors allow you to receive stereo audio input from audio sources such as an optical drive TV tuner or MPEG card Never connect a 1394 cable to the USB connectors Doing so will damage t...

Страница 70: ...ly are pre connected to these connectors If you have disconnected them during installation find the proper orientation and push down the plugs firmly to the connectors until they fit Important notes on the motherboard power requirements Important notes on the motherboard power requirements Important notes on the motherboard power requirements Important notes on the motherboard power requirements I...

Страница 71: ...s intrusion connector 4 1 pin CHASSIS Chassis intrusion connector 4 1 pin CHASSIS Chassis intrusion connector 4 1 pin CHASSIS Chassis intrusion connector 4 1 pin CHASSIS Chassis intrusion connector 4 1 pin CHASSIS This connector is for a chassis mounted intrusion detection sensor or switch Connect one end of the chassis intrusion sensor or switch cable to this connector The chassis intrusion senso...

Страница 72: ...LED 2 pin HD_LED This 2 pin connector is for the HDD Activity LED Connect the HDD Activity LED cable to this connector The IDE LED lights up or flashes when data is read from or written to the HDD 11 11 11 11 11 System panel connector 10 1 pin F_PANEL System panel connector 10 1 pin F_PANEL System panel connector 10 1 pin F_PANEL System panel connector 10 1 pin F_PANEL System panel connector 10 1 ...

Страница 73: ...on 2 pin PWRBTN This connector is for the system power button Pressing the power button turns the system on or puts the system in sleep or soft off mode depending on the BIOS settings Pressing the power switch for more than four seconds while the system is ON turns the system OFF Reset button 2 pin RESET Reset button 2 pin RESET Reset button 2 pin RESET Reset button 2 pin RESET Reset button 2 pin ...

Страница 74: ...4 12 4 12 4 12 4 12 4 12 Chapter 4 Motherboard info Chapter 4 Motherboard info Chapter 4 Motherboard info Chapter 4 Motherboard info Chapter 4 Motherboard info ...

Страница 75: ...Pundit AE3 ASUS Pundit AE3 ASUS Pundit AE3 ASUS Pundit AE3 ASUS Pundit AE3 BIOS setup Chapter 5 This chapter tells how to change system settings through the BIOS Setup menus and describes the BIOS parameters ...

Страница 76: ... feature allows you to update the BIOS without having to go through the long process of booting from a floppy disk and using a DOS based utility The EZ Flash utility is built in the BIOS chip so it is accessible by pressing Alt F2 during the Power On Self Tests POST You can use the motherboard support CD to recover the original BIOS file EZFlash starting BIOS update Checking for floppy Floppy not ...

Страница 77: ...pleted Start flashing When no floppy disk is found the utility automatically checks the optical drive for the original or updated BIOS file The utility then updates the corrupted BIOS file Bad BIOS checksum Starting BIOS recovery Checking for floppy 5 1 2 5 1 2 5 1 2 5 1 2 5 1 2 ASUS CrashFree BIOS 2 utility ASUS CrashFree BIOS 2 utility ASUS CrashFree BIOS 2 utility ASUS CrashFree BIOS 2 utility ...

Страница 78: ...The ASUS Update utility is copied to your system 5 1 3 5 1 3 5 1 3 5 1 3 5 1 3 ASUS Update utility ASUS Update utility ASUS Update utility ASUS Update utility ASUS Update utility The ASUS Update is a utility that allows you to manage save and update the motherboard BIOS in Windows environment The ASUS Update utility allows you to Save the current BIOS file Download the latest BIOS file from the In...

Страница 79: ... Updating the BIOS through the Internet To update the BIOS through the Internet 1 Launch the ASUS Update utility from the Windows desktop by clicking Start Start Start Start Start Programs Programs Programs Programs Programs ASUS ASUS ASUS ASUS ASUS ASUSUpdate ASUSUpdate ASUSUpdate ASUSUpdate ASUSUpdate ASUSUpdate ASUSUpdate ASUSUpdate ASUSUpdate ASUSUpdate The ASUS Update main window appears 2 Se...

Страница 80: ...SUpdate ASUSUpdate ASUSUpdate ASUSUpdate ASUSUpdate ASUSUpdate ASUSUpdate The ASUS Update main window appears 2 Select Update BIOS from a Update BIOS from a Update BIOS from a Update BIOS from a Update BIOS from a file file file file file option from the drop down menu then click Next Next Next Next Next 4 From the FTP site select the BIOS version that you wish to download Click Next Next Next Nex...

Страница 81: ...ring the Power On Self Test POST to enter the Setup utility otherwise POST continues with its test routines If you wish to enter Setup after POST restart the system by pressing Ctrl Alt Delete or by pressing the reset button on the system chassis You can also restart by turning the system off and then back on Do this last option only if the first two failed The Setup program is designed to make it...

Страница 82: ...ster Not Detected Secondary IDE Slave Not Detected Third IDE Master Not Detected Fourth IDE Master Not Detected IDE Configuration Onboard PCI S ATA Controller Enabled System Information Use ENTER TAB or SHIFT TAB to select a field Use or to configure the System time 5 2 1 5 2 1 5 2 1 5 2 1 5 2 1 BIOS menu screen BIOS menu screen BIOS menu screen BIOS menu screen BIOS menu screen Navigation keys Na...

Страница 83: ... 7 5 2 7 5 2 7 Pop up window Pop up window Pop up window Pop up window Pop up window Select a menu item then press Enter to display a pop up window with the configuration options for that item 5 2 8 5 2 8 5 2 8 5 2 8 5 2 8 Scroll bar Scroll bar Scroll bar Scroll bar Scroll bar A scroll bar appears on the right side of a menu screen when there are items that do not fit on the screen Press the Up Do...

Страница 84: ... 3 3 5 3 3 5 3 3 Legacy Diskette A 1 44M 3 5 in Legacy Diskette A 1 44M 3 5 in Legacy Diskette A 1 44M 3 5 in Legacy Diskette A 1 44M 3 5 in Legacy Diskette A 1 44M 3 5 in Sets the type of floppy drive installed Configuration options Disabled 360K 5 25 in 1 2M 5 25 in 720K 3 5 in 1 44M 3 5 in 2 88M 3 5 in System Time 11 51 19 System Date Thu 06 10 2004 Legacy Diskette A 1 44M 3 5 in Primary IDE Ma...

Страница 85: ... ATAPI Removable Media Device if your device is either a ZIP LS 120 or MO drive Configuration options Not Installed Auto CDROM ARMD LBA Large Mode Auto LBA Large Mode Auto LBA Large Mode Auto LBA Large Mode Auto LBA Large Mode Auto Enables or disables the LBA mode Setting to Auto enables the LBA mode if the device supports this mode and if the device was not previously formatted with LBA mode disa...

Страница 86: ...Monitoring Auto Sets the Smart Monitoring Analysis and Reporting Technology Configuration options Auto Disabled Enabled 32Bit Data Transfer Disabled 32Bit Data Transfer Disabled 32Bit Data Transfer Disabled 32Bit Data Transfer Disabled 32Bit Data Transfer Disabled Enables or disables 32 bit data transfer Configuration options Disabled Enabled 5 3 5 5 3 5 5 3 5 5 3 5 5 3 5 OnBoard PCI SATA Controll...

Страница 87: ...Incorrect field values can cause the system to malfunction 5 4 1 5 4 1 5 4 1 5 4 1 5 4 1 CPU Configuration CPU Configuration CPU Configuration CPU Configuration CPU Configuration The items in this menu show the CPU related information auto detected by BIOS Cool N Quiet Enabled Cool N Quiet Enabled Cool N Quiet Enabled Cool N Quiet Enabled Cool N Quiet Enabled Enables or disables the AMD Cool n Qui...

Страница 88: ...ory clock mode Configuration options Auto Limit Memclock Value 100MHz Sets the memory clock value This item appears only when the Memclock Mode item is set to Limit Configuration options 100MHz 133MHz 166MHz 200 MHz 5 4 2 5 4 2 5 4 2 5 4 2 5 4 2 Chipset Chipset Chipset Chipset Chipset The Chipset menu items allow you to change the advanced chipset settings Select an item then press Enter to displa...

Страница 89: ...y graphics boot device Configuration options Internal VGA AGP Int VGA AGP PCI PCI AGP PCI Int VGA AGP FAST WRITE Disabled Enables or disables the AGP Fast Write feature Configuration options Disabled Enabled Select AGP 3 0 Data Ratio 8X Allows you to select the AGP 3 0 data ratio Configuration options 8X 4X Shared Memory 32MB Allows you to set the shared memory size for the video RAM Configuration...

Страница 90: ...erTransport data width Configuration options 8x8 BIT 16x16 BIT 16x8 BIT 8x16 BIT HT Speed 800 MHz Sets the HyperTransport data speed Configuration options 200s MHz 400 MHz 600 MHz 800 MHz HyperTransport Configuration HT Width 8x16 BIT HT Speed 800 MHz MPS Configuration MPS Configuration MPS Configuration MPS Configuration MPS Configuration MPS Configuration MPS Revision 1 4 MPS Revision 1 4 Sets t...

Страница 91: ... USB Configuration USB Configuration USB Configuration USB Configuration USB Configuration The items in this menu allows you to change the USB related features Select an item then press Enter to display the configuration options 5 4 3 5 4 3 5 4 3 5 4 3 5 4 3 Onboard Devices Configuration Onboard Devices Configuration Onboard Devices Configuration Onboard Devices Configuration Onboard Devices Confi...

Страница 92: ...eed Full Speed Stop EHCI HC in OHCI handover Enabled Allows you to enable or disable the feature to stop the EHCI host controller during the OHCI OS handover call This is needed when installing operating systems that do not support EHCI host controllers Configuration options Disabled Enabled Serial Port1 Address 3F8 IRQ4 Serial Port1 Address 3F8 IRQ4 Serial Port1 Address 3F8 IRQ4 Serial Port1 Addr...

Страница 93: ...ptions Normal Bi directional EPP ECP ECP Mode DMA Channel DMA3 Allows selection of the Parallel Port ECP DMA channel This item appears only when the Parallel Port Mode Parallel Port Mode Parallel Port Mode Parallel Port Mode Parallel Port Mode is set to ECP ECP ECP ECP ECP Configuration options DMA0 DMA1 DMA3 Parallel Port IRQ IRQ7 Allows you to select the Parallel Port IRQ Configuration options I...

Страница 94: ...system the operating system configures the Plug and Play devices not required for boot Configuration options No Yes PCI Latency Timer 64 PCI Latency Timer 64 PCI Latency Timer 64 PCI Latency Timer 64 PCI Latency Timer 64 Allows you to select the value in units of PCI clocks for the PCI device latency timer register Configuration options 32 64 96 128 160 192 224 248 Allocate IRQ to PCI VGA Yes Allo...

Страница 95: ...ard Auto OffBoard PCI ISA IDE Card Auto OffBoard PCI ISA IDE Card Auto OffBoard PCI ISA IDE Card Auto OffBoard PCI ISA IDE Card Auto Allows BIOS to use PCI bus mastering when reading writing to IDE devices Configuration options Auto PCI Slot IRQ xx assigned to PCI Device IRQ xx assigned to PCI Device IRQ xx assigned to PCI Device IRQ xx assigned to PCI Device IRQ xx assigned to PCI Device When set...

Страница 96: ... on S3 Resume No Repost Video on S3 Resume No Determines whether to invoke VGA BIOS post on S3 STR resume Configuration options No Yes 5 5 3 5 5 3 5 5 3 5 5 3 5 5 3 ACPI 2 0 Support No ACPI 2 0 Support No ACPI 2 0 Support No ACPI 2 0 Support No ACPI 2 0 Support No Allows you to add more tables for Advanced Configuration and Power Interface ACPI 2 0 specifications Configuration options No Yes 5 5 4...

Страница 97: ... the system goes into off state after an AC power loss When set to Power On the system goes on after an AC power loss When set to Last State the system goes into either off or on state whatever the system state was before the AC power loss Configuration options Power Off Power On Last State Resume On Ring Disabled Resume On Ring Disabled Resume On Ring Disabled Resume On Ring Disabled Resume On Ri...

Страница 98: ...is item is set to Enabled the items RTC Alarm Date RTC Alarm Hour RTC Alarm Minute and RTC Alarm Second appear with set values Configuration options Disabled Enabled The succeeding items appear when the Power On By RTC Alarm Power On By RTC Alarm Power On By RTC Alarm Power On By RTC Alarm Power On By RTC Alarm item is set to Enabled RTC Alarm Date To set the alarm date highlight this item and pre...

Страница 99: ...nd displays the motherboard and CPU temperatures Select Disabled if you do not wish to display the detected temperatures VCORE Voltage 3 3V Voltage 5V Voltage 12V Voltage VCORE Voltage 3 3V Voltage 5V Voltage 12V Voltage VCORE Voltage 3 3V Voltage 5V Voltage 12V Voltage VCORE Voltage 3 3V Voltage 5V Voltage 12V Voltage VCORE Voltage 3 3V Voltage 5V Voltage 12V Voltage The onboard hardware monitor ...

Страница 100: ...1st 3rd Boot Device 1st Floppy Drive 1st 3rd Boot Device 1st Floppy Drive 1st 3rd Boot Device 1st Floppy Drive 1st 3rd Boot Device 1st Floppy Drive 1st 3rd Boot Device 1st Floppy Drive These items specify the boot device priority sequence from the available devices The number of device items that appears on the screen depends on the number of devices installed in the system Configuration options x...

Страница 101: ...creen Logo Enabled Full Screen Logo Enabled Full Screen Logo Enabled Full Screen Logo Enabled This allows you to enable or disable the full screen logo display feature Configuration options Disabled Enabled Set this item to Enabled to use the ASUS MyLogo feature Add On ROM Display Mode Keep Current Add On ROM Display Mode Keep Current Add On ROM Display Mode Keep Current Add On ROM Display Mode Ke...

Страница 102: ... to disabled password Change Supervisor Password Change Supervisor Password Change Supervisor Password Change Supervisor Password Change Supervisor Password Select this item to set or change the supervisor password The Supervisor Password item on top of the screen shows the default Not Installed Not Installed Not Installed Not Installed Not Installed After you set a password this item shows Instal...

Страница 103: ...ew Only View Only View Only View Only allows access but does not allow change to any field Limited Limited Limited Limited Limited allows changes only to selected fields such as Date and Time Full Access Full Access Full Access Full Access Full Access allows viewing and changing all the fields in the Setup utility Change User Password Change User Password Change User Password Change User Password ...

Страница 104: ...p Password Check Setup When set to Setup BIOS checks for user password when accessing the Setup utility When set to Always BIOS checks for user password both when accessing Setup and booting the system Configuration options Setup Always Boot Sector Virus Protection Disabled Boot Sector Virus Protection Disabled Boot Sector Virus Protection Disabled Boot Sector Virus Protection Disabled Boot Sector...

Страница 105: ... confirmation before exiting Discard Changes Discard Changes Discard Changes Discard Changes Discard Changes This option allows you to discard the selections you made and restore the previously saved values After selecting this option a confirmation appears Select OK OK OK OK OK to discard any changes and load the previously saved values If you attempt to exit the Setup program without saving your...

Страница 106: ...ts Load Setup Defaults This option allows you to load the default values for each of the parameters on the Setup menus When you select this option or if you press F5 a confirmation window appears Select OK OK OK OK OK to load default values Select Exit Save Changes Exit Save Changes Exit Save Changes Exit Save Changes Exit Save Changes or make other changes before saving the values to the non vola...

Отзывы: