background image

2

E

•  When installing, removing or moving the monitor, ensure 

that this is carried out by at least 2 people.

•  Be sure to use a wall-mount bracket designed or 

designated for mounting the monitor.

•  This monitor is designed to be installed on a concrete wall 

or pillar. Reinforced work might be necessary for some 
materials such as plaster / thin plastic board / wood before 
starting installation. 
This monitor and bracket must be installed on a wall which 
can endure at least 4 times or more the weight of the 
monitor. Install by the most suitable method for the material 
and the structure.

•  To attach a VESA-compliant mounting bracket, use M6 

screws that are 5/16 inch (8 mm) to 3/8 inch (10 mm) 
longer than the thickness of the mounting bracket.

•  Do not use an impact driver.
•  When moving the monitor, be sure to hold it with the unit 

bottom and the side of unit. Do not hold the LCD panel or 
corners. This may cause product damage, failure, or injury.

•  Do not use any screw holes other than VESA holes for 

installation.

Mounting Precautions  

(For ASUS dealers and service engineers)

n

Removing the attachment plate

Caution

•  The attachment plate is only for use with the monitor.  

Do not use with any other devices.

1.  Spread a thick, soft cloth (blanket, etc.) that will prevent 

damage to the LCD panel on a stable flat surface where 

the entire monitor can be placed, and place the monitor 

with the LCD panel face down on the cloth.

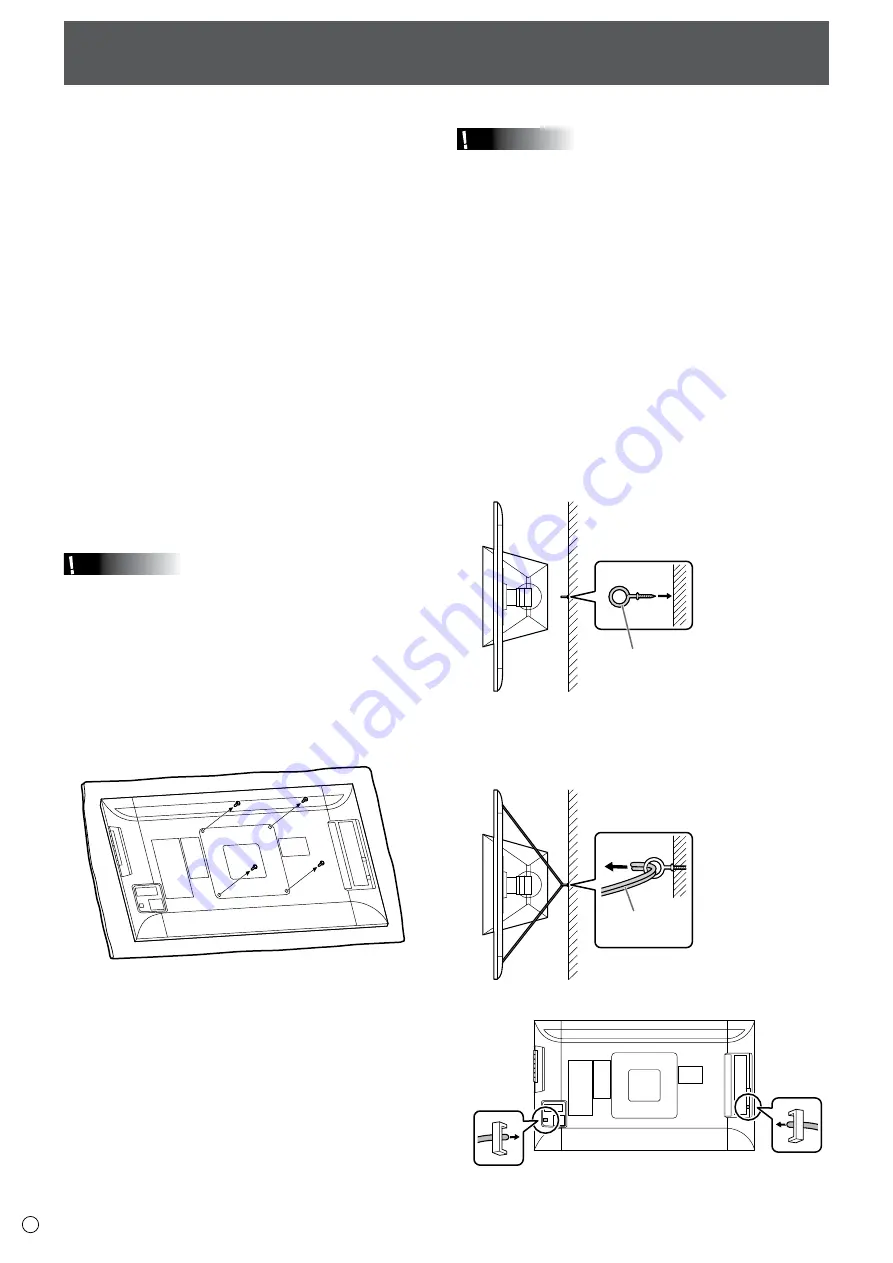
2.  Remove the screws (x4) that fasten the attachment 

plate, and remove the attachment plate.


n

Toppling prevention

Caution

•  To reduce the risk of injury and damage caused by the 

product toppling or falling in an earthquake or similar 

situation, take measures to prevent toppling and falling.

•  If the wall or platform on which the monitor is installed is 

not sufficiently strong, the effectiveness of the toppling/

falling prevention measures will be severely compromised. 

Reinforce the wall or platform as needed. 

The toppling/falling prevention measures are intended to 

reduce the risk of injury and damage in an earthquake, 

however, the effectiveness of the measures is not 

guaranteed in all earthquakes.

•  Before implementing the toppling prevention measures, 

complete all connections.

Secure to wall or post
1.  Attach a commercially available eye bolt (a bolt shaped 

to allow attachment of a string or cord) to the wall or 

post.

Verify that the eye bolt is attached firmly and does not come 

out.

Commercially available eye bolt

(bolt shaped to allow attachment of 

a string or cord)

‡7RSRIPRQLWRU

2.  Run a commercially available cord of sufficient strength 

through the cable clamp attachments and the eye of the 

eye bolt on the wall or post to secure the monitor.

‡7RSRIPRQLWRU

Commercially

available cord

‡%DFNRIPRQLWRU

Содержание PQ321QE

Страница 1: ...LCD Monitor User Manual PQ321QE ...

Страница 2: ... aid reporting in case of loss or theft please record the product s model and serial numbers in the space provided The numbers are located in the rear of the product Model No Serial No E8479 July 2013 First Edition ...

Страница 3: ...NG TO QUALIFIED SERVICE PERSONNEL The lightning flash with arrowhead symbol within a triangle is intended to alert the user to the presence of uninsulated dangerous voltage within the product s enclosure that may be of sufficient magnitude to constitute a risk of electric shock to persons The exclamation point within a triangle is intended to alert the user to the presence of important operating a...

Страница 4: ...n case the LCD panel breaks 11 Overloading Do not overload AC outlets or extension cords Overloading can cause fire or electric shock 12 Entering of objects and liquids Never insert an object into the product through vents or openings High voltage flows in the product and inserting an object can cause electric shock and or short internal parts For the same reason do not spill water or liquid on th...

Страница 5: ...bookcases without anchoring both the furniture and the monitor to a suitable support Not standing the monitors on cloth or other materials placed between the monitor and supporting furniture Educating children about the dangers of climbing on furniture to reach the monitor or its controls Especially for child safety Don t allow children to climb on or play with the monitor Don t place the monitor ...

Страница 6: ...esult in fire electric shock or injury Do not drop the AC adapter or subject it to impact Never disassemble the AC adapter It contains high voltage parts that are dangerous to touch The AC adapter is for indoor use only Do not use it outside Do not use the supplied AC adapter with other devices Do not damage the power cord and AC adapter nor place heavy objects on it stretch it or over bend it Als...

Страница 7: ...revent heat from accumulating inside 2 5 2 5 2 5 7 7 8 20 2 5 2 5 Unit inch cm For the monitor in landscape orientation For the monitor in portrait orientation 7 7 8 20 2 5 Unit inch cm When you install this monitor on a wall the monitor emits heat during operation please be aware that this heat may discolor or alter the wall If it is difficult to provide sufficient space for any reason such as th...

Страница 8: ...STOMER 4 SAFETY PRECAUTIONS 4 TIPS AND SAFETY INSTRUCTIONS 6 MOUNTING PRECAUTIONS 7 Supplied Components 8 Part Names 9 Installing the stand supplied 10 Connecting Peripheral Equipment 12 Connection with a PC or AV equipment 12 Connecting the Power Cord 13 Binding Cables 14 Turning Power On Off 15 Turning on the main power 15 Turning power on off 15 Basic Operation 16 Menu Items 18 Displaying the m...

Страница 9: ...See page 12 7 Headphone terminal See page 12 8 AC input terminal See page 13 9 Main power switch See page 15 10 Antitheft hole 11 Power button See page 16 12 Brightness adjustment button See page 16 13 Brightness adjustment button See page 16 14 VOL button See page 16 15 VOL button See page 16 16 MENU ENTER button See page 16 17 RETURN button See page 16 1 LCD panel 2 Power LED See page 15 ...

Страница 10: ...at surface where the entire monitor can be placed and place the monitor with the LCD panel face down on the cloth 4 Place the stand on the monitor Hook the tab on the stand under the mounting plate pre installed on monitor A bag containing the screws supplied and hex wrench supplied is attached to the round hole in the stand pedestal Countersunk screw M4 x 6 without washers Insert by hooking the t...

Страница 11: ...are installing the monitor in landscape orientation take caution when adjusting the angle at a raised height so that it does not topple Approx 45 Approx 25 Approx 5 Approx 45 TIPS The height cannot be adjusted in a vertical installation Adjusting the angle Adjust to an angle that is easy to view Approx 5 29 32inch 15cm nHeight angle adjustment Adjusting the height Adjust to a height that is easy t...

Страница 12: ...V equipment 1 RS 232C input terminal The monitor can be connected to a PC using the RS 232C conversion cable supplied and a commercially available RS 232 straight cable to control the monitor from the PC 2 DisplayPort input terminal Use the supplied DisplayPort cable Select the audio input terminal to be used in DisplayPort of AUDIO SELECT on the SETUP menu When DisplayPort is selected connection ...

Страница 13: ...PS Be sure to clamp the AC adapter cable supplied onto the cable clamp attachment using the supplied cable clamp When clamping the AC adapter cable take care not to stress the terminal of the AC adapter cable Do not bend the AC adapter cable excessively Landscape Portrait Caution Do not fasten the supplied AC adapter to the monitor or other equipment AC adapter cable Supplied Cable clamp attachmen...

Страница 14: ... and bind the cables Cable clamp Cable clamp attachment Cable Cable clamp small Cable clamp attachment Cable Cable clamp large Cable clamp attachment Cable nStoring the cables The cables connected to the rear of the monitor can be bound using the cable clamp on the stand Landscape Portrait Cable clamp large Cable clamp attachment Cable Caution Do not forcibly bend or apply force to the cables Risk...

Страница 15: ...ectrical disconnection pull out the main plug Turning Power On Off Turning power on off Press the power button to turn the power ON OFF Power LED Power button Power lamp status Status of the monitor Green lit Power on Off Power off Standby mode Orange lit Input signal waiting mode Caution When switching the main power switch or the power button off and back on always wait for at least 5 seconds A ...

Страница 16: ...ot press any buttons for about 4 seconds the VOLUME menu automatically disappears Move the cursor up or down in the menu screen and increase or decrease the setting The cursor moves up when the VOL button is pressed and down when the VOL button is pressed 6 MENU ENTER button Displays and turns off the menu screen See page 18 Settings can be entered when the menu screen is displayed 7 RETURN button...

Страница 17: ...The appearance of the original video may change if you select a screen size with a different aspect ratio than the original image e g TV broadcast or video input from external equipment When a non wide image 4 3 is viewed with the whole screen using the screen size switching function of this monitor the edge of the image may be lost or appear distorted If you wish to respect the creator s intentio...

Страница 18: ...12 PICTURE BACK RETURN DisplayPort CONTRAST 30 4 Press brightness adjustment button to adjust the setting 1 9 2 0 x 1 0 8 0 V 60Hz BRIGHT BLACK LEVEL TINT COLORS SHARPNESS COLOR ADJUSTMENT ADVANCED RESET PICTURE SETUP MONITOR OTHERS 31 30 30 30 12 PICTURE BACK RETURN DisplayPort CONTRAST 40 For items that have press MENU ENTER button and then configure the settings 5 Press RETURN button to close t...

Страница 19: ...Selects the color temperature when the WHITE BALANCE is set to PRESET The setting values are shown for reference The color temperature of the screen varies over time This function is not intended to keep the color temperature constant USER Adjusts each item when the WHITE BALANCE is set to USER R CONTRAST Adjusts bright toned red component G CONTRAST Adjusts bright toned green component B CONTRAST...

Страница 20: ... be displayed properly with some video card combinations nMONITOR MONITOR Select the installation direction of the monitor LANDSCAPE Landscape orientation PORTRAIT Portrait orientation If the monitor is in a portrait orientation and a Windows PC is connected set Orientation to Portrait Flipped in the Screen Resolution settings If you are using a different operating system refer to the manual for y...

Страница 21: ...nitor When a button other than VOL VOL button brightness adjustment button is pressed or if no action is taken for 15 seconds the display disappears MOTION TIME 1 Specify a time period operating interval until SCREEN MOTION starts MOTION TIME 2 Specify a time period during which SCREEN MOTION operates time period during which the screen will move PATTERN2 PATTERN1 OFF SCREEN MOTION function is dis...

Страница 22: ...hidden ON 1 Shows all menus modes and messages ON 2 Hides messages automatically displayed by the display Shows messages during operation OFF Hides all menus modes and messages LED Specifies whether to light the power LED Initialization Reset Functional Restriction Setting FUNCTION TEMPERATURE ALERT Selects the notification method for an abnormal temperature OFF Do not notify about an abnormal tem...

Страница 23: ...None Set to the same baud rate as the BAUD RATE setting of SETUP menu Initial setting 38400 bps Communication procedure nCommand format When a command is sent from the PC to the monitor the monitor operates according to the received command and sends a response message to the PC C1 C2 C3 C4 P1 P2 P3 P4 Return code Command field 4 prescribed alphanumerical characters Parameter field 4 character str...

Страница 24: ...command if this occurs If execution of the command is taking some time I W T A Return code 0DH 0AH When the following commands are used WAIT is returned In this case a value will be returned if you wait a while Do not send any command during this period Commands which return WAIT When one of the following commands is used RSET INPS WIDE POWR MWIN MWIP DPST When control via RS 232C is locked to pre...

Страница 25: ... 0 60 SHARPNESS SHRP WR 0 24 0 24 COLOR ADJUSTMENT COLOR MODE BMOD WR 0 0 STD 2 2 VIVID 3 3 sRGB WHITE BALANCE THRU CTMP WR 0 0 PRESET 1 18 1 18 From 1 approximately 3 000K to 15 approximately 10 000K 500K steps 16 approximately 5 600K 17 approximately 9 300K 18 approximately 3 200K USER 99 99 R CONTRAST CRTR WR 0 256 0 256 ERR when CTMP is not set to 99 G CONTRAST CRTG WR 0 256 0 256 B CONTRAST C...

Страница 26: ... OFF 1 OSD LED 2 LED STATUS ALERT SALT WR 0 2 0 2 0 OFF 1 OSD LED 2 LED Others Function Command Direction Parameter Reply Control Response contents VOLUME VOLM WR 0 31 0 31 BRIGHT VLMP WR 0 31 0 31 TEMPERATURE SENSOR DSTA R 0 Internal temperature normal 1 Internal temperature abnormal has occurred and the monitor is in standby mode 2 Internal temperature abnormal occurred To delete the information...

Страница 27: ...re has a problem Turn off the monitor and request repair from your ASUS dealer When STATUS ALERT is set to OSD LED This varies depending on the setting When AUTO DIMMING is displayed When the internal temperature of the monitor rises excessively the brightness of the backlight automatically decreases in order to prevent a further temperature rise If you attempt to use brightness adjustment button ...

Страница 28: ...cal Design Tilt angle 25 5 Swivel angle 45 45 Height Adjustment mm 150 mm VESA Wall Mounting mm 200 x 200 mm Security Kensington lock Yes Dimension Phys Dimension with Stand WxHxD 750 x 489 x 256 mm Phys Dimension without Stand WxHxD For VESA Wall Mount 750 x 441 x 35 mm Box Dimension WxHxD 990 x 558 x 230 mm Weight Net Weight Esti 13 Kg Gross Weight Esti 17 Kg Accessories AC adapter Power cord Di...

Страница 29: ...ting the monitor be sure to use a wall mount bracket that complies with the VESA compatible mounting method ASUS recommends using M6 screws and tighten the screws Note that screw hole depth of the monitor is 3 8 inch 10 mm Loose mounting may cause the product to fall resulting in serious personal injuries as well as damage to the product The screw and hole should come together with over 5 16 inch ...

Страница 30: ...Dot the image will be cut down to panel size then displayed 2 Displays using multi streaming 3 The signals for the left and right screens are both 1920 x 2160 signals All are compliant only with non interlaced Depending on the connected PC images may not be displayed properly even if the compatible signal described above is input nDDC plug and play The monitor supports the VESA DDC Display Data Ch...

Страница 31: ... 20 pin No Function No Function 1 MainLane 3 11 Gnd 2 Gnd 12 MainLane 0 3 MainLane 3 13 Gnd 4 MainLane 2 14 Gnd 5 Gnd 15 Aux 6 MainLane 2 16 Gnd 7 MainLane 1 17 Aux 8 Gnd 18 Hot plug detection 9 MainLane 1 19 Gnd 10 MainLane 0 20 3 3 V Specifications ...

Страница 32: ... to the LCD panel on a stable flat surface where the entire monitor can be placed and place the monitor with the LCD panel face down on the cloth 2 Remove the screws x4 that fasten the attachment plate and remove the attachment plate nToppling prevention Caution To reduce the risk of injury and damage caused by the product toppling or falling in an earthquake or similar situation take measures to ...

Страница 33: ...www asus com ...

Отзывы: