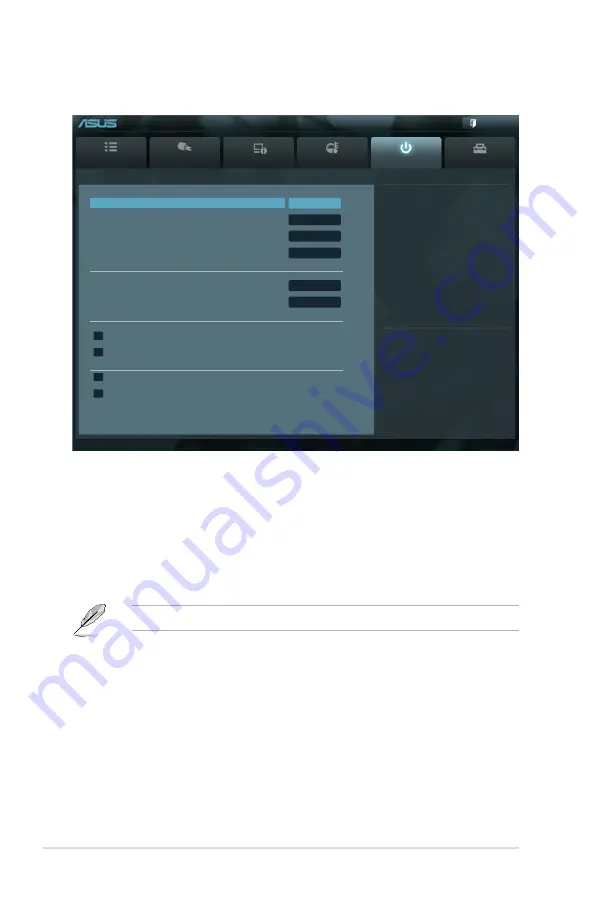
3-28
Chapter 3: BIOS setup
3.7
Boot menu
The Boot menu items allow you to change the system boot options.
Bootup NumLock State [On]
[On]
Sets the power-on state of the NumLock to [On].
[Off]
Sets the power-on state of the NumLock to [Off].
Full Screen Logo [Enabled]
[Enabled]
Enables the full screen logo display feature.
[Disabled]
Disables the full screen logo display feature.
Set this item to [Enabled] to use the ASUS MyLogo 2™ feature.
Option ROM Messages [Force BIOS]
[Force BIOS] The third-party ROM messages will be forced to display during the
boot sequence.
[Keep Current] The third-party ROM messages will be displayed only if the third-
party manufacturer had set the add-on device to do so.
Setup Mode [EZ Mode]
[Advanced Mode]
Sets Advanced Mode as the default screen for entering the
BIOS setup program.
[EZ Mode]
Sets EZ Mode as the default screen for entering the BIOS setup
program.
Main
Ai Tweaker
Advanced
Monitor
Boot
Tool
Exit
Version 2.00.1201. Copyright (C) 2010 American Megatrends, Inc.
Select the keyboard NumLock state
→←
: Select Screen
↑↓
: Select Item
Enter: Select
+/-: Change Opt.
F1: General Help
F2: Previous Values
F5: Optimized Defaults
F10: Save ESC: Exit
EFI BIOS Utility - Advanced Mode
Bootup NumLock State
On
Full Screen Logo
Enabled
Option ROM Messages
Force BIOS
Setup Mode
EZ Mode
Boot Option Priorities
Boot Option #1
P3: xxxxxxx
Boot Option #2
P4: xxxxxxx
Boot Override
> P5: xxxxxxxxxxxx
> P6: xxxxxxxxxxxx
> Hard Drive BBS Priorities
> CD/DVD ROM Drive BBS Priorities
Содержание P8P67 WS Revolution
Страница 1: ...Motherboard P8P67 WS Revolution ...
Страница 14: ...xiv ...
Страница 16: ...ASUS P8P67 WS Revolution Chapter summary 1 1 1 Welcome 1 1 1 2 Package contents 1 1 1 3 Special features 1 2 ...
Страница 24: ...1 8 Chapter 1 Product Introduction ...
Страница 55: ...A B 1 2 3 2 3 2 CPU installation ASUS P8P67 WS Revolution 2 29 ...
Страница 56: ...C B A 5 6 4 2 30 Chapter 2 Hardware information ...
Страница 58: ...To uninstall the CPU heatsink and fan assembly 2 A B B A 1 2 32 Chapter 2 Hardware information ...
Страница 59: ...1 2 3 To remove a DIMM 2 3 4 DIMM installation B A ASUS P8P67 WS Revolution 2 33 ...
Страница 61: ...DO NOT overtighten the screws Doing so can damage the motherboard 3 ASUS P8P67 WS Revolution 2 35 ...
Страница 62: ...2 3 6 ATX Power connection 1 2 OR OR 2 36 Chapter 2 Hardware information ...
Страница 63: ...2 3 7 SATA device connection 2 OR 1 ASUS P8P67 WS Revolution 2 37 ...
Страница 69: ...Connect to 5 1 channel Speakers Connect to 7 1 channel Speakers ASUS P8P67 WS Revolution 2 43 ...
Страница 72: ...2 46 Chapter 2 Hardware information ...
Страница 116: ...3 42 Chapter 3 BIOS setup ...


