background image

ASUS ASMB3-IKVM

2-13


Refer to the table on the next page for a description of the help menu options.

2.5 

Running the KIRARARI utility

The KIRARARI utility allows you to update the ASMB3-IKVM firmware, configure 

the LAN setting for the remote server and change the user name/password in DOS 

environment. This utility is available from the support CD that came with the package.
To run the KIRARARI utility:
1.  Insert the support CD into the optical drive.
2.  Restart the remote server, then press <Del> during POST to enter the BIOS 

setup.

3.  Go to Boot menu and set the Boot Device Priority item to [CD-ROM].
4.  When finished, press <F10> to save your changes and exit the BIOS setup.
5.  On reboot, the main menu appears. Select 

FreeDOS command prompt

, and 

then press <Enter> .

* The model name (for example RS100-E5) varies based on the motherboard 

model you purchase.

ASUS Server RS100-E5/PI2 System

FreeDOS command prompt

ASMB3-iKVM Firmware Update

6.  When the 

C:>

 prompt appears, type 

CD \ASMB3\IKVM\MODEL\RS100-E5\

PI2

, then press <Enter>.*

7.  At the prompt, type 

kirarari.exe

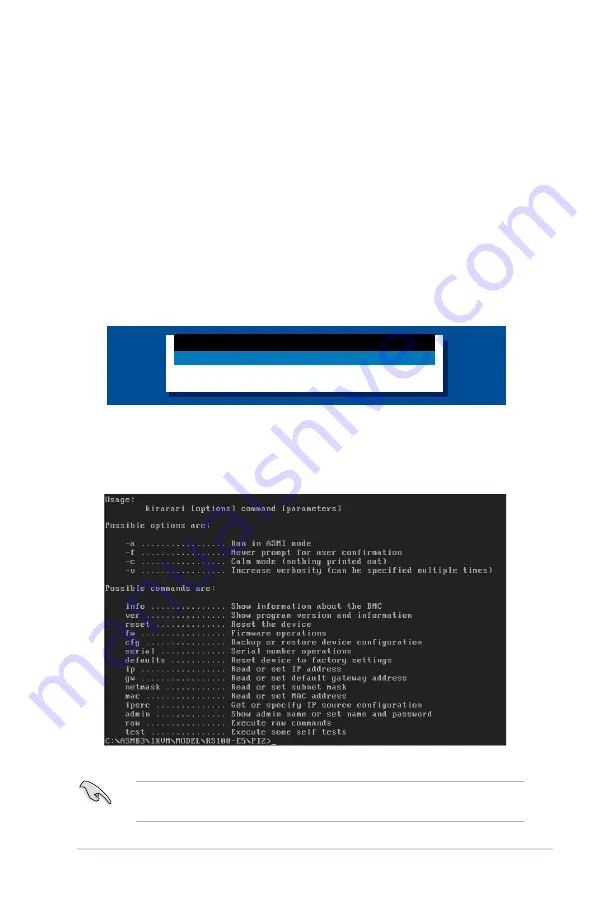
, then press <Enter> to display the 

KIRARARI Utility Help Menu. The screen appears as shown.

Содержание ASMB3-IKVM

Страница 1: ...ASMB3 IKVM Server Management Board ...

Страница 2: ...RCHANTABILITY OR FITNESS FOR A PARTICULAR PURPOSE IN NO EVENT SHALL ASUS ITS DIRECTORS OFFICERS EMPLOYEES OR AGENTS BE LIABLE FOR ANY INDIRECT SPECIAL INCIDENTAL OR CONSEQUENTIAL DAMAGES INCLUDING DAMAGES FOR LOSS OF PROFITS LOSS OF BUSINESS LOSS OF USE OR DATA INTERRUPTION OF BUSINESS AND THE LIKE EVEN IF ASUS HAS BEEN ADVISED OF THE POSSIBILITY OF SUCH DAMAGES ARISING FROM ANY DEFECT OR ERROR IN...

Страница 3: ...are installation 2 2 2 3 Firmware update 2 5 2 4 BIOS configuration 2 6 2 4 1 AMI BIOS setup 2 6 2 4 2 Phoenix BIOS setup 2 9 2 5 Running the KIRARARI utility 2 13 2 5 1 Updating the ASMB3 IKVM firmware 2 14 2 5 2 Configuring the LAN controller 2 15 2 5 3 Configuring the user name and password 2 16 Chapter 3 Software support 3 1 Web based user interface 3 2 3 1 1 Loging in the utility 3 2 3 1 2 Ho...

Страница 4: ...iv Contents 3 1 8 Device Settings 3 17 3 1 9 Maintenance 3 24 Appendix Reference information A 1 LAN port for server management A 2 A 2 BMC socket A 3 A 3 Troubleshooting A 4 ...

Страница 5: ...use harmful interference to radio or television reception which can be determined by turning the equipment off and on the user is encouraged to try to correct the interference by one or more of the following measures Reorient or relocate the receiving antenna Increase the separation between the equipment and receiver Connect the equipment to an outlet on a circuit different from that to which the ...

Страница 6: ... If the power supply is broken do not try to fix it by yourself Contact a qualified service technician or your retailer Operation safety Before installing any component to the server carefully read all the manuals that came with the package Before using the product make sure all cables are correctly connected and the power cables are not damaged If you detect any damage contact your dealer immedia...

Страница 7: ...ace that the server management board supports Appendix Reference Information The Appendix shows the location of the IKVM LAN port for server management and BMC socket on several motherboards This section also presents common problems that you may encounter when installing or using the server management board Where to find more information Refer to the following sources for additional information a...

Страница 8: ...that you must type the command exactly as shown then supply the required item or value enclosed in brackets Example At the DOS prompt type the command line format a DANGER WARNING Information to prevent injury to yourself when trying to complete a task CAUTION Information to prevent damage to the components when trying to complete a task NOTE Tips and additional information to help you complete a ...

Страница 9: ...upports Keyboard Controller Style KCS LAN type 10 100 Mbps Dedicated LAN LED 1 x BMC heartbeat Bus 2 x I2C bus 1 x LPC bus 2 x UART bus debug only 1 x DVO bus 1 x LAN interface Main features IPMI 2 0 compliant and supports KVM over LAN Web based user interface remote management Virtual media Form factor 2 66 x 1 48 Specifications are subject to change without notice ...

Страница 10: ... ...

Страница 11: ...1 Chapter 1 Product introduction This chapter describes the server management board features and the new technologies it supports ...

Страница 12: ...e the productivity Before you start installing the server management board check the items in your package with the list below If any of the above items is damaged or missing contact your retailer 1 2 Package contents Check your server management board package for the following items ASUS ASMB3 IKVM board Support CD User guide 1 3 Features 1 KVM over LAN Allows you to access your servers anytime a...

Страница 13: ... and confidentiality capabilities for IPMI LAN sessions Advanced Encryption Standard AES 3 Web based user interface Remote Management JAVA based web browser Supports multiple viewers with different authorities Supports Secure Sockets Layer SSL Uses cryptographic protocols to secure and authenticate connection between a client and a server over a network Ensure data integrity and privacy Remote BIO...

Страница 14: ... with Baseboard Management Controller BMC socket IKVM LAN port for server management Microsoft Internet Explorer 5 5 or later Firefox Visit the ASUS website www asus com for an updated list of server motherboards that support the ASMB3 IKVM See the Appendix for details LED Name Status Description LED1 BMC Heartbeat Blinking ASMB3 IKVM firmware is in execution Off for about 30 seconds The Heartbeat...

Страница 15: ...er via direct LAN connection or through a network hub Below are the supported server management configurations Remote server with ASMB3 IKVM Hub or router Direct LAN connection LAN connection through a network hub Remote server with ASMB3 IKVM RJ 45 cable Remote console with JAVA based web browser Remote console with JAVA based web browser ...

Страница 16: ...1 6 Chapter 1 Product introduction ...

Страница 17: ...2 Chapter 2 Installation This chapter provides instructions on how to install the board to the server system and install the utilities that the board supports ...

Страница 18: ...ponents to avoid damaging them due to static electricity Hold components by the edges to avoid touching the ICs on them Whenever you uninstall any component place it on a grounded antistatic pad or in the bag that came with the component Before you install or remove any component ensure that the power supply is switched off or the power cord is detached from the power supply Failure to do so may c...

Страница 19: ...C power is re plugged you have to wait for about 30 seconds for the system power up 6 Insert the LAN cable plug to the IKVM LAN port for server management Refer to the Appendix for the location of the IKVM LAN port for server management on various server motherboards 7 For direct LAN configuration connect the other end of the LAN cable to the local central server LAN port For connection to a netwo...

Страница 20: ...2 4 Chapter 2 Installation To uninstall the board 1 Simultaneously push the BMC socket retaining clips outward until the board tilts up 2 Carefully pull the board out from the BMC socket then set aside ...

Страница 21: ...menu 6 A confirmation message appears asking whether you want to update the firmware or not Press Y to update ASUS Server RS100 E5 PI2 System FreeDOS command prompt ASMB3 iKVM Firmware Update Are you sure you want to update ASMB3 iKVM Firmware now Yes or No YN The firmware updating process starts 7 When the update process is completed the following screen appears Starting Firmware Upgrade Uploadin...

Страница 22: ...tion for remote server control and monitoring Running the BIOS IPMI configuration To configure the IPMI in the BIOS 1 Restart the remote server then press Del during POST to enter the BIOS setup 2 Go to the Advanced or Server menu then select the IPMI Configuration sub menu Use this sub menu to configure the IPMI settings 3 When finished press F10 to save your changes and exit the BIOS setup IPMI ...

Страница 23: ...ddress Source Allows you to select the IP address source type When set to Static Mode the following three items become configurable and you have to assign the IP address subnet mask and gateway address for the remote server When set to DHCP Mode you don t have to assign the IP address subnet mask and gateway address for the remote server Select Screen Select Item Change Option F1 General Help F10 ...

Страница 24: ... Address Allows you to set the gateway address We recommend that you use the same gateway address you have specified on the operating system network for the used network card BMC Watch Dog Timer Action Disabled Allows the BMC to reset or power down the system when the operating system crashes or hangs Configuration options Disabled Reset System Power Down Power Cycle It is necessary to install ASW...

Страница 25: ...Item Change Values F9 Setup Defaults ESC Exit Select Menu Enter Select Sub menu F10 Save and Exit F1 Help Select Item Change Values F9 Setup Defaults ESC Exit Select Menu Enter Select Sub menu F10 Save and Exit Item Specific Help Enable Disable IPMI event logging Disabling will still log events received via the system interface IPMI IPMI Specification Version 2 0 BMC Firmware Version 1 04 System E...

Страница 26: ...ss log feature Configuration options Disabled Enabled BIOS POST Errors Enabled Allows you to enable or disable the POST error log feature Configuration options Disabled Enabled BIOS POST Watchdog Disabled Allows you to enable or disable the BIOS POST watchdog feature Configuration options Disabled Enabled OS Boot Watchdog Disabled Allows you to enable or disable the OS boot watchdog feature Config...

Страница 27: ...elect Item Change Values F9 Setup Defaults ESC Exit Select Menu Enter Select Sub menu F10 Save and Exit System Event Log SEL Entry Number 1 SEL Record ID 0001 SEL Record Type 02 System Event Record Timestamp 04 17 2006 16 10 44 Generator Id 20 00 SEL Message Rev 04 Sensor Type 01 Temperature Sensor Number 32 CPU2temperature1 SEL Event Type 01 Threshold Event Description Upper Non critical Going Hi...

Страница 28: ...g Low Assertion 006 DIMM_01 AMB temp Temp 04 17 2006 16 10 45 Upper Critical Going Low Assertion PhoenixBIOS Setup Utility Main Advanced Server Security Boot Exit F1 Help Select Item Change Values F9 Setup Defaults ESC Exit Select Menu Enter Select Sub menu F10 Save and Exit 0001 CPU2temperature1 Temp 04 17 2006 16 10 44 SEL Entry Number 1 SEL Record ID 0001 SEL Record Type 02 System Event Record ...

Страница 29: ...e remote server then press Del during POST to enter the BIOS setup 3 Go to Boot menu and set the Boot Device Priority item to CD ROM 4 When finished press F10 to save your changes and exit the BIOS setup 5 On reboot the main menu appears Select FreeDOS command prompt and then press Enter The model name for example RS100 E5 varies based on the motherboard model you purchase ASUS Server RS100 E5 PI2...

Страница 30: ...P from DHCP server kirarari admin Show administrator name kirarari admin name xxxxx Set login name of administrator to xxxxx kirarari admin passwd xxxxx Set login password of administrator to xxxxx 2 5 1 Updating the ASMB3 IKVM firmware You may use KIRARARI utility to update the ASMB3 IKVM firmware To update the firmware 1 Download the latest ASMB3 IKVM firmware from the ASUS website www asus com ...

Страница 31: ...re in the same subnet You can use the network settings utility in your OS to check 4 Type kirarari ip set xxx xxx xxx xxx then press Enter to assign any IP address to the remote server The screen displays the request and response buffer Write the remote server IP address in a piece of paper for reference C ASMB3 IKVM MODEL RS100 E5 PI2 kirarari ip set 192 168 0 212 Successfully set IP address to 1...

Страница 32: ... on page 2 13 2 At the prompt type kirarari admin name xxxxx then press Enter to change the login name C ASMB3 IKVM MODEL RS100 E5 PI2 kirarari admin name super Successfully set administrator username to super C ASMB3 IKVM MODEL RS100 E5 PI2 3 Type kirarari admin passwd xxxxx then press Enter to change the password 4 Restart the remote server enter the BIOS setup then boot from the hard disk drive...

Страница 33: ...3 Chapter 3 Software support This chapter tells you how to use the web based user interface that the server management board supports ...

Страница 34: ... CD You can also download JRE from http java sun com javase downloads 3 1 1 Loging in the utility 1 Ensure that the LAN cable of the computer is connected to the IKVM LAN port of the remote server 2 Open the web browser and type in the same IP address as the one in the remote server 3 The below screen appears Enter the default user name super and password pass Then click Login A Change Password sc...

Страница 35: ...page 2 Console Click this icon to open the remote server window 3 Logout Click this icon to log out the utility 4 Remote server screen Displays the remote server screen Click this screen to open the remote server window 5 Refresh Click this icon to refresh the remote server screen 6 Function keys Click each function key to start using its specific functions ...

Страница 36: ...then click KVM Console to open remote server console screen Remote server console screen Click to open close the Drive Redirection window Click to open the Options menu Indicates the availability of keyboard and mouse Indicates the number of networks users that are connected via Console Redirection ...

Страница 37: ...in the remote system You have to check the box before Enable Write support item if you want to write data into the shared drive For enabling this function the Force read only connectors item in the Drive Redirection window of the web based utility should be unchecked See page 3 9 for details You may want to share an ISO image file with users in the remote system Click Connect ISO and then a Choose...

Страница 38: ...e server console screen 4 Readability Filter Click to toggle the Readability Filter function on or off If this function is switched on most of the screen details will be shown even if the scaling mode is set to higher percentage This function is available only with a JVM 1 4 or higher 5 Scaling Click to adjust the diaplay ratio of the remote server console screen 6 Local Cursor Click to select the...

Страница 39: ... Floppy Image Upload Allows you to upload a binary image with a maximum size of 1 44 MB to the ASMB3 IKVM This image will be emulated to the remote server as a USB floppy device 5 Virtual Drive Selects the drive in the remote server as a distination drive for you to upload your image data 6 Floppy Image File Click Browse to preview and select the files that you want to upload to the remote server ...

Страница 40: ...t to share the data stored in your CD ROM image with the users in the remote server 5 Virtual Drive Selects the drive in the remote server that you want to share your data with 6 Share host Enter the IP address or the name of the system that you want to share data with via Windows Share 7 Share name Enter the name of the Windows Share you want to share data with in the remote server 8 Path to imag...

Страница 41: ...e file name of the data in Drive 1 of the remote server 3 Active Image Drive 2 Displays the file name of the data in Drive 2 of the remote server 4 Drive Redirection Use this window to configure Drive Redirection settings 5 Disable Drive Redirection Check this box to disable Drive Redirection function When this function is disabled local drives will not be accessible for other users in remote serv...

Страница 42: ...2 Virtual Media Options Check this box to disable the funciton of Virtual Media options to prevent data stored in a local drive from being accessed by the user in the remote server 3 Apply Click to apply the setting if you ve checked the box 4 Reset to defaults Click to return to the default settings 1 2 3 4 ...

Страница 43: ...w the power information for the remote server Click Refresh to update the information on this window 3 Power Control Click Power On to turn on the remote server click Power Down to turn off the remote server click Power Cycle to turn off the remote server and turn it on later click Reset to reset the remote console 6 1 2 3 Click Power Cycle to turn off the remote server and allow the remote server...

Страница 44: ...ormation for the remote server 2 Monitoring Sensors Allows you to see the related health monitoring information for the remote server Click Refresh to update the information on this window 1 2 System Event Log 1 System Event Log Click this function key to display the system health event log information for the remote server 1 ...

Страница 45: ...ASUS ASMB3 IKVM 3 13 Alert Settings 1 Alert Settings Click this function key to enter the alert settings submenu for the remote server 1 ...

Страница 46: ... Password window After entering all the necessary information click Apply to apply the new settings 1 Users Groups 1 Users Groups Click this function key to enter the user management and group management submenus 2 Users Management Allows you to setup the related user information 3 Group Management Allows you to setup the group information for better user management 1 2 3 ...

Страница 47: ...ion key to enter the user group permissions submenu 2 User Group Permissions Selects the user and group that you want to show the permission details 3 Update Click to update the permission information 1 2 3 You can only set the user permission by setting group only ...

Страница 48: ...uld configure the detailed settings for the remote server console Keyboard Mouse Click Keyboard Mouse to open the setup window From the window you could configure the detailed settings for the keyboard and mouse Set USB Mouse Type to Windows 2000 Mac OS X if your operating system is Windows set USB Mouse Type to Other Operating Systems if your operating system is Linux ...

Страница 49: ... 1 Network Click this function key to enter the network submenus 2 Network Basic Settings Allows you to configure basic settings for the network 3 Network Miscellaneous Settings Allows you to configure other settings for the network 4 LAN Interface Settings Allows you to configure the LAN interface speed and LAN interface duplex mode ...

Страница 50: ...r 3 Software support Dynamic DNS 1 2 1 Dynamic DNS Click this function key to enter the dynamic DNS submenus and configure its related settings 2 Enable Dynamic DNS Check this box to enable the dynamic DNS service ...

Страница 51: ... 3 KVM Encryption Allows you to set to use the encrypted connection 4 IP Access Control Allows you to configure the detailed IP access control settings 5 Group based System Access Control Allows you to limit several user access to the network by identifying their IP addresses 6 User Blocking Allows you to set the conditions when a user will be blocked 7 Login limitations Allows you to configure th...

Страница 52: ...ure its related settings 2 Certificate Signing Request CSR Allows you to define the Certificate Signing Request CSR form Click Create to apply the settings Date Time 1 2 1 Date Time Click this function key to enter the Date Time submenus 2 Date Time Settings Allows you to configure the internal realtime clock for the remote server ...

Страница 53: ...Authentication 1 2 1 Authentication Click this function key to enter the Authentication submenus 2 Authentication Settings Allows you to configure the authentication settings Click Apply to apply the settings Event Log 1 2 ...

Страница 54: ...g list NFS Logging Enabled Check the box to enable the NFS log list SMTP Logging Enabled Check the box to enable to send e mails to the address you ve specified in the Receiver Email Address column SNMP Logging Enabled Check the box to enable to send a SNMP trap to a specified destination IP address 3 Event Log Assignments Allows you to select the events that will generate an event log Scroll down...

Страница 55: ...ASUS ASMB3 IKVM 3 23 SNMP Settings 1 2 1 SNMP Settings Click this function key to enter the SNMP submenus 2 SNMP Settings Allows you to configure the Simple Network Management Protocol SNMP settings ...

Страница 56: ...n key to enter the Device Information submenus 2 Device Information Displays the detailed information of the ASMB3 IKVM board 3 Connected Users Displays the user name IP address and status of the users connected to the remote system Event Log 1 2 1 Event Log Click this function key to enter the Event Log submenus 2 Event Log Displays the event log list ...

Страница 57: ... click Browse to select the firmware file Click Upload to start updating the firmware It might take a few minutes to complete the procedure Unit Reset 1 2 1 Unit Reset Click this function key to enter the Unit Reset submenus 2 Reset Keyboard Mouse Click to reset keyboard mouse 3 Reset Video Engine Click to reset the video and its controller 4 Reset Device Click to reset the IPMI firmaware 3 4 ...

Страница 58: ...3 26 Chapter 3 Software support ...

Страница 59: ... The Appendix shows the location of the IKVM LAN port for server management and BMC socket on several motherboards This section also presents common problems that you may encounter when installing or using the server management board ...

Страница 60: ... IKVM LAN port for server management to connect the remote server to the local central host direct LAN connection or to the network hub or router Refer to the illustrations below to identify the IKVM LAN port for server management on some server motherboards P5BV M RS100 E5 motherboard You can refer to motherboard manual for the location of IKVM LAN port 1 8 5 6 4 2 7 3 ...

Страница 61: ... 64 bit 240 pin module DDR2 DIMM_B1 64 bit 240 pin module DDR2 DIMM_B2 64 bit 240 pin module PCI3 PCIE1 PCIE2 PCI4 Super I O FRNT_FAN1 CPU_FAN1 REAR_FAN1 CR2032 3V Lithium Cell CMOS Power AUX_PANEL1 FLOPPY1 SB_PWR1 RECOVERY1 P5BV M RS100 E5 PS 2KBMS T Mouse B Keyboard LAN_USB12 LAN1 VGA1 COM1 LAN2 LGA775 CHAFAN_SET1 RAID_SEL1 HDLED1 TPM1 ATX12V1 EATXPWR1 CPUFAN_SET1 BUZZ1 PRI_IDE1 USB34 SATA3 SATA...

Страница 62: ...er console screen From the pop up menu click Local Cursor and then select Transparent or default 3 Click Synchronize mouse in the remote server console screen Only for Linux operating system Cannot use Virtual Media to share the data stored in the CD ROM image with the users in the remote server Check if you ve installed NWLink IPX SPX NetBIOS compatible Transport Protocol item for the network If ...

Отзывы: