background image


NOTE

:You may need the Microsoft Windows Operating System installation files (CAB 

files) to complete the installation.  The CAB files are contained in the Microsoft’s system 
CD-ROM.  Some systems may have already installed the CAB files to the hard drive, but 
you should have the CD-ROM handy just in case. 

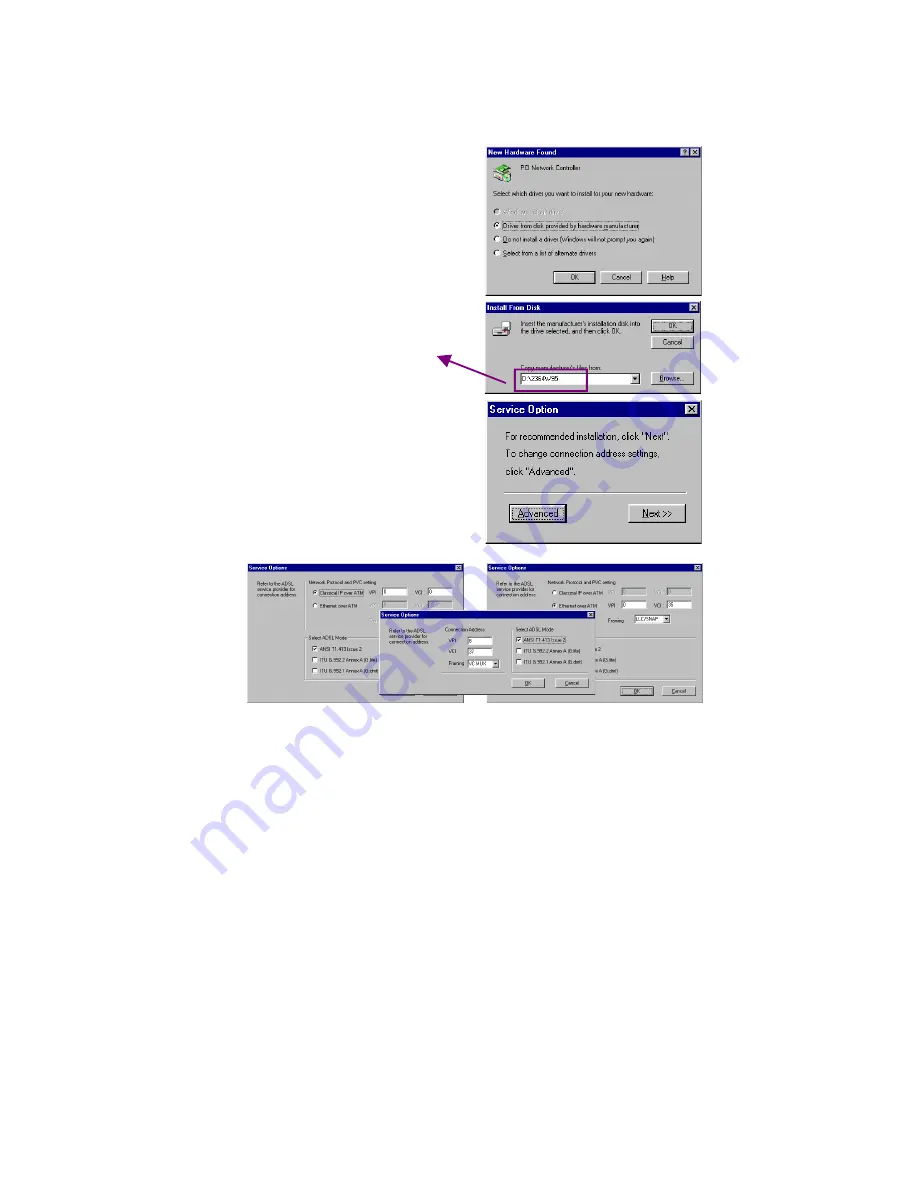
1. The 

New Hardware Found 

window will 

detect the ADSL modem card as a 

PCI 

Network Controller.

 Select the 

Driver 

from disk provided by hardware 
manufacturer 

option. Click 

OK

2. Insert 

the 

ADSL Driver 

CD-ROM into 

your systems CD drive. 


3. The 

Install From Disk

 window appears. 

Click 

Browse

 to locate the driver on your 

CD-ROM for the protocol supported by 
your ADSL provider: 

1483w95 

or


2364w95 

or

 1577w95 

(The example uses 

“D” as the CD-ROM drive letter. Your 
drive may have a different letter.) Then 
click 

OK

.  

4. When 

the 

Service Option

 window 

appears, click 

Advanced.


5. The 

Service Options

 window displays 

the 

Connection Address

 and 

Select 

ADSL Mode

 sections. Enter in the 

VPI

VCI

 and 

Framing

 values supplied by 

your ADSL service provider.  


In the 

Select ADSL Mode

 section, select 

the mode(s) recommended by your ADSL 
service provider. Click on the mode(s) 
required and then click 

OK

.  

NOTE:


The service mode type will be one of 

the following:

 ANSI T1.413 Issue 2


 ITU G.992.2 Annex A(G.lite) 


 ITU G.992.1 Annex A(G.dmt)


RFC 1483


RFC 1577 


RFC 2364 


Содержание AAM6000PI

Страница 1: ...AAM6000PI ADSL Modem Card ...

Страница 2: ...aking a RFC 1483 1577 connection 95A 95B 98 98SE 15 Making a RFC 2364 connection 95A 95B 98 98SE 17 Windows 2000 19 Making a RFC 1483 1577 connection 2000 22 Making a RFC 2364 connection 2000 24 Windows NT4 0 RFC 1483 1577 26 Windows NT4 0 RFC 2364 29 Appendix Editing your Service Connection 33 Removing Drivers 34 Diagnostic Tools 35 Trouble Shooting 37 Connector Pin out 38 System Requirements Com...

Страница 3: ...ill be displayed on the General tab Refer to the following table for more detailed information Windows OS System Properties Description Release Microsoft Web Win 95A 4 00 950A Windows 95 OSR1 Win 95B 4 00 950B Windows 95 OSR2 Win 98 4 10 1998 Window 98 Win 98SE 4 10 2222A 2nd Edition Windows 98 2nd Edition Win 2000 5 00 2195 Windows 2000 Win NT 4 00 1381 Windows NT 4 0 If you have questions regard...

Страница 4: ...95 See Note Win 98 98SE 1483w98 2364w98 1577w98 See Note Win NT 4 0 1483nt4 2364nt4 See Note Win 2000 1483w2k 2364w2k See Note Note RFC2516 Point to Point Protocol over Ethernet is supported by third party developers See the PPPoE driver supplement for detailed information and installation instructions Having determined the ADSL Driver you will be installing you now need to gather the connection i...

Страница 5: ...your computer from the electrical outlet 4 Unscrew slot cover bracket from an unused PCI usually white in color slot 6 Make sure the card is firmly seated and secure the card with the bracket screw 3 Remove the cover from your systems chassis see you PC manufacturer s manual 5 Gently and evenly insert the PCI modem card into your empty PCI slot 7 Replace the cover of your computer system 8 Connect...

Страница 6: ...on files CAB files to complete the installation The CAB files are contained in the Microsoft s system CD ROM Some systems may have already installed the CAB files to the hard drive but you should have the Microsoft Windows CD ROM handy just in case Proceed now to the installation procedure for the Windows Operating System installed in your computer Windows 95A Page 5 Windows 95B Page 8 Windows 98 ...

Страница 7: ...dware found window 2 At your desktop click Start and then select Run 3 The Run window appears Insert the ADSL Driver CD then click on Browse and proceed to locate the ADSL Driver 95 CD ROM Then locate and select the MSDUN13 EXE file The Msdun13 exe appears in the Open box Click OK 4 The Microsoft Dial Up Networking 1 3 window appears with the message This will install Microsoft Dial Up Networking ...

Страница 8: ...ow appears Click Browse to locate the driver on your CD ROM for the protocol supported by your ADSL provider 1483w95 or 2364w95 or 1577w95 The example uses D as the CD ROM drive letter Your drive may have a different letter Then click OK 4 When the Service Option window appears click Advanced 5 The Service Options window displays the Connection Address and Select ADSL Mode sections Enter in the VP...

Страница 9: ...ported as not found enter the path CD Drive letter and Win95 e g D Win95 7 You must now make an Internet connection Locate the Internet protocol supported by your ADSL service provider from the following table and proceed to that section to make the Internet connection RFC1483 Bridged Ethernet over ATM Ö Ö Ö Ö Go to page 15 RFC1577 Classical Internet Protocol over ATM Ö Ö Ö Ö Go to page 15 RFC2364...

Страница 10: ...ardware found window 2 At your desktop click Start and then select Run 3 The Run window appears Insert the ADSL Driver CD then click on Browse and proceed to locate the ADSL Driver 95 CD ROM Then locate and select the MSDUN13 EXE file The Msdun13 exe appears in the Open box Click OK 4 The Microsoft Dial Up Networking 1 3 window appears with the message This will install Microsoft Dial Up Networkin...

Страница 11: ...ems CD drive 3 The Update Device Driver Wizard will appear and indicate that Windows was unable to locate a driver for this device Click Other Locations 4 The Select Other Location window appears Click Browse to locate the driver on your CD ROM for the protocol supported by your ADSL provider 1483w95 or 2364w95 or 1577w95 The example uses E as the CD ROM drive letter Your drive may have a differen...

Страница 12: ...CI and Framing values supplied by your ADSL service provider In the Select ADSL Mode section select the mode s recommended by your ADSL service provider Click on the mode s required and then click OK NOTE The service mode type will be one of the following ANSI T1 413 Issue 2 ITU G 992 2 Annex A G lite ITU G 992 1 Annex A G dmt 8 The previous Service Option window will appear click Next NOTE During...

Страница 13: ...rnet connection Locate the Internet protocol supported by your ADSL service provider from the following table and proceed to that section to make the Internet connection RFC1483 Bridged Ethernet over ATM Ö Ö Ö Ö Go to page 15 RFC1577 Classical Internet Protocol over ATM Ö Ö Ö Ö Go to page 15 RFC2364 Point to Point Protocol over ATM Ö Ö Ö Ö Go to page 17 ...

Страница 14: ...izard You will be asked What do you want Windows to do Select Search for the best driver for your device then click Next 3 Insert the ADSL Driver CD into your systems CD ROM drive 4 Then select Specify a location and Click Browse to locate the driver on your CD ROM for the protocol supported by your ADSL provider 1483w98 or 2364w98 or 1577w98 The example uses D as the CD ROM drive letter Your driv...

Страница 15: ... NOTE The service mode type will be one of the following ANSI T1 413 Issue 2 ITU G 992 2 Annex A G lite ITU G 992 1 Annex A G dmt 8 The previous Service Option window will appear click Next 9 If prompted to insert your Windows CD do so at this time then click OK 10 Enter the CD drive Letter and then Win98 e g D Win98 and click OK 11 At the conclusion of the ADSL modem driver installation the Add N...

Страница 16: ...ctive and monitoring connectivity 13 You must now make an Internet connection Locate the Internet protocol supported by your ADSL service provider from the following table and proceed to that section to make the Internet connection RFC1483 Bridged Ethernet over ATM Ö Ö Ö Ö Go to page 15 RFC1577 Classical Internet Protocol over ATM Ö Ö Ö Ö Go to page 15 RFC2364 Point to Point Protocol over ATM Ö Ö ...

Страница 17: ... the Configuration tab scroll the installed network component window and find ASUS ADSL PCI NIC 3 When the Network window appears select the Configuration tab scroll the installed network component window and select TCP IP ÆASUS ADSL PCI NIC Then click the Properties button 4 The TCP IP Properties window will appear Select the IP Address tab and then select the Specify an IP Address option Enter t...

Страница 18: ... 7 Enter your host name into Host box 8 Enter your domain name into Domain box 9 Enter DNS number into DNS Server Search Order box and click Add If you have more than one DNS numbers repeat this step 10 After setting all the necessary TCP IP properties click OK 11 The Network window appears Click OK 12 The System Setting Change window appears You will be asked if you want to restart your computer ...

Страница 19: ...indow appears Enter 0 zero into the Telephone number box Click Next 5 Another Make New Connection window appears It will indicate that You have successfully created a new Dial Up Networking connection called My Connection Click Finish 1 Double click the My Computer icon on the desktop Then double click the Dial Up Networking icon Making an ADSL connection RFC 2364 Point to Point Protocol over ATM ...

Страница 20: ...ssword supplied by your Internet service provider ISP Then click Connect 8 The Connecting to My Connection window appears The message Logging on to network confirms a valid connecting process 9 The Connection Established window appears Internet service is now established Click Close and the Diagnostic tool icon appears on the task bar Congratulations you are done Your ADSL Internet connection is e...

Страница 21: ... Still in the Found New Hardware Wizard select Search for a suitable device Click Next 3 Next you will be prompted for software drivers Select Specify a location Click Next 4 Insert the ADSL Driver CD into the systems CD ROM drive Click Browse to locate the driver on your CD ROM for the protocol supported by your ADSL provider 1483w2K or 2364w2K or 1577w2K The example uses D as the CD ROM drive le...

Страница 22: ...dvanced Service Options window appears In the Network Protocol and PVC Settings section enter in the VPI VCI and Framing values supplied by your ADSL service provider In the Select ADSL Mode section select the mode s recommended by your ADSL service provider Click on the mode s required and then click OK NOTE The service mode type will be one of the following ANSI T1 413 Issue 2 ITU G 992 2 Annex ...

Страница 23: ... If you are not asked you need to restart your computer manually at this time 11 You must now make an Internet connection Locate the Internet protocol supported by your ADSL service provider from the following table and proceed to that section to make the Internet connection RFC1483 Bridged Ethernet over ATM Ö Ö Ö Ö Go to page 22 RFC1577 Classical Internet Protocol over ATM Ö Ö Ö Ö Go to page 22 R...

Страница 24: ... will turn from gray to clear Enter in the IP address Subnet Mask and Default Gateway supplied by your ADSL service provider Click OK Making an ADSL connection RFC 1483 Bridged Ethernet over ATM 2000 RFC 1577 Classical Internet Protocol over ATM 2000 1 Double click My Computer Control Panel and then Network and Dial up Connections 2 The Network and Dial up Connections window appears Right click on...

Страница 25: ...ous General Tab window appears Click OK 6 The Network and Dial up Connection window appears CLOSE this window and your connection is complete Congratulations you are done Your ADSL Internet connection is established ...

Страница 26: ...for a phone number Enter the phone number supplied by your ADSL service provider Click Next 6 You will then be prompted to select your user configuration typically only for myself Click Next Making an ADSL connection RFC 2364 Point to Point Protocol over ATM 2000 1 On your desktop right click My Network places 2 The Network and Dial up Connections window appears Double click Make New Connection ...

Страница 27: ... connection as you choose and then click Finish 8 The Connect My Connection window will appears Enter your User Name and Password supplied by your ADSL service provider You are now ready to make a network connection Click Dial 9 The Connection complete window appears click OK Congratulations you are done Your ADSL connection is established ...

Страница 28: ...ct the Adapters tab and then click Add 3 The Select Network Adapter window appears Click Have Disk 4 Insert ADSL Driver CD ROM into your systems CD drive 5 The Insert Disk window appears Click Browse to locate the driver on your CD ROM for the protocol supported by your ADSL provider 1483NT4 or 1577NT4 The example uses d as the CD ROM drive letter Your drive may have a different letter Click OK 6 ...

Страница 29: ...U G 992 1 Annex A G dmt 9 The previous Service Option window will appear click Next 10 The Network window will appear Click the Adapters tab to verify that the ASUS ADSL PC NIC has been found Click on the Protocols tab and verify that the ADSL Management and Monitor Interface is present NOTE To review the Network window properties at any time right click the Network Neighborhood icon and select Pr...

Страница 30: ... Subnet Mask and Default Gateway supplied by your ADSL service provider Click OK 12 The Network Settings Change window appears You must now re start your computer for the settings to take effect Click Yes Congratulations you are done Your ADSL Internet connection is established ...

Страница 31: ...s tab and then click Add 3 The Select Network Adapter window appears Click Have Disk 4 Insert ADSL Driver CD ROM into your systems CD drive 5 The Insert Disk window appears Click Browse to locate the driver on your CD ROM for the protocol supported by your ADSL provider 2364NT4 The example uses d as the CD ROM drive letter Your drive may have a different letter Click OK 6 The Select OEM Option win...

Страница 32: ...ce provider Then click OK NOTE The service mode type will be one of the following ANSI T1 413 Issue 2 ITU G 992 2 Annex A G lite ITU G 992 1 Annex A G dmt 9 The previous Service Option window will appear click Next 10 The Setup Message window appears Click OK 11 The Windows NT Setup window appears Insert your NT4 0 CD ROM into the PC system CD drive and type in D i386 Click Continue 12 The Add RAS...

Страница 33: ... Network window properties at any time right click the Network Neighborhood icon and select Properties NOTE If no previous network devices have been installed then the Network Neighborhood icon will not be present on the desktop To open the Network window double click My Computer then Control Panel then Network 15 The Network Settings Change window appears You must now re start your computer for t...

Страница 34: ...upplied by your ADSL service provider Click OK NOTE If this screen persists and a connection logon error is reported confirm that the correct User name and Password are entered and try the connection again Also verify that the connection address is correct 19 The Connection Complete window is displayed at the completion of a successful Dial Up logon Choose a display behavior and click OK to close ...

Страница 35: ...ocess for editing the IP address settings is the same for Windows NT 4 0 and Windows 95 98 2 At the desktop double click My Computer then double click Control Panel to view the contents of the control panel In the Control Panel window double click the Network icon Note The Network window shortcut is a right click the Network Neighborhood on your desktop then left click Properties 3 Select the Prot...

Страница 36: ...el double click the Network icon and select the Adapters tab 2 Select the ASUS ADSL PCI NIC then click Remove 3 A warning message will inform you that a component is about to be removed Click Yes 4 Once the ASUS ADSL PCI NIC is removed from the adapter list click Close 5 The PC system must be restarted for the changes to take effect Click Yes Windows 2000 1 On the desktop right click on My Compute...

Страница 37: ...on established NIC is transmitting data TX on RX off Green Green ADSL connection established NIC is transmitting and receiving data NIC is disconnected or a driver problem exists On the Diagnostic Tool icon located on the right hand side of the status bar right click the icon to display the menu then click Open The ADSL Diagnostic Tool window appears on the desktop The four tabs of the Diagnostic ...

Страница 38: ...dem card functionality Running the Diagnostic program will disconnect the NIC from the ADSL line Close all Dial up sessions and close all files before running the Diagnostic program Product Information e g driver revisions are displayed by clicking the Product Info tab Product Information lists the versions of the Diagnostic Tools and the driver version The DLL version describes the software being...

Страница 39: ...DSL service been altered recently 9 9 9 9 Does condition change with time of day a possible problem with line noise 9 9 9 9 Are appliances near the PC system introducing noise into your ADSL service 9 9 9 9 Power down the PC system and re seat the ADSL modem card Is the NIC achieving ADSL connection but you can t reach the Internet 9 9 9 9 Is the service connection address correct 9 9 9 9 Bridged ...

Страница 40: ...or ADSL data For the card to make a proper ADSL connection the installed ADSL data port should also use pins 3 and 4 for data If the ADSL data port installation uses pins 2 and 5 for data then a wiring converter will be required Do not alter or remove the wiring converter if present Consult with your ADSL provider before attempting any wiring changes ...

Страница 41: ...ent This equipment has been tested and found to comply with the limits for a Class B digital device pursuant to Part 15 of the FCC Rules These limits are designed to provide reasonable protection against harmful interference in a residential installation This equipment generates uses and can radiate radio frequency energy and if not installed and used in accordance with the instructions may cause ...

Страница 42: ...40 Copyright 2000 Integrated Telecom Express Inc All product names are trademarks or registered trademarks of their respective companies Specifications subject to change without notice ...

Отзывы: