1-12
Chapter 1: Product introduction
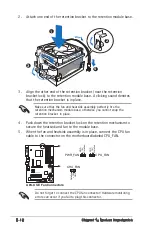
2. Attach one end of the retention bracket to the retention module base.
1
3
4
5
2
3. Align the other end of the retention bracket (near the retention
bracket lock) to the retention module base. A clicking sound denotes
that the retention bracket is in place.
Make sure that the fan and heatsink assembly perfectly fits the
retention mechanism module base, otherwise you cannot snap the
retention bracket in place.
4. Push down the retention bracket lock on the retention mechanism to
secure the heatsink and fan to the module base.
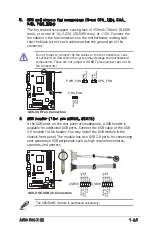
5. When the fan and heatsink assembly is in place, connect the CPU fan
cable to the connector on the motherboard labeled CPU_FAN.
A8S-X SE
®
A8S-X SE Fan Connectors
PWR_FAN
CHA_FAN
G
N
D
R
ot
at
io
n
+1
2V
G
N
D
R
ot
at
io
n
+1
2V
G
N
D
R
ot
at
io
n
+1
2V
CPU_FAN
Do not forget to connect the CPU fan connector! Hardware monitoring
errors can occur if you fail to plug this connector.
Содержание A8S-X
Страница 1: ...Motherboard A8S X SE ...
Страница 12: ...xii ...
Страница 13: ...This chapter describes the motherboard features and the new technologies it supports 1 Product introduction ...
Страница 72: ...2 32 Chapter 2 BIOS Setup ...

